How to Build WordPress Navigation Using wp_nav_menu()
Every modern WordPress theme should include many common elements within the code. Hard-coding manual navigation works if you've already created the content, but it is not very dynamic at all. The best method would be creating your own wp_nav_menu programmatically which an administrator can then tie into one of their own menus.
For this article, I'd like to go over the fundamentals you should follow when creating your own navigation in a theme. Specifically going over the many custom options and how you can set up a brand new menu from scratch. You won't need to create anything for this article so think of it more like a reference guide when coding.
Basics of a wp_nav_menu
Back before the many advancements of WordPress 3.0 developers typically used wp_page_menu() in theme development. This will output a full list of pages along with a homepage link, and you have some parameters which are outlined in the codex. You might still use this in your sidebar or footer area if it makes sense.
But the much more popular method of navigation is through WordPress' built-in menu system. Administrators may create as many custom menus as they like, dragging & dropping links to create manual hierarchy and structure. You can directly manage links to posts, pages, categories, tags, practically anything on your site.
The first step is to write some code in your functions.php file which creates the navigation menu. This may be done with register_nav_menu() or register_nav_menus() if you have multiple items. These menus only require a single identifier called $location along with a small descriptive string.
register_nav_menu( 'primary', 'Primary Menu' );
$location is more like a slug ID used to identify the menu in your theme. You'll reference this defined item inside any PHP theme file you need it to appear. Also note that nav menus will auto-initialize theme support so you do not need to use add_theme_support() for menus.
Positions in your Theme
With your menu(s) setup in functions.php, we should move on to the other theme files. Let's start in a typical location such as header.php where we can add some very basic code. This sample is copied from the wp_nav_menu() codex and includes all of the optional parameters.
$defaults = array(
 'theme_location'  => '',
 'menu'            => '',
 'container'       => 'div',
 'container_class' => '',
 'container_id'    => '',
 'menu_class'      => 'menu',
 'menu_id'         => '',
 'echo'            => true,
 'fallback_cb'     => 'wp_page_menu',
 'before'          => '',
 'after'           => '',
 'link_before'     => '',
 'link_after'      => '',
 'items_wrap'      => '<ul id="%1$s" class="%2$s">%3$s</ul>',
 'depth'           => 0,
 'walker'          => ''
);

wp_nav_menu( $defaults );
I'm going to delve into these options more in the next section. But I'll start by glossing over the first two. Please remember that all of these are optional because the values you see above will become your default if not overwritten. theme_location should match the location slug you chose when registering the wp_nav_menu. This is the only value that you should change to ensure it matches up properly.
Sometimes people confuse the menu location with the menu since they are both very similar. In fact, the menu should almost always be omitted which then allows the webmaster to assign their own menu to that location. This menu parameter is used to include a pre-made admin menu. It should be identical to a pre-existing menu that has already been created. But since most people will not have an existing menu(or this could change between websites) it's best practice to simply leave it out of your theme navigation.
Setting Parameters
The other settings are mostly for customization which is why you could ignore them. But let's tackle the rest so we have a good understanding of the possibilities. container, container_class, and container_id are beneficial when styling the menu. The outer container element wraps around the UL so it could even be an HTML5 <nav> if you like semantics.
The menu_class and menu_id get applied onto the unordered list itself. Each menu gets a class of .menu, so you might wish to change this if you're using more than one. The echo param tells this function to output the HTML menu, otherwise, it will return the value back to a function or PHP variable. When wp_nav_menu() cannot run for any reason, it will automatically fallback to using wp_page_menu() as I mentioned earlier.
The next two before and after params will output any HTML just before each of the anchor links, or just after closing them. link_before and link_after will append HTML inside the anchor links, just before & after the text itself. Remember these options and be sure not to get them mixed up! When in doubt, check the codex for support.
Now if you do not want to use an unordered list you can change this inside items_wrap. It's using a sprintf() type of syntax to replace values with dynamic parameters in the same function. %1$s refers to menu_id, %2$s refers to menu_class, and %3$s is related to the list items output. Since it takes a whole lot of extra work to change the <li> elements it is usually best to just leave this one alone.
Finally, the depth parameter tells the menu how deep we should go for hierarchy. If our header navigation is only a single-tier dropdown menu then we only need 1 level of depth. Or we may have a 2-tier flyout menu which could use 2 levels of depth. -1 is a special value which displays all links in the menu but condenses them together into the same display level.
Now the $walker item is a special parameter for customizing how WordPress outputs content in a tree hierarchy. It expects a new class object which includes customized methods for item output. This is a fairly advanced topic, but you can read more about it from the Walker class reference guide.
Generate Menus from WP Admin
This last bit should provide administrators & webmasters a better way to understand menus. Once logged into the admin panel hover "Appearance" and then click the menus link.
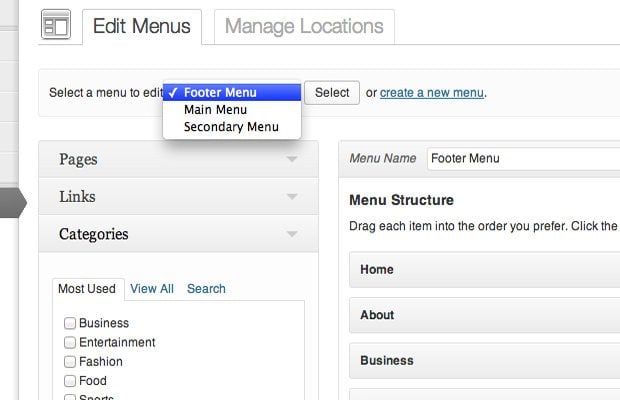
From here you should rearrange links by organizing from the left accordion into the right section. You can give the menu a name which can be referenced in PHP - but notice at the top you'll see a drop-down select menu. Once you register navigation and give it a theme location it appears in this dropdown for the administrator to select. This is how webmasters can organize their own menus without needing to code any PHP.
From the left side, you can choose between pages, posts, links, categories, and tags. If you click the small tab near the top-right corner labeled "Screen Options" you can hide some of these screen choices. You'll also find advanced menu options for giving each link a target(such as target="_blank") or even unique CSS classes.
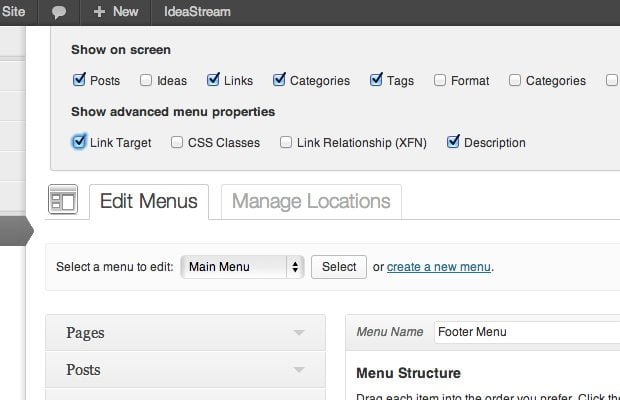
Each category link could use a different class for unique colors when selected. By default, you'll give each link some text and a brief description, which is often used only by the website administrator. Links can also have title attributes and unique XFN values.
The more you practice using wp_nav_menu the clearer it will become. As a developer who has been using WordPress for years, I find this to be very handy. Newcomers who are just learning the basics of WordPress can still pick this up quickly without much of a struggle.
JetMenu Plugin for Elementor Page Builder

There is a simpler way to add a wp_nav_menu to your website. You've probably already heard about page builders - those are software that helps you to build website visually, just drag-and-dropping elements to the work field. Elementor is one of the most popular of them and has a huge fan community. There are lots of plugins created especially for Elementor - they expand its capabilities and add different useful widgets to the menu panel. JetMenu is one of such WordPress plugins that give you an opportunity to create mega menus quickly and easily.
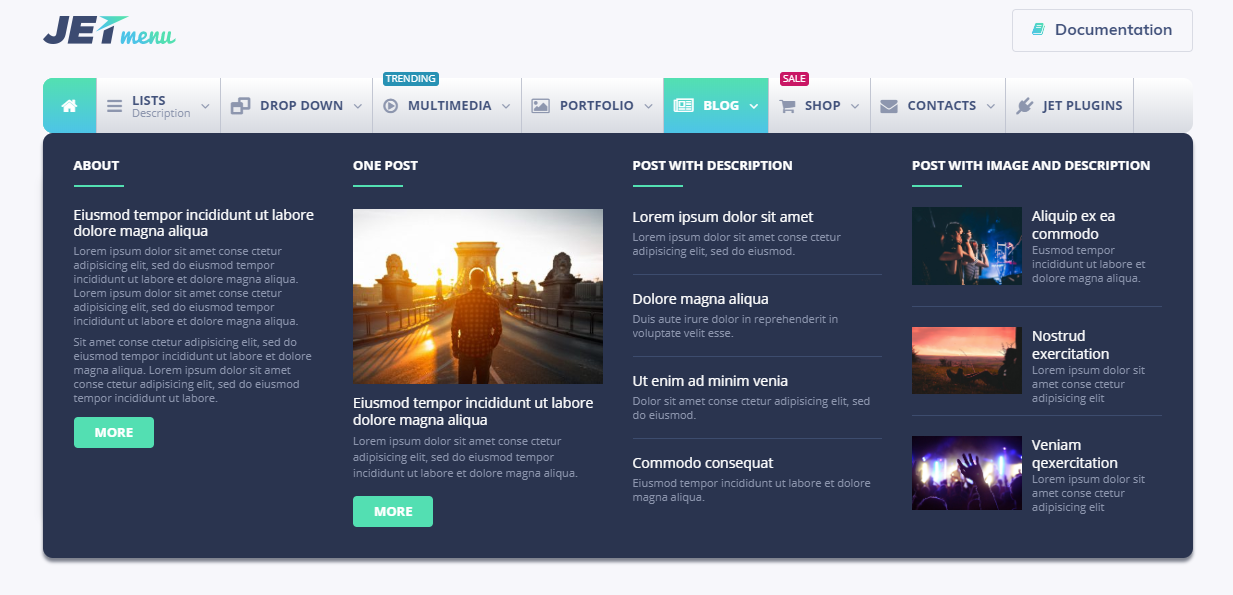
Mega menu is a great navigation tool - it is more attractive and useful than a common drop-down menu and improves the user's experience. Besides that, it allows you to show the user much more interesting offers than a regular menu. JetMenu adds widgets both to the Elementor menu (those are Vertical Mega Menu and Mega Menu) and WordPress dashboard (it adds new features to the Appearance > Menus tab). Creation of a new menu is really easy. To start, go to the Appearance > Menus and enable JetMenu for the current location. Afterward, choose what menu you would like to customize and click "JetMenu" button on it. Enable mega menu option and click "Edit Mega Menu item content" button.
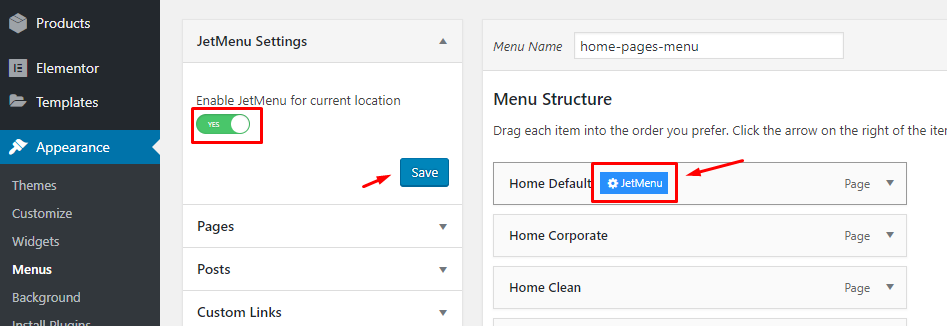
Enable mega menu option and click "Edit Mega Menu item content" button.

You will be moved to the Elementor customization menu and can start adding elements to your mega menu.

JetMenu plugin creators shoot a set of video tutorials that will help you to understand all the details of its work. Here's the first of them, but if you go to the YouTube - there will be another 8 videos about different ways of your menu customization.
Stratum - Elementor Extras WordPress Plugin

Demo | Download
Stratum Elementor Addon is a collection of 20+ advanced Elementor widgets with a strong business orientation. The addon enhances the functionality of the existing Elementor widgets collection with extra multipurpose elements for all kinds of websites - from personal portfolios and blogs to business websites and large eCommerce projects.
Although Stratum widgets are fairly equal to premium-like solutions, even Elementor Pro the addon users can try all 20+ widgets for free. Moreover, the addon gives access to exclusive and highly-demanded options unavailable even in the Elementor Pro packages.
In case you only need a couple of advanced widgets from Elementor Pro but you are not ready to pay for the plugin premium subscription, Stratum becomes the solution “in-between”. For the cheap at half the price of Elementor PRO, you will get a handy set of 6 analog PRO widgets:
- Advanced Slider
- Advanced Posts
- Masonry Gallery
- Testimonial Carousel
- Price List
- Flip Box
Closing
I hope this in-depth look at the WordPress navigation system can help new developers jump right into theming. Obviously, there are some other important aspects to coding a theme. But navigation is so crucial and also somewhat confusing if you've never built something like this before. Try out these sample PHP codes and see what you can make using WordPress as the core foundation.
Best Plugins for a New WordPress Site [Free eBook]
FAQ
It is a WordPress function that shows to the user the menu, attached to come location, ID, slug or just the first non-empty menu.
Choose the method you feel more comfortable with. If you don’t feel confident with the code – it will be completely OK to work with the administration dashboard.
Navigation through the website is the key element of good user experience. If it is not clear and convenient – users won’t stay on the site. And as you know the website’s structure better than anyone – it is you who have to make it understandable for visitors.
Read Also
The Ten Best WordPress Navigation Menu Plugins for Your Website
Color-Coded Dropdown Navigation with Submenus
How to Add More Navigation Menus to Your WordPress Theme
Coding a Mobile-Responsive Website Layout Using Footer Navigation
How to Code a Hidden Sliding Navigation for Responsive Websites