How to Add Fonts to Procreate
Procreate has rapidly gained a reputation as a powerhouse in the world of digital illustration, becoming a go-to app for iPad users worldwide. Whether you’re a professional artist or a hobbyist, you’ll know the significance of customizing your design tools to suit your unique style and creative vision.
While Procreate boasts an extensive selection of fonts, there’s always room for a personal touch. Perhaps you’ve discovered a font elsewhere that perfectly encapsulates your style, or maybe you’ve created a custom font yourself. Whatever the case may be, the ability to add new fonts to Procreate broadens your creative horizons and helps your digital artwork stand out from the crowd.
In this guide, we’ll walk you through the process of adding new fonts to Procreate, step by step.
We’ll demystify the process and equip you with the knowledge you need to expand your typography toolkit in Procreate. Get ready to elevate your digital artistry and make your creative mark with unparalleled precision.
Getting Fonts Ready for Procreate
Before you can add a font to Procreate, you’ll need to download or create the font file. Remember, Procreate only supports fonts in .TTF or .OTF format.
Find and Download the Font
There are countless websites offering free or paid fonts. Just ensure that the font you download is in .TTF or .OTF format. You can store the downloaded file in a location easily accessible, like the Files app on your iPad.
How to Import Fonts to Procreate
Once you have the font file ready, importing it to Procreate is straightforward.
1. Open a Procreate Canvas
Start by launching the Procreate app and open an existing project or create a new canvas.
2. Access the Text Tool
Tap on the wrench icon in the top-left corner of the screen to open the Actions menu. Select the “Add” tab, then tap on the “Add Text” option. This will open a text box on your canvas.
3. Go to Font Menu
In the keyboard area, you’ll see a “Fonts” option. Tap on it to open the font library.
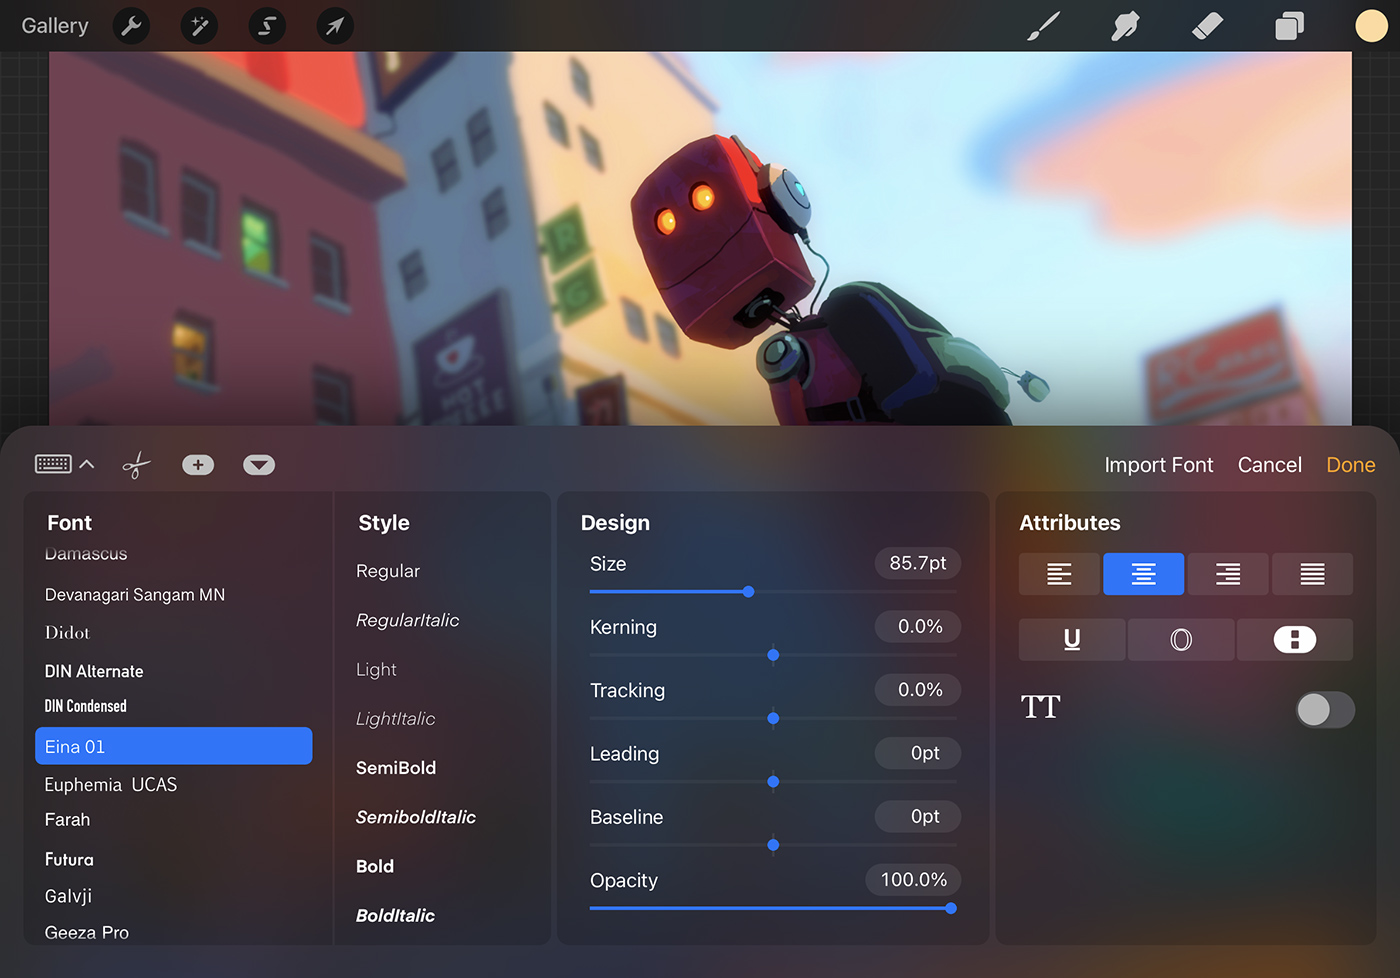
4. Import Your Font
At the top of the font library, there’s an option labeled “Import Font.” Tap on it, navigate to the location where you saved the font file, and then select the file.
5. Use Your New Font
You’ll now find your new font in the list. You can use it just like any other font in Procreate.
Tips for Using Fonts in Procreate
Now that you know how to add fonts to Procreate, here are some tips to help you make the most of this feature:
1. Consider Legibility
While it can be tempting to use fancy fonts, remember that legibility is crucial. If people can’t read your text, it doesn’t matter how beautiful your font is.
2. Pair Fonts Carefully
Using more than one font can make your design more dynamic. However, you’ll want to pair fonts that complement each other. Avoid using fonts that are too similar, as they can make your design look confusing.
3. Use Kerning
Procreate allows you to adjust the spacing between individual letters, known as kerning. This feature can be useful for refining the look of your text.
4. Experiment with Text Effects
Procreate offers a variety of text effects, like 3D and shadow effects. Don’t hesitate to experiment with these to make your text stand out.
5. Know When to Use Caps
Capital letters can add emphasis, but using them excessively can make your text difficult to read. Use caps sparingly for the best effect.
Conclusion
Adding custom fonts to Procreate opens a whole new world of creative possibilities. Whether you’re looking to achieve a particular aesthetic, communicate a specific message, or simply want to have more options at your fingertips, knowing how to import and use your own fonts is a powerful tool. So, go ahead and start experimenting with different fonts to make your artwork truly one-of-a-kind. Happy creating!