How to Set Up Yoast SEO for WordPress
If you want your WordPress site to rank in search results, you must optimize your pages with search engine optimization (SEO). With WordPress, you can help optimize your pages to rank in search results by installing a plugin like Yoast SEO. Yoast SEO is an excellent addition to your site if you want to boost your rankings in search results.
In this post, we’ll cover how to install and set up Yoast SEO for WordPress, so you can start driving better SEO results. Keep reading to learn more!
Sign up today!

For even more digital marketing advice, sign up for the email that more than 150,000 other marketers trust: Revenue Weekly.
How to install Yoast SEO for WordPress
First, let’s look at how to install the Yoast SEO plugin on WordPress.
Follow these steps to install the Yoast SEO WordPress plugin:
- Log into your WordPress website
- Click on Plugins
- Click Add New
- Search for Yoast SEO
- Install the plugin
- Once installed, click Activate
After following these steps, you can move on to setting up Yoast SEO.
How to set up Yoast SEO for WordPress
Once you install the plugin, it’s time to set up Yoast SEO. Yoast SEO offers numerous features and settings you’ll want to review and tweak to fit your goals. We’ll break these features and settings down into two categories: General settings and search appearance.
But before we dive into the categories, the first thing you need to do is import your SEO data. If you’ve just built your WordPress site, you can skip ahead. But for businesses that are moving over to Yoast SEO or installing for the first time, you must import your SEO data.
This step is critical if you currently use a different SEO plugin. You need to import the data to Yoast SEO before deactivating the old plugin to ensure you don’t lose the data.
Once you transfer the data, you can dive into setting up Yoast SEO.
General settings
First, you’ll look at your general settings to set up Yoast SEO properly. There are multiple components under general settings you’ll want to check and set.
Features
Under the Features section, you’ll see numerous features that you can enable or disable. Here are the features you’ll see:
- SEO analysis: This feature shows you the SEO score and analysis of your content.
- Readability analysis: This feature shows you the readability score of posts — it indicates how easily someone can read and understand your content.
- Cornerstone content: This feature enables you to market and filter cornerstone content –– cornerstone content being the articles and pages you want to rank the best for your site.
- Text link counter: This feature shows the number of internal links to and from an article.
- XML sitemap: This feature enables you to create an XML sitemap for your website.
- Security: No advanced settings for authors: This feature hides advanced SEO settings from authors to improve your site’s security.
Once you decide whether you want to enable or disable these features, make sure you save your changes to apply them!
Link to integrations
The next section you’ll want to look at is the link to integrations. Yoast SEO offers built-in integrations for the following:
- SEMrush: SEMrush is an SEO tool that helps you find related keywords and improve content performance.
- Ryte platforms: With this online tool, you can check your website for indexability and alerts.
If you use either of these tools, you’ll want to ensure that you enable them with Yoast SEO.
Webmaster tools
The next setting you’ll see is webmaster tools. With this setting, you can verify your website with top search engines like Bing, Google, and Baidu. To use this feature, you’ll need the meta tag from the search engine (You can access your Google meta tag through Google Search Console).
Your meta tag verifies ownership of your site and enables you to access valuable data from your WordPress site. By connecting your WordPress site to a search engine like Google, you can get all the search data you need in one place.
Search appearance
The next part of setting up Yoast SEO is configuring your search appearance settings. With these settings, you control how your website appears in search results — you determine how your audience sees your content.
To set up Yoast SEO properly, look at the following settings:
General search appearance
When setting up Yoast SEO, make sure your general search appearance settings are up to your standards. In this section, you’ll determine your:
- Separator: The separator is the symbol that you use to separate titles. Most companies use a dash ( – ).
- Homepage title tag and meta description: You can also set the title tag and meta description for your homepage in your general settings. If users search for your business online, this information is what they’ll see in the search results.

- Person type: With this setting, you’ll indicate if you’re an individual person or an organization. When choosing an organization, you must list the company name and provide Yoast SEO with a logo picture.
Content types
The next step in how to set up Yoast SEO for WordPress is to set your content types. This section is critical because it’s where you set the title tags and meta descriptions for each post or page that you create.
Essentially, you can set it to autofill components of your pages into these tags.
For example, if you’re creating a blog post, you may implement a “title” tag, which means that the blog title will automatically fill in for the SEO title.
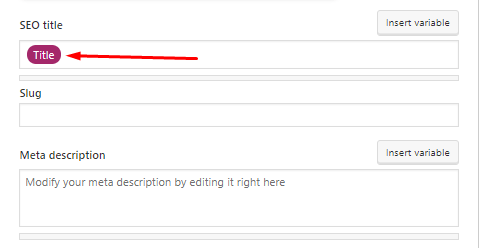
With this setting, you can create an automatic template that Yoast SEO will use every time you create a new post in WordPress.
Media
In this next part of setting up Yoast SEO, you’ll see an option to control what happens when someone clicks on your media files. Typically, WordPress creates a new page for each image on your site that only displays the photos. While this setup may not seem like a big deal, it can impact your SEO.
When WordPress creates these attachment pages, they have no content value, and therefore are seen as low-quality pages, which can impact your SEO.
With Yoast SEO, you can solve this problem. Yoast SEO will create your images as attachment files rather than attachment pages, so it doesn’t hurt your SEO. When you get to this setting, it should be set to “Yes” by default — you don’t need to make changes.
Breadcrumbs
The last item you’ll want to look at on your website is the breadcrumbs setting. Your breadcrumb navigation is what provides your audience with a clear path or trail of the page they’re visiting. With Yoast SEO, you can determine the path and tweak the settings.
In this setting, you can determine elements like the anchor text for your homepage, like “Home” or “Back Home.”
This setting also enables you to determine the separator between the locations of each page in the breadcrumb navigation. This symbol can be an arrow, double arrow, or any other similar symbol.
Get started with setting up Yoast SEO
Now that we’ve covered how to set up Yoast SEO for WordPress, you’re ready to get started with Yoast SEO. But if you’re feeling overwhelmed with trying to manage the SEO of your WordPress site, WebFX can help.
We have a team of over 300 marketing experts that know how to optimize your site for SEO. In addition, we’ll provide you with a dedicated account representative that will guide you through every step of the process.
Ready to optimize your site for SEO? Contact us online or call us today at 888-601-5359 to speak with a strategist about our SEO services!