How To Migrate From WordPress To A Headless CMS
WordPress is the most used website builder in the world; almost half of the web has used WordPress to create their website. It makes sense, because it allows you to quickly create websites and has a rich plugin’s ecosystem to help you scale your site.
But technology is evolving, and there are more and more options that make it easier to create websites. Moreover, they give us the possibility to improve the website’s performance and to have more control and security over the application.
The initial WordPress architecture is monolithic, so the user interface and data access are combined on the same platform.

Since the introduction of the REST API on WordPress, it can be used in a headless way, allowing developers to use it as a backend and having the front-end in a different project.
In this decoupled way, models and controllers are bundled on the WordPress side, handling data manipulation and database interaction. Meanwhile, the front-end only interacts with the REST API via an HTTP client.
But this also has some disadvantages, you still need to configure and update WordPress, make it secure and are dependent on their technology for the development of new functionalities.
Related Reading on SmashingMag
For those of you who are just starting in the headless world, these articles will help you understand the ins and outs behind it and why everyone is starting to migrate.
- “Headless CMS Explained In 5 Effective Minutes”
- “Rethink Your Content Strategy For A Headless CMS”
- “How Thinking In Components Can Increase Your Productivity”
- A curated list of articles related to “Headless” →
But Why Migrate To A Headless CMS?
Taking into account that this article will showcase how to migrate from WordPress to a Headless CMS, WordPress is probably your current setup.
A Headless CMS will give us the freedom to focus only on the front-end project, being able to choose the technology we are familiar with, and on the structure of our data. In the end, it takes care of the content management and the content delivery, so that we can take care of the rendering part.
“A Headless CMS is a system that provides the same features as a Content Management System (CMS) and more, all exposed through an API.”

This type of setup is especially useful for companies that have multiple sites and want to reduce costs or simplify processes. A headless architecture allows these companies to centralize content management in a single administration interface, providing the APIs that will be consumed by the company’s different web pages.
Another common use of a headless architecture is to create a front-end project that represents the company brand. In this way, all the products that the company launches will have the same look and feel, but each one will have its own content, managed in the same administration panel.
Note: This example can be easily seen on conference websites such as JSWorld Conference and VueJS Amsterdam which, being from the same creators, the front-end project is the same, only the content changes.
Different to a CMS like WordPress, in a Headless CMS you have an administration panel already configured and maintained, and sometimes also hosted, for you. To start creating content, you just need to create an account, log in, and you will be able to create, edit, duplicate and delete your content, manage users, translate content and work with publication workflows, among other things.
A headless CMS will make it easier for the people in your team to understand the workflow, whether they are content creators or marketers, something to keep in mind if you aren’t the only one who will edit the content.

It is worth noting that some Headless CMS, not only focuses on offering you the services already offered by a CMS like WordPress. It also provides services such as image CDNs to resize or reformat your images on the fly, or additional security through S3 backups.
Having this setup will not only give you freedom, security and comfort, but will also improve the performance of your application without third-party services. Just by connecting your front-end project via an HTTP client and getting the components and data, you will be up and running.
The Benefits Of Going Headless And When It Makes Sense
WordPress’ architecture often does not offer the possibilities we sometimes need when working on a website, especially when it comes to optimizing performance, one of the most important points when ranking our site in a search engine like Google and especially now that Web Vitals is up and running.
But it is clear that if we have a personal site that only we ourselves work on, then it’s not necessary to migrate it to a headless setup. However, if more people are involved in that project (not just developers but content creators or marketing teams), then we should consider adopting Headless CMS.
How Can A Headless CMS Help Us Improve The Performance Of Our Website And The Quality Of Our Front-End Project?
By allowing you to develop the front-end in a way that is completely independent of the platform where you edit your content.
The technology you choose is your own choice, if you wanted to upgrade your project to the latest front-end framework, you would not be dependent on a back-end and could do so without having to rethink migrations.
Allowing you to create multiplatform projects without having to depend on different administration panels.
In the end, if for an app you need a shorter description than the main website, you can always make use of a new "short_description" field and just represent it on the front-end of that specific app.
It is intended to make development easier and simplify the process of creating a site, as well as scaling it.
By having the front-end completely isolated we can change the visual appearance of our entire application without modifying the structure of our content.
- Always offering services that will allow us to optimize our assets and the speed of response with which they are served to us. Ultimately all our data will be delivered through CDN networks.
A content delivery network (CDN), is a geographically distributed network of proxy servers and their data centers. The goal is to provide high availability and performance by distributing the service spatially relative to end-users.
What If We Are Concerned About How It Will Work With Our Brand’s Or Company’s Structure?
As well as supporting cross-platform applications, it also allows us to maintain brand consistency.
Having the front-end as a base project and having multiples spaces in a Headless CMS, allows you to have consistency between your products and makes the scalability easier because we have less code to maintain.
- Although not all headless CMS have this benefit, the headless CMS we are migrating to, Storyblok, has a Visual Editor, which allows creating independence among teams. The editors or content creators can access the panel to edit existing content or create new content, being able to see a preview of how it will look before publishing. So they won’t have to involve the development team in this process and can do their work more efficiently.
- It also streamlines content management by allowing you to set up your own content workflow. You can define the stages that a piece of content must go through before being published and, only when it passes the process successfully, it will be published.
How Can A Headless CMS Save Time Compared To A Traditional CMS?
- Taking care of maintaining the security of the platform and updating it on your behalf. Whenever there is a bug or users require a new feature, the team behind your Headless CMS will develop it for you, you just have to start using it!
- Constantly improving the user experience (UX) and design (UI) for you, so that content creators and developers feel comfortable creating new fields, components or pages. But not only on the visual aspect, but they will also be looking to improve the performance of the database, so you get your content instantly and forget about all the work that is involved.
Monolithic vs Headless
| Feature | Monolithic | Headless |
|---|---|---|
| Architecture | Coupled: linked back-end front-end | Decoupled: independent front-end project |
| Technology | You will have to use the one in which the project is developed | Freedom to choose your front-end technology |
| Cross-platform | Limited to one front-end at a time | Connects to any front-end projects |
| Content workflow | Restrictive | Custom |
| Security and updates | You take care | It takes care for you |
Having seen the advantages that a headless setup can bring to our project and the people who work on it, I think it is time to look at the steps we need to migrate our project.
What You Need To Keep In Mind When Going Headless
As we have already mentioned, Headless CMS allow for a clean separation of concerns between content creators and developers. In this way (in a Headless CMS), the developer focuses on creating the content structure, which will be represented in the front-end project, and the editor will be in charge of using the components and filling them with content in the admin panel.
Type Of Content We Can Create In A Headless CMS
1. Types of entry or template
Similar to Custom Post Types in WordPress but with more freedom and extensibility when it comes to data types and editors.
When you go to create a new content entry in your dashboard, you expect to be able to choose what type it depends on the situation. For example, if you have a website with a blog you will want to have several types of templates, one for pages with listings or dynamic content called "page" and one for each blog entry "post".
Depending on the headless CMS you have chosen, the name will vary but the concept is the same. In Storyblok these types of entities are called Content Type. “Content Types” define the type of content entry and can hold the basic fields for your content entries. By default, we have a “Page” content type.
2. Reusable components
In a Headless CMS, you can create, in addition to Content Types, nested components and reuse them between content types and other components. In Storyblok, this type of component — as you may have noticed from its name — is called Blok.
To use them in a Content Type such as a page, you will need to create a field in the schema of type blocks. This field allows you to add nested components to your page while adding content.
But, in principle, we will not need such components during the migration. It simply gives you the flexibility to create robust and dynamic applications without having to involve the developer.
For example, when a member of the marketing team wants to add a new Hero to the About us page, if the Hero component was created as nested and the page had a Blocks field, the marketing person could add the Hero without having to involve the developer.
Rendering The Data Coming From The Headless CMS
As we are defining the structure of our content in the Headless CMS panel, we have to consider which framework we want to create our front-end project with and which HTTP client we will use.
When choosing a framework we have to take several factors into account:
Are my team and I am familiar with this technology?
Does it allow me to render my content in the type of rendering my project needs?
Does it have plugins or modules that facilitate integration with the Headless CMS I’m using?
In most cases, a static site will be sufficient and will always be the most economical and high-performance answer. So, you just have to look for a static site generator for the technology you are familiar with, for example, Nuxt for Vue or Next for the React library.
Connecting these two things, a Headless CMS and a static site builder are considered as a set of web development best practices focused on providing the highest performance, security and lowest cost. This architecture is also known as Jamstack. It’s an architecture designed to make the web faster, more secure and easier to scale. It builds on many of the tools and workflows which developers love, and which bring maximum productivity.
By making use of the trendy frameworks, you will be assured of an integration guide with the Headless CMS you are going to work with, and most of them have already a module or package that allows you to obtain information from the API and in many cases extend it.
The only thing left for you to do is to define the structure of your components concerning how you have structured the data in your Headless CMS and automate the content publishing process. For example, using the Webhooks that the Headless CMS provides you with, you will be able to start a build process in your favourite hosting by its build hooks once the content has been published.
Amount Of Time You’ll Need
As with any migration, the time required will always depend proportionally on the complexity of your project. If we are talking about a common WordPress site you will only need to migrate the Post types that you have defined or that comes by default in it, such as Pages, Posts and Categories, and their content.
If, on the other hand, you have customized your project with multiple plugins, you will have to develop them through the front-end project or using the ones provided by your Headless CMS. For example, if we are SEO conscious and therefore make use of Yoast SEO on WordPress, we will have the Field-Type SEO plugin in Storyblok to help us in the transition, but we will still have to develop our sitemap in the front-end with a guide to help us.
In the end, all the burden of development will fall on the front-end project, as setting up the Headless CMS will not take that much time.
But let’s stop talking and let’s take a look at it!
Steps To Migrate Our Content From WordPress To Storyblok
The migration will consist of four steps, from the creation of a space in our new Headless CMS Storyblok to the representation of the migrated content in our front-end project, which we will see in detail below and in which I will leave you resources to make the migration easier for you.
Let’s get started!
1. Creating A Space In Storyblok
In order to create a space in Storyblok, you first need to have an account. To do this, you will need to select the plan that suits you best.
Go to the Pricing page and start with the plan that best suits your needs or try the free plan for testing.
Create your account, and you will be able to access the panel.

Choose ‘Create a new space’ and let’s get started!

Space is a content repository. Think of it as a place to keep all the content related to one project. Each space has its own components, data sources, assets, environments, domains, collaborators and permissions.
Take some time to explore the sections on the left sidebar. Start by browsing the following:
- Content, this will be the folder where the content will be stored, where the marketing team will spend most of their time.
- Assets, where all the images will be stored, which you can then get through the CDN service, optimized and of any size.
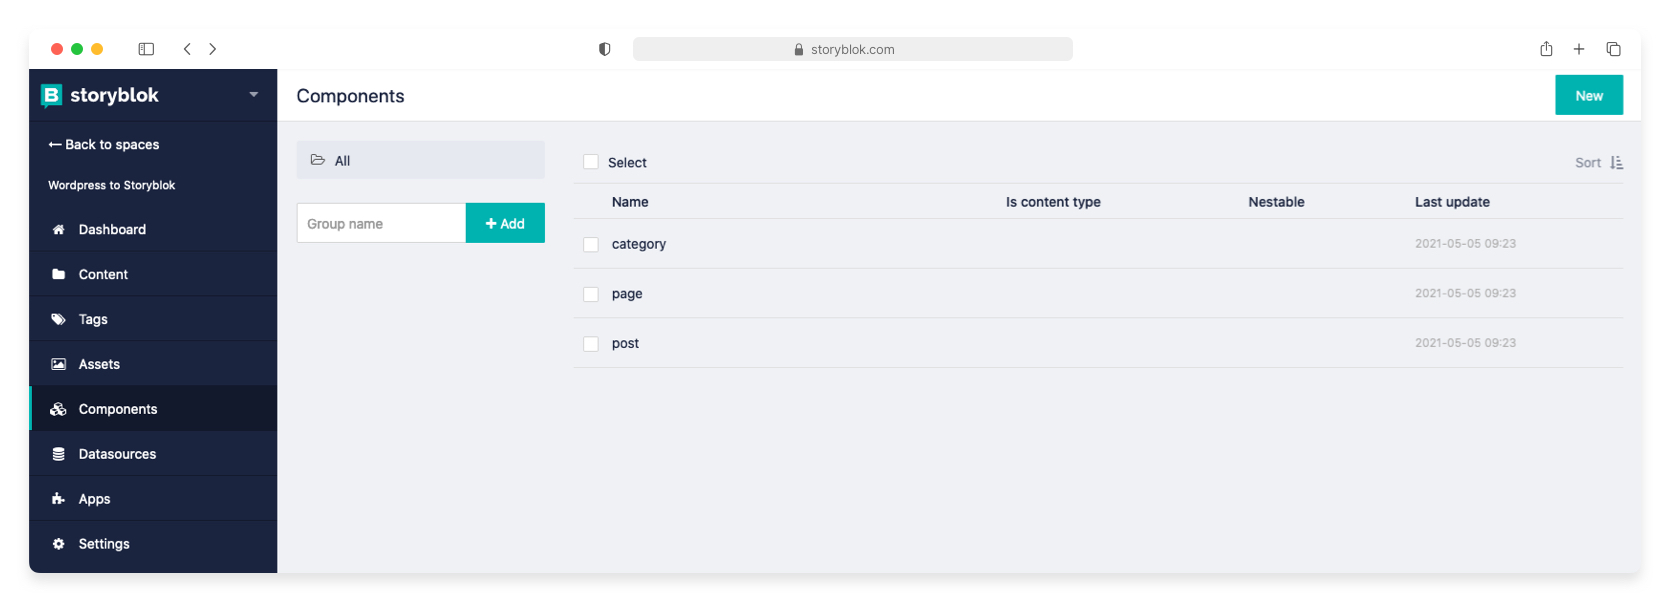
- Components, where you will create the Content types and Nested components.
- Settings, the section where you will be able to configure the data of your space as well as the languages of your application, the workflows you want your content to follow before being published, user permissions, etc. Let’s say that this area will be the one related to the IT team of the project.
If you still want to explore every option on the dashboard before diving into the migration, I recommend taking a look at Understanding the UI by Storyblok.
Now that you know a bit about the Storyblok ecosystem, it’s time to define what the content of our application will look like.
2. Defining Models
To migrate WordPress content to Storyblok, the next step is to create the schemas that define the WP data structure by creating Post Types in the Storyblok space.
Let’s start with pages and posts (the main Post Types in any WP site), which we’ll call page and post in Storyblok.
The schema of pages in WP contains the fields: title, slug, featured image, date, and content.
Note: To see all the fields contained in a Post Type go to the schema at WP REST API schema references.
What you need to know is that, by default, any Content Type in Storyblok will have some fields already defined for you, such as Name, Slug, Tags, First published date, and so on.

Those fields could be used to migrate the content from WP. You will only need to extend it by adding featured_image and content in the Page Content Type.
Go to the Components section in your space, click on the page created by default, remove the body field and add featured_image as type Assets > Images and content as Rich-text.

Once the page schema is ready, let’s move on to the post. For the Post Content Type, it is necessary to include more information, such as featured_image, excerpt, content, and relationships to other types such as Authors or Categories.

Since Authors and Categories will also have their own content, go to the Content section in the sidebar and create a couple of folders called authors and categories.
Each of the folders must have a default Content Type associated. To do this, in the Components section, create Author and Category as new Content Types, and then associate the Content Type relative to each folder by clicking on the three dots on the right of the folder and selecting Settings.

In this way, in the Post Content Type you can add a Single-Option or Multi-Options field with source Stories and point to the folder created for each field:
- Authors
This specifies the folder where they are locatedauthors/. - Categories
This specifies the folder where they are locatedcategories/.

Note: If you want to know more about this relationship, have a look at the article Authors and Articles Relationship.
Now that you have seen how to create a couple of Content Types and how to create relationships between them, you will have to define the rest of the models following the same steps.
Adding A Content Type: Global
And you ask yourself, what about the content that all my pages will share? Like the navigation menu, footer, and other common elements?
Don’t worry, Storyblok has already thought about that and offers us a simple guide to define our global elements dynamically. It shows us how to create a global Content Type and how to use it in the Content section.
3. Migrating The Content
Now it’s time to start migrating the content you have stored. To access WP content you need to access the REST JSON API. Access the path /wp-json, if the project is deployed, or ?rest_route=/ if local.
In case neither of the two routes works, inspect the HTML of your page for a link in the head with rel="https://api.w.org/", as indicated in the WP discovery guide, and get the correct one.
<link rel="https://api.w.org/" href="https://localhost/your-site/index.php?rest_route=/">
To help us during the migration, the Storyblok developers have provided us with a plugin that will save us a lot of work. This plugin is called wordpress-importer, on it, it is possible to define the equivalent Content Type in Storyblok for the WP Post type to be migrated, and it will push it to our space and migrate the images to our Assets section for us.
Note: Using this script requires node ≥14.0.0 because it’s using optional chaining.
Creating The Migration Script
The first thing to do is to clone the repository. Then, install the NPM packages, using npm install or yarn, and create a file in the root of the project as migrateWPtoStoryblok.js. In order to run the script you need a script in package.json to run it, add:
"migrate": "node ./migrateWPtoStoryblok.js"
Once everything is ready, it’s time to start defining the script following the README specifications. And, as you can see, the next thing that will be needed is to find the Space_id and the OAuth token to connect to the Storyblok space.
- The
Space_idis in the Settings section of the sidebar, as soon as you click on it, you will see it on the right side. - To generate the
OAuthtoken, you need to go to the top of the sidebar, click on the little arrow right next to the Storyblok logo, and go to My Account. If we scroll down we will see the Personal access tokens section, generate one, and copy it.
When you have obtained both secrets, you can add them to the beginning of the script along with the URL of the JSON API of your project:
import { Wp2Storyblok } from './index.js'

const wp2storyblok = new Wp2Storyblok('https://your-domain.com/wp-json', {
  token: 'storyblok-oauth-token', // My Account > Personal access tokens
  space_id: 'space-id', // Settings
})
As described in previous sections, the Page Content Type in Storyblok is the equivalent of the Post Type in WP pages. In the code block below, you’ll see where you’ll need to specify each.
And, once the Post Type and Content Type are defined, it is time to specify the name of the fields used in this entity type in WP and the equivalent name in Storyblok, in the schema_mapping option.
import { Wp2Storyblok } from './index.js'

const wp2storyblok = new Wp2Storyblok('https://your-domain.com/wp-json', {
  // ... Secrets
  content_types: [
    {
      name: 'pages', // Post type in WP
      new_content_type: 'page', // Equivalent Content type in Storyblok
      folder: '', // OPTIONAL: To save all the content of the same type in a specific folder
      schema_mapping: {
        "title": "name", // "Field in WP": "Field in Storyblok"
      }
    }
  ]
})
Note: For the migration to work correctly, make sure that the permalinks are selected by the name of the entry and not as simple. Otherwise, the script will not create the parent-child relationship between pages.
Within the schema_mapping you can define several types of fields, these can be:
- A simple field, such as
title. - A sub-property of a field, like in this case the URL of the feature image.
Note: The plugin itself takes care of migrating the images to the Storyblok space via the associated URL inlinks.wp:featuredmedia.0. A field migrated to a nested block in Storyblok.
Imagine you want to create a component in Storyblok to define your site’s rich text so that all post types using it have the same style and options.
For that, you can use the object format and specify the name of the field in the Storyblok model under the field property, the name of the component you want to store inside that field, and the name of the field inside the component where the content will be migrated.
import { Wp2Storyblok } from './index.js'

const wp2storyblok = new Wp2Storyblok('https://your-domain.com/wp-json', {
  // ... Secrets
  content_types: [
    {
      // ... Post type WP:Storyblok
      schema_mapping: {
        "title": "name", // "Field in WP": "Field in Storyblok"
        "_links.wp:featuredmedia.0": "content.preview_image", // Using the dot notation you can define subproperties.
        // Using nested blocks in Storyblok
        "content": {
          field: 'content.body_items', // Field name in Storyblok
          component: "rich-text", // Component name inside the above field
          component_field: "content" // Field name inside the component where you want to migrate the content
        }
      }
    }
  ]
})

wp2storyblok.migrate()
Entry Type Page
Now that you know how to define the field types, for the page schema, it would look like in the code block below.
The plugin will take care of the parent-child relationship between pages by creating a folder in Storyblok under the parent’s slug and associating the parent as the home of that folder.
Furthermore, if the content field contains images, the plugin will also migrate it for you!
{
  name: 'pages', // Name of the post type in WP
  new_content_type: 'page', // Name of the Content Type in Storyblok
  schema_mapping: {
    "date": "first_published_at",
    "title": "name",
    "slug": "slug",
    "_links.wp:featuredmedia.0": "content.featured_image",
    "content": "content.content",
  }
}
Entry Type Post
Posts have a schema similar to pages but, in this case, to store them in a folder you must define the name of the folder below the entry type:
{
  name: 'posts', // Post type name in WP
  new_content_type: 'post', // Content Type name in Storyblok
  folder: 'articles', // Destination folder name in Storyblok
  schema_mapping: {
    "date": "first_published_at",
    "title": "name",
    "slug": "slug",
    "_links.wp:featuredmedia.0": "content.featured_image",
    "excerpt": "content.excerpt",
    "content": "content.content",
  }
}
Entry Type Category
And once the schema for posts has been defined, it makes sense to define the schema for the categories so that they can be associated as described in the previous section.
In order to define the folder that contains them as categories and not as category, their default name, you must go to the Permalinks option in the WordPress admin and change the Categories base option to categories. Then the multi-option field of the Post entries will be the one that has the relationship with the corresponding categories.
Note: These steps are the same as those to be followed for migrating authors and linking them to articles.
{
  name: 'categories', // Name of the post type in WP
  new_content_type: 'category', // Name of the Content Type in Storyblok
  // By default will be contained by a folder called Category (change it in the Permalinks option in WP)
  schema_mapping: {
    "name": "name",
    "slug": "slug",
    "description": "content.description",
    "parent": "content.parent",
  }
}
Full Final Script
The code below will be the resulting migration script from a WP project with the basic types to the Storyblok space we had created.
import { Wp2Storyblok } from './index.js'

const wp2storyblok = new Wp2Storyblok('https://your-domain.com/wp-json', {
  token: '',
  space_id: 34234,
  content_types: [
    {
      name: 'pages', // Name of the post type in WP
      new_content_type: 'page', // Name of the Content Type in Storyblok
      schema_mapping: {
        "date": "first_published_at",
        "title": "name",
        "slug": "slug",
        "_links.wp:featuredmedia.0": "content.featured_image",
        "content": "content.content",
      }
    },
    {
      name: 'categories', // Name of the post type in WP
      new_content_type: 'category', // Name of the Content Type in Storyblok
      // By default will be contained by a folder called Category (change it in the Permalinks option in WP)
      schema_mapping: {
        "name": "name",
        "slug": "slug",
        "description": "content.description",
        "parent": "content.parent",
      }
    },
    // Add authors as categories.
    {
      name: 'posts', // Name of the post type in WP
      new_content_type: 'post', // Name of the Content Type in Storyblok
      folder: 'articles', // Name of the destination folder in Storyblok
      schema_mapping: {
        "date": "first_published_at",
        "title": "name",
        "slug": "slug",
        "_links.wp:featuredmedia.0": "content.featured_image",
        "excerpt": "content.excerpt",
        "content": "content.content",
      }
    }
    // More schemas...
  ]
})

wp2storyblok.migrate()
4. Create A Front-End Project
Now that the content is already stored in the Storyblok dashboard, it’s time to connect the Front-end project to Storyblok.
Whatever your framework or JS library, Storyblok provides the JavaScript client that will help you with the integration. In addition, in case you are using a specific framework, you will find other packages that will ease the way, like in Nuxt the storyblok-nuxt module.
This JavaScript API will also include a bridge between Storyblok and your Front-end application. The bridge is responsible for communicating via iframe with Storyblok to tell the editing interface which component to open when the user clicks on it.
Here is a list of tutorials you can find on Storyblok to connect your Front-end project.
Note: If you don’t find your technology among them, don’t worry there are many other tutorials on the Storyblok website, search for yours in the search engine, and if you don’t find one I encourage you to contact them, and you will help many more people!
- Next
- Gatsby
- Vue
- Nuxt
- Angular
- Svelte
- Ember
- AMP
5. Host Your Front-End Project And Automate Deploy
Once your project is ready to go into production, you choose a hosting provider and link your repository for easy deployment, then you ask yourself:
How do I redeploy my static site if I publish an entry on Storyblok?
The answer is very simple: by using the webhooks offered by Storyblok and the build hooks of your hosting.
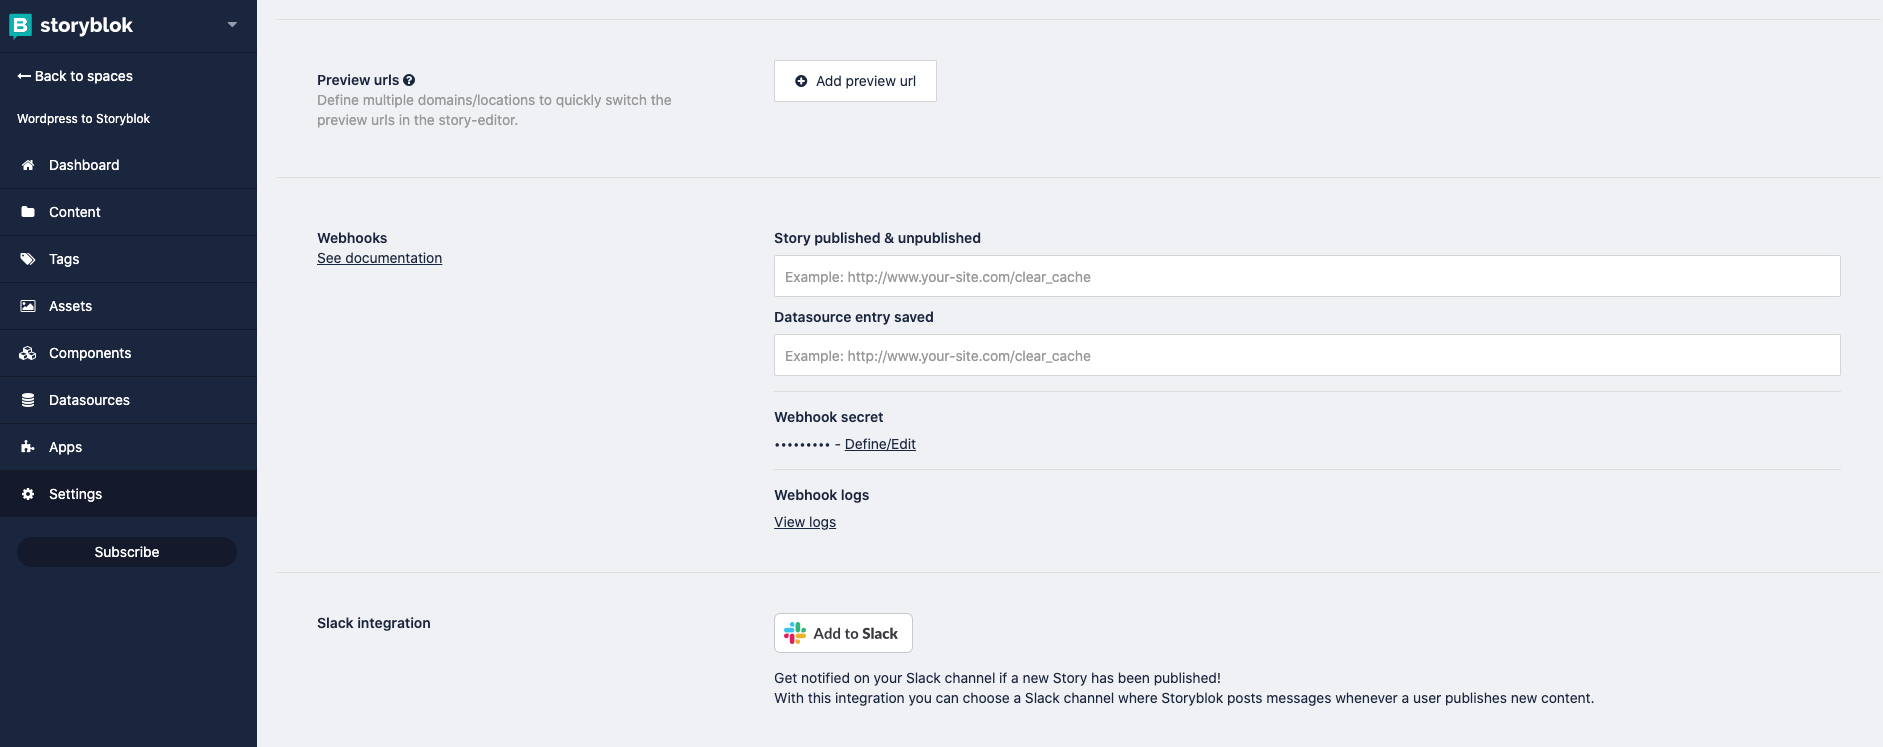
To give you a real example, you can create build hooks URLs in Netlify within the deployment section; the URL created for Storyblok in the build hooks will go in the Settings → Webhooks → Story published & unpublished field in the Storyblok space.
Guides And Tools We Have Used During Migration
Let’s recap the links that have helped in the migration of the content and those that helped to understand the functioning of the REST API and the headless CMS to which you are migrating.
WP REST API Documentation Needed
REST API
- REST API Developer Endpoint Reference
- Using the REST API
- Discovering the API and its route
Schemas
- Page schema reference
- Post schema reference
- Categories schema reference
Migrating To Storyblok
General Info
- The Storyblok official website
- Storyblok Pricing & Plans
Documentation
- Understanding the UI
- Structures of Content
- Setting Up the Blog Content Structure in Storyblok
Global Components
- How to build a website header menu navigation with Storyblok
- The Storyblok Bridge V2
SEO Related
- How to generate a445r Sitemap with a headless CMS?
- https://www.storyblok.com/apps/seo
Webhooks And Build Hooks
- Everything about Webhooks
- How to use Storyblok webhooks
- Hosting build hooks - Netlify example
Scripts And Packages
- Universal JavaScript SDK for Storyblok’s API: https://github.com/storyblok/storyblok-js-client
- Migration WP to Storyblok helper: https://github.com/storyblok/wordpress-importer
Jamstack
- The Jamstack website
- A List of Static Site Generators for Jamstack Sites
Conclusion
After reading this article you will have what you need to understand why a headless setup will improve your project, how to migrate from your WordPress project to a headless CMS like Storyblok and how to keep improving and extending your project.
As you have seen, the possibilities of a headless setup are endless. After the migration, you will have enormous flexibility to scale your project, improve its performance and SEO, increase the productivity of the development team and stay on top of the latest trends.
Everyone is starting to migrate and there is more and more content and scripts that make it easier. What are you waiting for to migrate your WordPress?