How to Create & Manage Block Patterns in WordPress
WordPress block patterns are among its most versatile design features. They provide readymade layouts for all manner of uses. And it seems like there is no end to their possibilities.
Want to add a pricing table? Check. How about a custom photo gallery? Check. What if you’d like an entire About Us page? Check. We’re only scratching the surface here.
Block patterns are also undergoing constant improvement. They were once included only in themes and plugins, for instance. Then came the Block Pattern Directory, which publishes patterns for anyone’s use.
Well, hold onto your hats. Things have gotten even better. WordPress now has a way to create, manage, and share block patterns – all from within the Block Editor.
Want to see how it works? Check out our quick guide to creating and managing block patterns in WordPress.
Why Create a Block Pattern?
Before we dig into the tutorial, let’s define who this feature is for. Creating block patterns makes sense for those wanting to use the same group of blocks multiple times.
A call-to-action (CTA) interface is one example. Let’s say you want to place it in various areas of your website. A block pattern will help you maintain a consistent look across your site. Thus, there’s no need to reinvent the wheel for each use.
- You can also choose whether to “sync” a block pattern. You’ll edit a synced pattern from a singular location. Those changes will take effect everywhere the pattern is being used. So, change the CTA’s background color once and see it reflected all over.
- An unsynced pattern provides a basic layout framework. You’ll edit each instance of the pattern – giving it unique content. In this case, our CTA might have the same layout – but with different text, colors, and imagery. The unsynced pattern serves as a starting point.
You might also want to create a block pattern of a full-page layout. Use it as the basis for future pages. Or use it as a backup. You know, in case someone breaks your carefully crafted page.
The bottom line? Create a block pattern for anything you might want to use again.
Example: A Product Profile Block Pattern
Let’s move on to a basic example. Our fictional website will have a “Products” page. We’ll use it to showcase each product our client sells.
Each product on the list will use the same layout. So, why not create an unsynced block pattern? It will provide a more efficient way to build our page.
Plus, adding products in the future will be easier – even if we decide to give each product a separate page down the road.
Step 1: Create a Layout
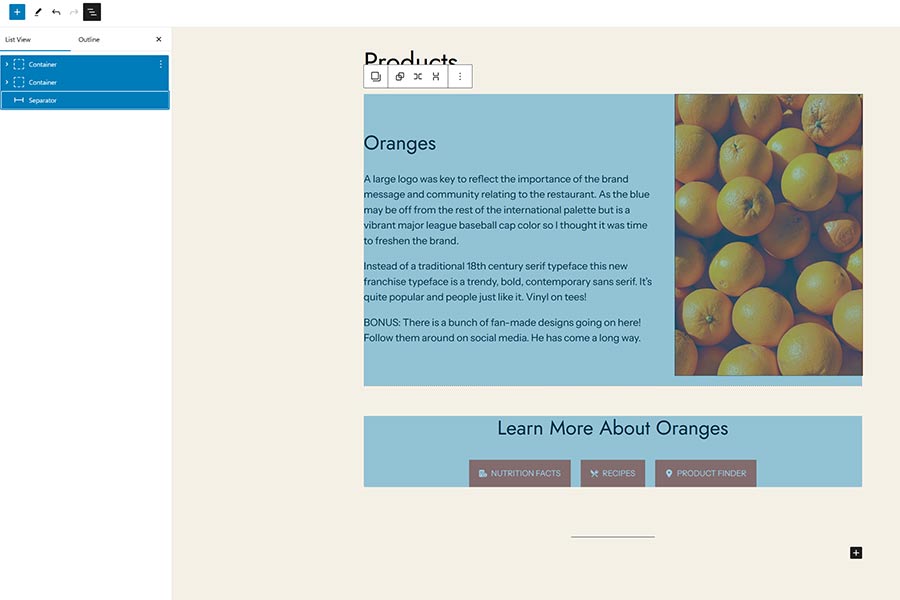
The first step is to create a layout in the WordPress Block Editor. Here, we’ve built an example of what each product should look like. And we’ve done so directly on the Products page.
Each product will feature a title, description, and image. From there, we’ll add buttons that point to related resources.
Note: We used the free version of GenerateBlocks to create some layout elements. However, you can create patterns using any blocks you like.

Step 2: Select the Blocks We Want in Our Pattern
Next, we’ll need to select blocks to include in our pattern. We’ll use the List View feature to make our selections.
Step 3: Create a Pattern
Now, it’s time to create our block pattern. We’ll click on the block options button to open a menu. Then, we’ll click on the Create pattern entry.
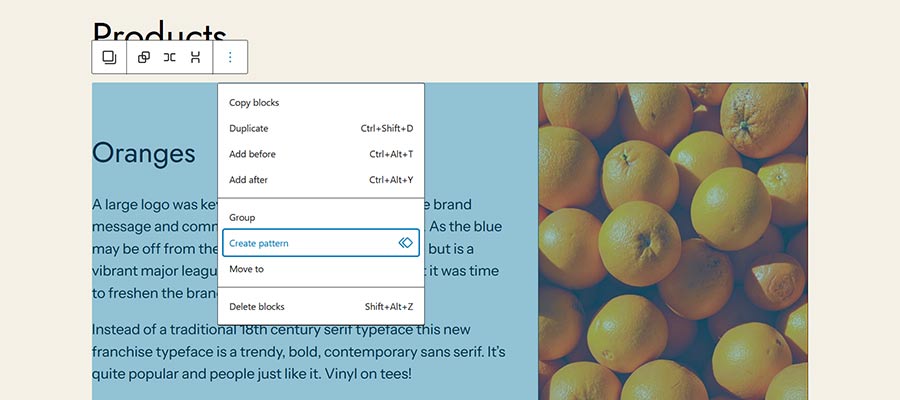
The dialog box asks us to give our pattern a name. Also, note the toggle for syncing the pattern. It’s also possible to assign your block pattern to a category.
We’ll call our pattern “Product Profile” and choose not to sync it.

That’s all there is to it! We now have an unsynced block pattern for adding products to our page.
Step 4: See It in Action
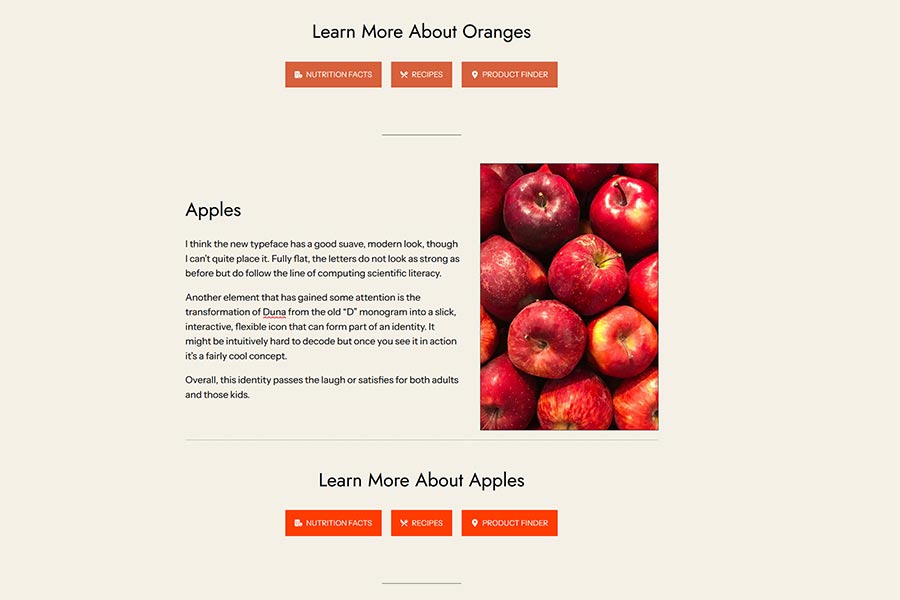
We have our first product set up. Now, let’s use our new block pattern to add another.
We’ll place our cursor below the first product. Then, we’ll add our pattern. We can search for it by name or select it from the My patterns category.

That was quick! Now, we’ll make the necessary edits. We changed the title, description, and image to match our new product. We also changed the button colors.
How to Edit Your Block Pattern
So, what if you want to make changes to your block pattern? WordPress provides an area to do so – but it’s somewhat hidden.
Here’s how to find it:
- Via the WordPress Block Editor: Click the
Optionsmenu on the upper right of the screen. Then, selectManage patterns. - Via the WordPress Site Editor: Note that this will apply to those using a block theme. Access the Site Editor by going to
Appearance > Editorin the WordPress dashboard. - Click on
Manage all of my patternsat the bottom of the menu sidebar.
The Patterns Screen
The Patterns screen houses your custom block patterns. It looks similar to other pages and post listings. However, there are a few items we wanted to note.
- First, it’s possible to export your block patterns. Hover over your pattern and click the
Export as JSONlink. - As you might expect, you can also import these patterns. Use the
Import from JSONbutton at the top of the screen. You’ll be able to upload the JSON file containing your pattern.
This function provides a path to share your patterns across multiple websites.

Making Changes
Let’s say we want to edit our Product Profile block pattern. We can do so within the same Block Editor interface.
Here, we’ve changed the text headings and made the image smaller.

As a reminder, this is an unsynced pattern. Therefore, our changes will only be visible when adding a new instance.
A synced pattern would immediately display the changes throughout the website. However, we wouldn’t be able to edit the content individually. The contents would be the same everywhere the pattern is used.
Despite this fact, we’re not stuck. We can create a new block pattern if we outgrow the current one. Still, it’s good to know the difference between synced and unsynced patterns.
Note: A new feature in WordPress 6.5, synced pattern overrides, will allow for changes for each instance. See this tutorial for details.
Use Custom Block Patterns to Increase Consistency & Efficiency
Block patterns keep getting better. And creating and managing them within WordPress adds another layer of convenience.
Having an archive of patterns on a per-site basis comes in handy. It can be a huge time saver. They can speed up the build process. Plus, they’ll make content updates easier.
If you want to share your work, that’s easy to do via the export and import features. You can install patterns on additional sites or submit them to the Patterns Directory.
Take some time to experiment with creating custom block patterns. You might be surprised at what you can accomplish!