How To Easily Build And Support Tables In Figma
The table is one of the most painful components designers have to deal with in their daily design lives. The table element is often a complex combination of text components, lines, rectangles, icons, and more. It soon may become a nightmare to work with, especially if you also want to support different screen resolutions, change the order of columns, and use real-life content.
In my projects, approximately half of the user interface designs I am working on are tables. This is why in this article, I’d like to share my approach to managing tables in Figma in an easier, more streamlined way.
I’m not a fan of long reads with too many unnecessary details, so I’ll “jump” into the subject right away. My guide consists of several parts; thus, you can stop reading at any point when you understand that what you have learned so far covers your needs at the moment, and you can go back/or jump forward to any section when you want to refresh your memory or learn about the more complex workflows. Let’s go!
Table of Contents
- Cells and Table Structure
- Real Data and Column Size Corrections
- Responsive Tables
- Basic Table Kit and States
- Figma Design file
- Conclusion
Note: This article is aimed at people with some experience using Figma Design. If you are an absolute beginner in the Figma field, I would suggest first checking some basic Figma tutorials. To make things easier for you, near the end of the article (check Figma Design File section), I have provided my Figma Design which you can use for deconstruction and learning purposes.
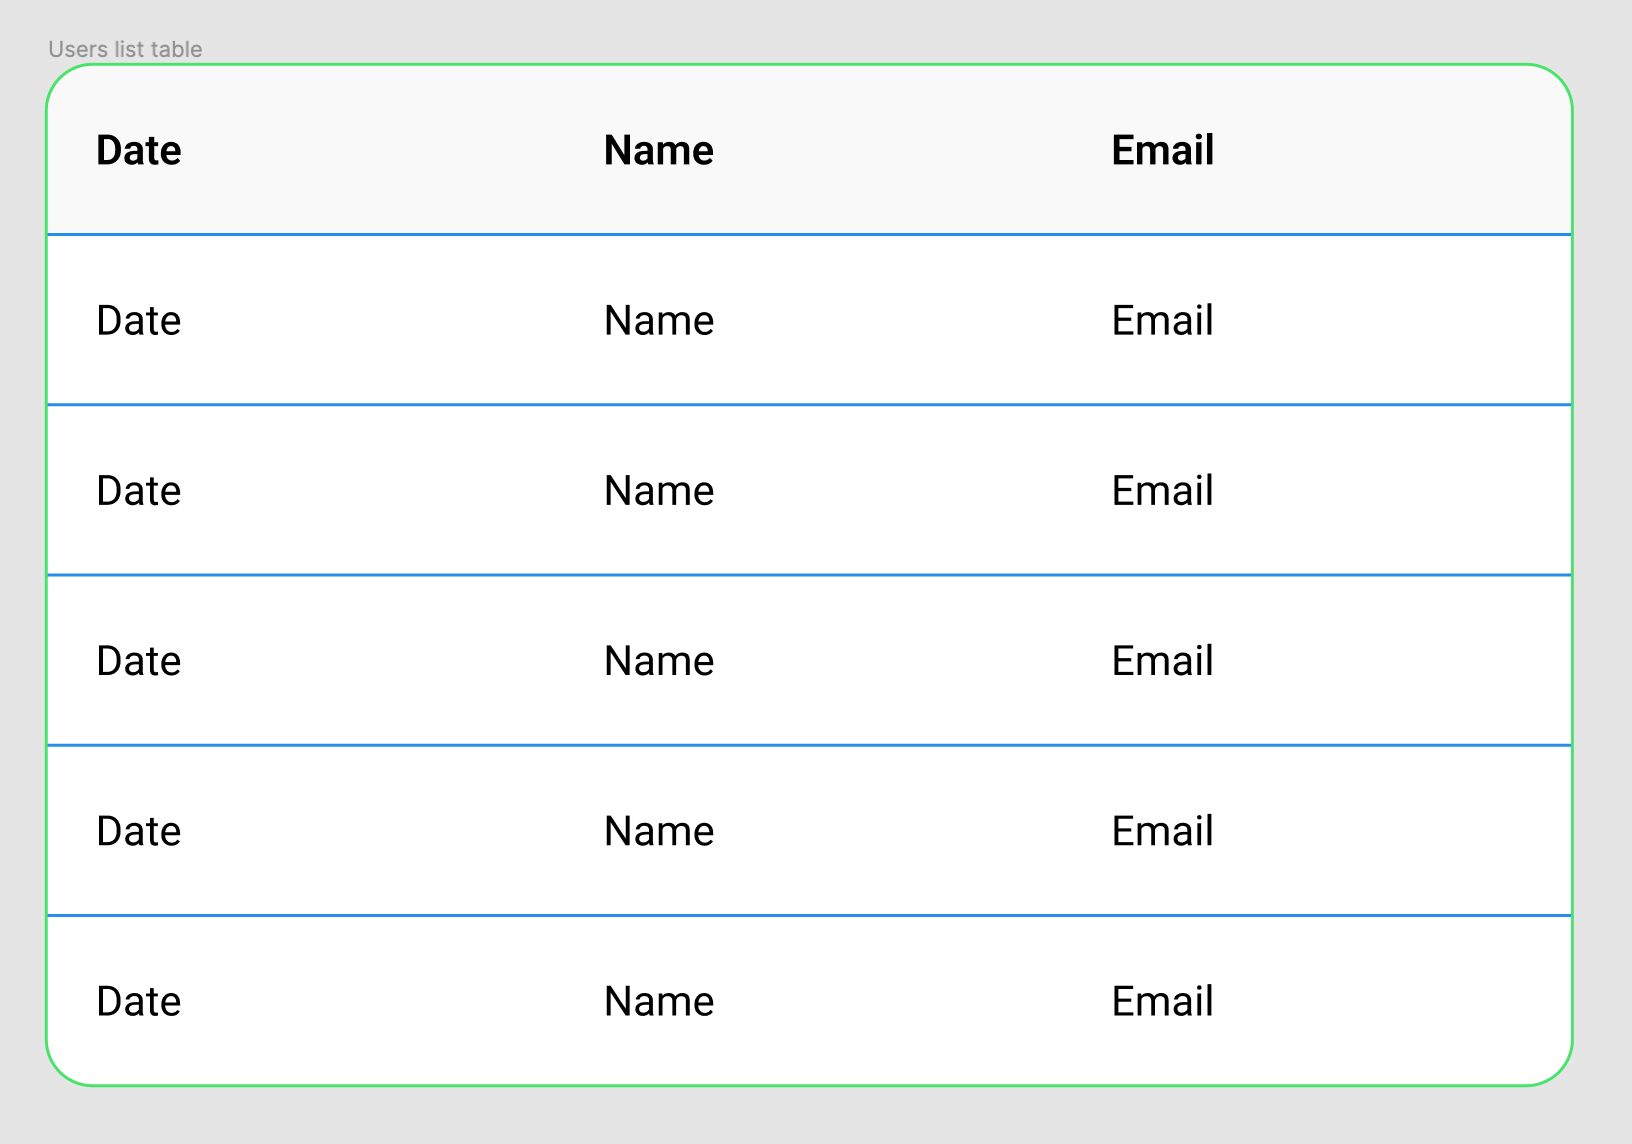
Cells And Table StructureI often use the Ant Design System in my projects. Let’s take their table components as an example.
To start, we need to make only two simple components in Figma:
- a head cell,
- a row cell.
Use Left and Center in Constraints to align the text.

Aside on keyboard shortcuts:
Ctrl/Cmd — Win/Mac
Alt/Option — Win/Mac
Shift — Win and Mac
Figma is a tool that works on both Windows and Mac. For example, the following keyboard shortcut combo Ctrl/Cmd + D means, “Press Ctrl + D on Windows, or press Cmd + D on Mac.”
Then we need to copy the components for our future table:
- hold Alt/Option + Shift + left mouse button for copying
- and Ctrl/Cmd + D to repeat the last action in Figma.

How to create the table lines? Start here:
- press and hold Alt/Option + Shift + mouse left for copying,
- and Ctrl/Cmd+ D to repeat the last action in Figma.
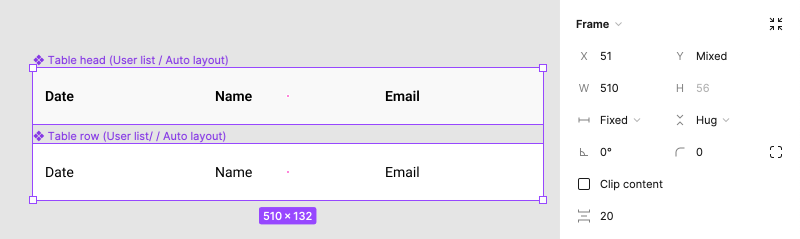
How did I do it? Here are the steps:
- group the table row elements into a single frame;
- set corners’ radius to 15
px; - set outline stroke to 1
px,#49E36B; - set frame fill color to
#278EEE.

To help you better imagine how it works, here is a quick illustration that I made:
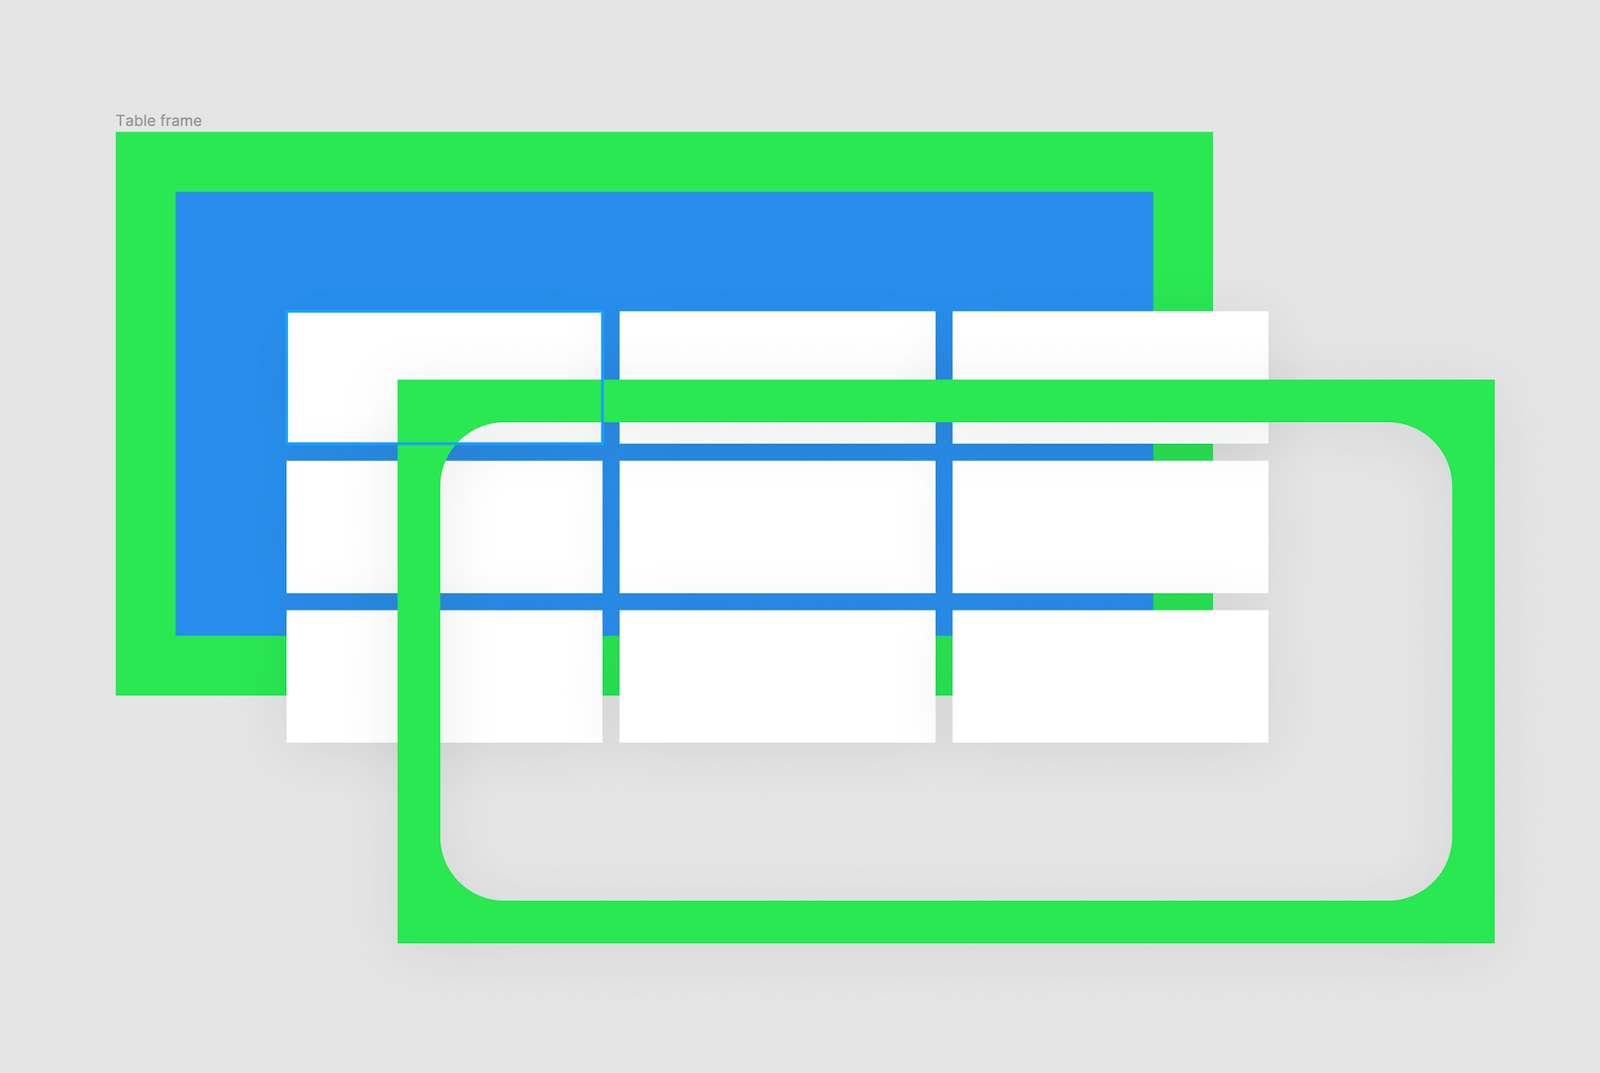
The frame is for coloring the table lines between the rows and the table stroke (the outside table border). And you will need to add “crop frame content” and “corner radius” to shape the table.
If you add “Auto layout,” it would work like this:

As a result, you would get this behavior. Hold Shift and double-click to highlight it, then resize the column.

For fixed-size cells, we apply Fixed horizontally:

For the responsive cells, we need to set Fill horizontally:

Then we turn this table into a Frame, and every row inside the Frame should have horizontal Constraints set as Left and right:

Voilà, we’re fully responsive now!

The kit structure:
- icons we use in the table,
- basic header states,
- basic cell states.
Icons
Using any icon library, you can have a few hundred icons. As a result, this can push you to inconsistency (using different icons for the same goals, for example), especially if you have more than one designer on your team. Table icons as a separate library will help you manage and support consistency on big projects.
Combinations
There are a few main combinations we have:
- just text in a cell,
- just an icon or a set of icons in a cell,
- a variety of text, icons, and other objects (checkbox, toggle, action, select, and so on) in a different order within a cell.
Avoid hidden layers! You will know that you used them while building a design system, and you will certainly forget about them later. In addition, people who will use your design system may not know about these hidden layers at all.
You will have an idea of how to create them based on the illustration above (Building a basic table kit), but I’ll specify a few more complex components for beginner designers.

And we use Auto layout with the following parameters in the second component example:

So, remember the table that we built using only two components? It’s time to update it!

Also, you can use “Figma Properties” to make it compact. All the instructions you can find in the following tutorial video created by the Figma team during Figma Config 2022: “Jumping into component properties.”

It’s only one example of how I structured the basic table kit in this article. You can use a similar workflow or create your own. In my projects, kits are much more complex, so I’ll leave this choice to you.
Figma Design File
I have prepared a Figma Design file that may help you go through some of the steps of my tutorial. If you have questions or need help, do post your questions in the comments section at the end of the article.

The way I am working with tables in Figma is not as black and white. The approach mainly depends on the product you’re designing and, of course, there are a few possible ways you could achieve the same goals.
Here are a few general recommendations I can make from my own practice:
- Keeping the line components on the design system side provides a chance to update tables for the whole project from one place. But every time you want to make an update, you will need to publish changes on the design system-level.
- If you keep tasks in different documents, don’t forget to disconnect that file from the design system. This would help avoid uncontrolled updates that you will miss.
- At first, using resizable components seems too tempting… until you need to begin supporting different styles in every size. If you have tables with varying line heights, it’s better to create individual components for each one of them.
- There is an approach that consists of using as few components as possible. But most of the time, you don’t look at your components — instead, you use “variants” to switch between them. So, it’s better to have enough separate components and, as a result, “variants” than to use hidden layers, the “Auto layout” option, and components inside other components that would be hard to manage later on.
- Check that all table cells support at least two lines of text. You can use 16
pxline spacing to make it happen. - I recommend using the minimum width for parent components (minimum width for each column). But these default minimum sizes have to be discussed with the front-end developers as they may sometimes have their own limitations. Therefore you need to ensure that everything in the design can be implemented in the later development stages.
- Create a color palette in your Design System for the tables, so you would be able to control all the colors from one place. Of course, you can use shared colors from the palette, but once you need to change text color in the tables, background, or something else, you will get into trouble.
- Create different text styles for the tables. For example, we use smaller line spacing in tables than in news feeds or articles. Having separate text settings would help you avoid future conflicts.
Thank you for following me along! As I already said, tables are a complex component, and I can talk about this topic for days. But maybe better to stop here and give you a chance to try this approach for yourself. Then, if you have questions, I’d be happy to reply and help! Or I could write another article: “Working With Tables in Figma: The Pro Level.” ;-)
Further Reading
I have collected a few links to resources (tutorials, plugins, discussions, etc.) related to working with tables in Figma:
- “Creating Tables In Figma,” Sasha Belichenko
A guide about one possible way of working with tables in Figma: how to create a table using components and Atomic Design methodology, and then how to integrate the table into your design system. - “Create a Figma Prototype with Data from Google Sheets,” Bryan Elkus
The article covers in detail a plugin for Figma called Google Sheets Sync. It allows a user to pull in content directly from Google Sheets which is super-useful if you want to use this to populate your designs with more realistic data. - “Creating Tables in Figma with Auto Layout”, Gavin McFarland
In this tutorial, Gavin explains how to modify tables in Figma which are completely fluid (with the Auto Layout feature). You can inspect the components in Figma Design to see how they were created.
Tweets
I spend my whole Figma life designing tables. I imagine other designers too. @figma can you please give us more features, like draggable horizontal rows AND vertical columns? Moving data around should be super easy, like Google Sheets.
— Joshua Sortino (@sortino) April 11, 2022
I have a love/hate relationship with tables, so here's how I set up my design system to make things easier. Rows vs. columns, cell variants, and a "module" component with a variable toolbar and variable pagination.https://t.co/0MbCROJAmp pic.twitter.com/xztjdwoVeL
— Jon Moore (@TheJMoore) April 12, 2022
We hear tables in @figma are hard, and we agree.
— Vincent van der Meulen (@vincentmvdm) April 11, 2022
Here's how we leveraged our internal design tools to create a more seamless workflow for designers across the @DesigningUber team ➡️ pic.twitter.com/R8PwiYdebK
A short Twitter thread on this topic, also mentioning the Configurator plugin that Vincent’s team made.
I found a pretty reliable way to create flexible, responsive custom tables in Figma. I’ll do a video walkthrough at some point, but if you want to play… https://t.co/cibZI3Uk4g
— Buzz Usborne (@buzzusborne) April 6, 2022
Did I make a full video about building tables in Figma? Yes. Do I regret going down this rabbit hole? Also yes. 📺🕳️ https://t.co/JCyLxEBktG
— Buzz Usborne (@buzzusborne) April 13, 2022
Tips time!
— luis. (@disco_lu) May 30, 2022
Using component props, we can create "infinite tables"
So we can toggle on however many columns / rows we need in designs
This prevents us maintaining large variant sets for every permutation of table 🍽
Community file to play with: https://t.co/WqNM5SMjSE pic.twitter.com/yhefqrNImC
Note: This technique is interesting if you have just a few tables in the product design. Otherwise it would be a problem to scale the system.
As you can see, dealing with tables is a “hot topic” 🔥 in the Figma design community! I hope that you could find something useful here, too.