How to Crop an Image in Keynote
Want to step up your Keynote presentation game with some tailored imagery? Cropping images directly in Keynote is an excellent way to focus on the important parts of a picture and keep your audience’s attention exactly where you want it. If you’re unsure about how to go about this, you’re in the right place!
Whether you’re a Keynote newcomer or a seasoned pro, this guide will ensure you master the art of cropping images within your presentations. We’ll break down the process into simple, easy-to-follow steps.
Are you ready to polish your Keynote presentations with precision-cropped images? Let’s delve into the world of image editing within Keynote together, and by the end, your presentations will have a whole new level of professionalism and appeal!
Understanding Image Cropping
Cropping an image means to remove unwanted outer areas from the picture. This can help emphasize the important part of the image, improve composition, or help the image fit better into your slide design. In Keynote, you can crop images to any shape, and even add a mask to focus on a particular area.
How to Crop an Image in Keynote
Here’s a step-by-step guide on how to crop an image in Keynote:
- Open your Keynote presentation and navigate to the slide with the image you want to crop.
- Click on the image to select it.
- Once the image is selected, you’ll see ‘Image’ appear in the top right of your screen. Click on it to bring up the image editing options.
- Click on ‘Mask with Shape’, then choose ‘Rectangular Mask’.
- You’ll now see a box on your image, which you can adjust to select the area of the image you want to keep. Click and drag the corners or edges of the box to crop your image.
- Once you’re happy with the crop, click ‘Done’.
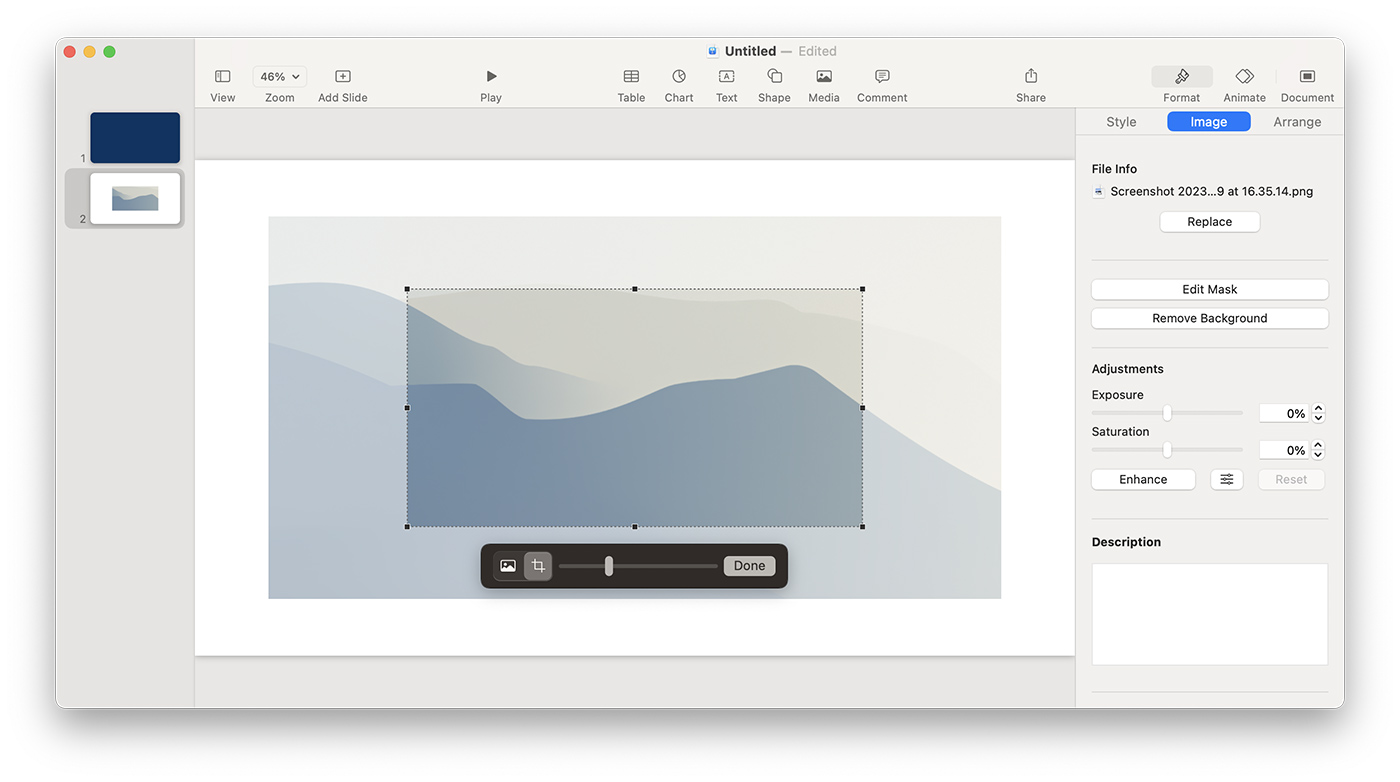
Note: You can always adjust the crop later by selecting the image and clicking ‘Edit Mask’.
Tips for Cropping Images in Keynote
While cropping images in Keynote is quite straightforward, here are a few tips to help you get the most out of this feature:
- Use Shape Masks: Keynote allows you to crop your image into various shapes, such as circles or stars. This can be a creative way to display your images and add visual interest to your slides.
- Focus on Important Areas: Use cropping to highlight the most important part of your image. This can help draw your audience’s attention to the key point you’re trying to make.
- Consistency is Key: Try to maintain consistent image sizes and shapes throughout your presentation. This can make your slides look more professional and cohesive.
Conclusion
Cropping images in Keynote is a simple but effective way to customize your presentation and make your slides more engaging.
Whether you’re removing unnecessary background details or highlighting a key point, the ability to crop images can be a valuable tool in your presentation-making toolkit. With this guide, you should now be able to crop images in Keynote with ease. Happy presenting!