Billing Management For Your Next SaaS Idea Using Stripe And Azure Functions
To follow the steps in this tutorial, you should have the following:
- a Stripe account (you can create one for free and use the test mode to avoid incurring any charges while following the steps in this article);
- a basic understanding of JavaScript and React;
- an Auth0 account (you can sign up for a free one).
Delivering a solution to users through software as a service (Saas) often entails making use of cloud providers to host and deliver your entire infrastructure, usually comprising a back end and a front-end client. To offset the charges incurred from your cloud providers, a proper billing model for your users is needed in certain cases. In other scenarios, you might have products or services that you want to sell.
The two applications in the aforementioned scenarios share a functional requirement, which is the ability to process the user’s payment. To achieve this, the developer could leverage an external payment infrastructure, such as Stripe, Square, or Amazon Pay, among many others.
In this article, we’ll look at Stripe and use its REST API through Stripe’s Node.js package to build an API layer comprising Azure Functions apps that can be executed by an HTTP trigger from a web, mobile, or desktop client. The API layer and the endpoints accessible through each of the functions are depicted in the diagram below.
Note: An Azure Functions app is an individual serverless function deployed and managed using the Azure Functions service. As depicted in the diagram below, a single project can comprise several Azure Functions apps.

After building the API, we will clone an existing web application, built using React to display art paintings for sale. The APIs above will be used to retrieve the paintings as individual products, and the other endpoints will be used to handle payments.
Note: While this article makes use of Azure Functions as a provider of serverless functions, you can reuse the logic in your preferred provider, such as AWS’ Lambda or Google’s Cloud Functions.
Stripe ObjectsBefore going further, we should understand the Stripe objects that we’ll be creating in this article and what they represent. Below is a list of the five objects we will be working with:
subscription
Asubscriptionobject is created to charge users at intervals specified by thebilling_periodin thepriceobject attached to the product. In this tutorial, we will have a product with a recurring price type, and we will subscribe users to it using thesubscriptionobject.product
Aproductobject is used to represent a single item or service being sold, and the price of the product is stored in thepriceobject. In this article, we will create a product using Stripe’s admin dashboard, then retrieve it through the Stripe API.price
Thepriceobject is used to hold the price-related details of a product, such as currency, price, and billing cycle. In this article, we will again create thepriceobject using Stripe’s admin dashboard, then retrieve it through the Stripe API.payment method
Apayment_methodobject on Stripe is used to hold a customer’s payment details. In this tutorial, we will create a payment method on each transaction and use it together with apayment_intentobject.payment intent
Apayment_intentobject is created to track the payment for a product from when it was created to when the payment is finally received. Eachpayment_intentobject contains astatusfield to record the stage at which the payment is. In this article, we will use apayment_intentwhen a user purchases a product with a one-time pricing type.
The first step to using Stripe is to create an account with your email address and a password, using Stripe’s online dashboard.
Creating a Stripe account will launch the new business in test mode. We can liken test mode to your local development mode, because it allows you to create Stripe objects and test them using test credit cards provided by Stripe, without incurring charges.
As shown in the Stripe dashboard for the sample application below, you can fill in an account name and other details to customize your service.

The image above shows the dashboard for our newly created account. Note the highlighted box in the image above, because the section contains the keys that you would use when programmatically working with the Stripe account either through the API or a supported client library.
Note: Store the secret key in a secure notepad, because we will be using them when working with Stripe through a Node.js package from an Azure function in the next section.
Creating Sample Products on StripeTo create a product object in Stripe, we can either use the REST API or Stripe’s web admin dashboard. In our case, the application’s owner is the sole manager of the products being sold; hence, we will use Stripe’s admin dashboard to create some sample products to be displayed in the demo application.
Note: When using Stripe’s Node.js package, the product method is used to perform CRUD operations on a product object.
Using the top navigation bar in the Stripe dashboard’s home page, click the “Products” tab to navigate to the “Products” page. On the “Products” page, click the “Create Product” button at the top to create your first product in this Stripe business account.
On the page for creating a product, write “Gallery Subscription” in the “Name” input field. Write some brief text in the “Description” input field, to be used as the product information. And put “150” in the “Price” input field, to be used as the price of the new product, as shown below.
Note: You can also click the “Image” box on the “Create Product” page to pick an image from your device to use as the image of the product.
The image below shows the input fields on the “Create Product” page for the sample product we’re creating.

From the image above, we can see that the “Recurring” option in the “Pricing details” is selected. This means that when a user is subscribed to this product, Stripe will automatically attempt to renew the subscription for the product at the end of the “billing period” specified in the “Pricing details” secton shown above. Click the “Save Product” button to save and continue.
After saving the product, you will be redirected back to the “Products” page. Click the “Create Product” button again to create a product, specifying different information for the “Name”, “Description”, and “Pricing details”. This time, select the “One time” box in the “Pricing details” to enable a user to purchase this item once without being charged again for it.
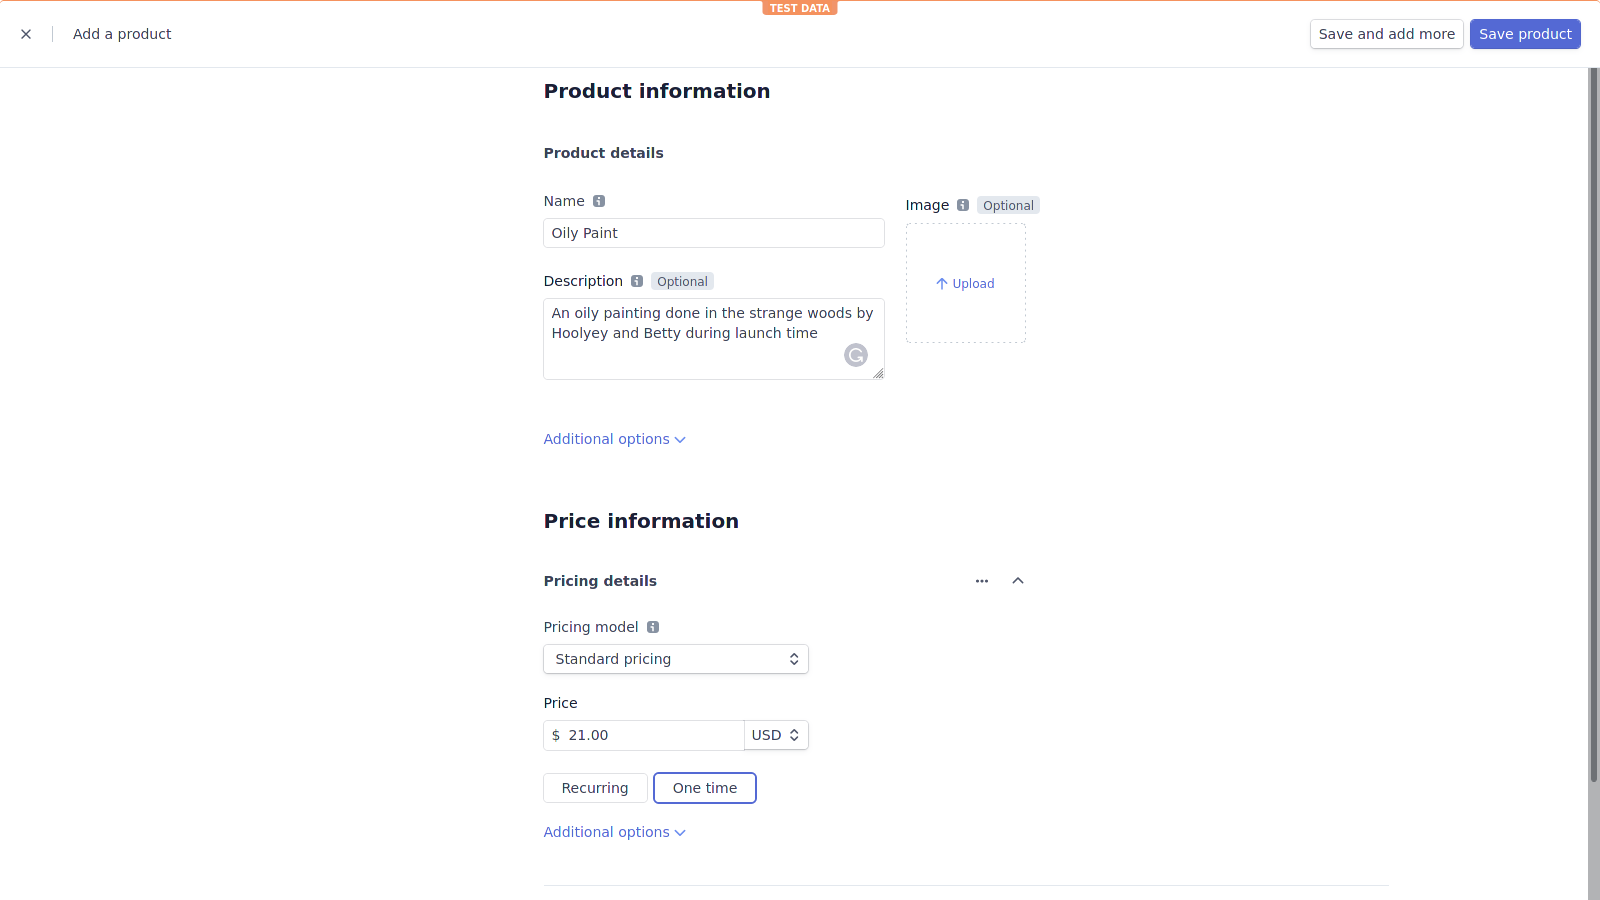
The image above shows a new product being created with a “one-time” price type. Notice that the “Billing period” dropdown menu is removed when the “One time” option is selected, unlike the first product that we created with a “Recurring” pricing type.
Note: You can continue to create more products with different names, descriptions, and pricing details, to populate the products in your Stripe business account.
Creating Azure FunctionsAzure Functions are functions provided by Azure for managing serverless event-driven code that can be executed through a defined event trigger. All Azure functions that we’ll create in this article will use the HTTP trigger, which enables a function to be triggered by making an HTTP request to the function’s URL endpoint.
All programmatic operations with Stripe in this article will be done using Stripe’s npm library for a Node.js environment. Serverless functions are used in this article to cover use cases for small applications, using a JAMstack architecture without a back-end service.
Azure functions can be developed either through the Azure portal or locally on your computer. All Azure functions in this article will be developed and executed locally using Azure’s Core Tools command-line interface (CLI). Execute the command below to install Azure’s Core Tools globally on your computer using npm.
npm i -g azure-functions-core-tools@3 --unsafe-perm trueNext, run the commands below to create a new project directory to store the Azure Functions files and to bootstrap the Azure Functions project using the Core Tools CLI.
# Create a new directory
mkdir stripe-serverless-api

# Change into new directory
cd stripe-serverless-api

# Bootstrap Azure Functions project
func new --language='javascript' --worker-runtime='node' --template="HTTP trigger"
--name="products"
The commands above will create a stripe-serverless-api project directory on your computer. Also, using the parameters passed to the Core Tools CLI, we created an Azure Functions app with an HTTP trigger template using a Node.js runtime with JavaScript.
We can start our new Azure function from the CLI to listen to HTTP requests through localhost on port 5050.
Note: When using the HTTP trigger for an Azure Functions app, the function can be invoked via the function app’s name appended to the endpoint. An example of the products function app created above is <FUNCTIONS_ENDPOINT>/products.
func start -p 5050Before we begin implementing the Azure functions, let’s install the two dependencies below, to be used within the Azure functions.
yarn add stripe dotenvStripe’s Node.js package, installed above, will be used to interact with the Stripe API. And dotenv will be used to load Stripe’s secret credentials, used in the Azure functions that will be created next.
Create a .env file to store the Stripe credentials copied from the Stripe dashboard in the format below, replacing the placeholder in angled brackets with the appropriate value.
// .env

STRIPE_SECRET_KEY=<STRIPE_SECRET_KEY>
The Stripe credentials stored above will be used to authenticate the Stripe package with the Stripe API. These credentials are sensitive and should be privately stored. To prevent them from getting pushed when the entire project is pushed to a GitHub repository, create a .gitignore file and add the .env file name.
// .gitignore
.env
At this point, the Azure Functions project is fully set up, and we can now proceed to build the individual apps within the project. We will proceed with implementing the logic in the Azure Functions apps, starting with the products function app.
Products Function
The purpose of this Azure function is to accept a GET HTTP request, and then respond with JSON data containing all products in the Stripe account.
Using your code editor, open the index.js file in the products directory that was made when you created the Azure Functions project. Add the code block below to the index.js file to retrieve all products created in Stripe.
require("dotenv").config();

const stripe = require("stripe")(process.env.STRIPE_SECRET_KEY);
const headers = {
  "Access-Control-Allow-Methods": "*",
  "Access-Control-Allow-Origin": "*",
  "Access-Control-Allow-Headers": "Content-Type",
  "Content-Type": "application/json",
};

module.exports = async function (context, req) {
  try {
    const { data } = await stripe.products.list({});
    context.res = {
      headers,
      body: {
        data,
      },
    };
  } catch (e) {
    context.res = {
      headers,
      body: e,
    };
  }
};
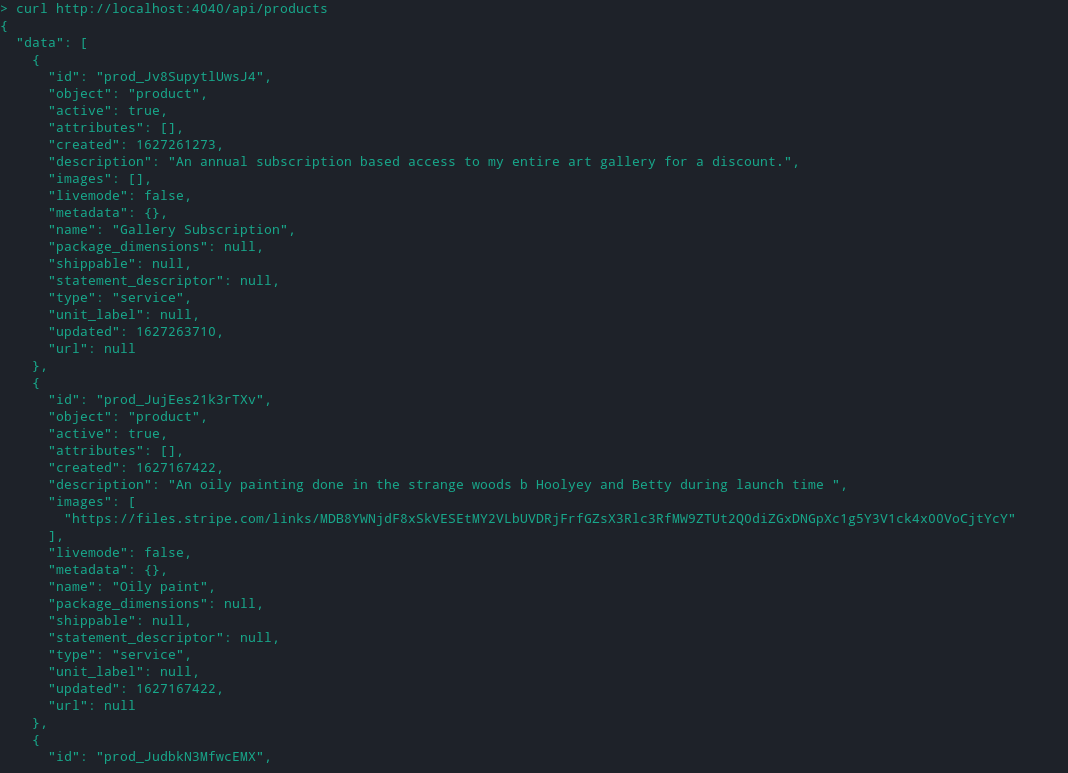
The exported function in the code block above uses the list method to list all products created in the account belonging to the STRIPE_SECRET_KEY variable being used.
Once the promise from the asynchronous list method is resolved, the data array is destructured and sent back (alongside some request headers) as the response to the request, by setting the body within the context object.
To test the function implemented above, open a new CLI and execute the command below, which makes a GET HTTP request, using cURL, to the Azure functions running in a separate terminal.
curl http://localhost:4040/api/customerAfter executing the command above, a JSON response will be returned to your console containing the previously created products.
Price Function
As shown in the fields returned from the products function above, the price details of a product are not included in the product object. To get the price details of a product, we need to fetch the price object associated with the product. This will be the job of the price function, because each time it is executed, it will return the price object associated with a product.
To create a new Azure Functions app, copy the the existing products folder, and paste it in the same directory as a duplicate. Then, rename the duplicated folder to price.
Using your code editor, open the index.js file in the new price directory, and replace the existing function with the contents of the code block below, which implements the price function:
require("dotenv").config();

const stripe = require("stripe")(process.env.STRIPE_SECRET_KEY);
const headers = {
  "Access-Control-Allow-Methods": "*",
  "Access-Control-Allow-Origin": "*",
  "Access-Control-Allow-Headers": "Content-Type",
  "Content-Type": "application/json",
};

module.exports = async function (context, req) {
  const { product } = req.query;

  try {
    const { data } = await stripe.prices.list({
      product,
    });
    context.res = {
      headers,
      body: {
        data : data[0],
      },
    };
  } catch (e) {
    context.res = {
      headers,
      body: e,
    };
  }
};
The price function app above accepts a GET HTTP request that contains a product in the query parameter with the value of a product’s ID. The list method on the price object is used to retrieve prices within a Stripe account. The product parameter passed to the list method restricts the prices retrieved to the ones associated with the product object whose ID has been passed to the list method.
Once the promise from the list method is resolved, the data array from the list method is destructured, and only the first object within the data array is sent back as the request response.
Note: Only the first object from the data array is sent back because we want to display only one price entity. A product may have several price objects attached it, but for this application, we will use only one.
To test the function implemented above, execute the command below, which sends a GET HTTP request containing a product ID in a request parameter to the Azure functions running in a separate terminal.
Note: You can find the ID of a product in the Stripe dashboard. Navigate to the “Products” page, and click a product to view its details. In the details displayed, you will find the ID of the product.
curl http://localhost:4040/api/price?product="prod_JudY3VFuma4zj7"Once you execute the command above, a JSON response will be returned to your console with an object containing the price object of a product.
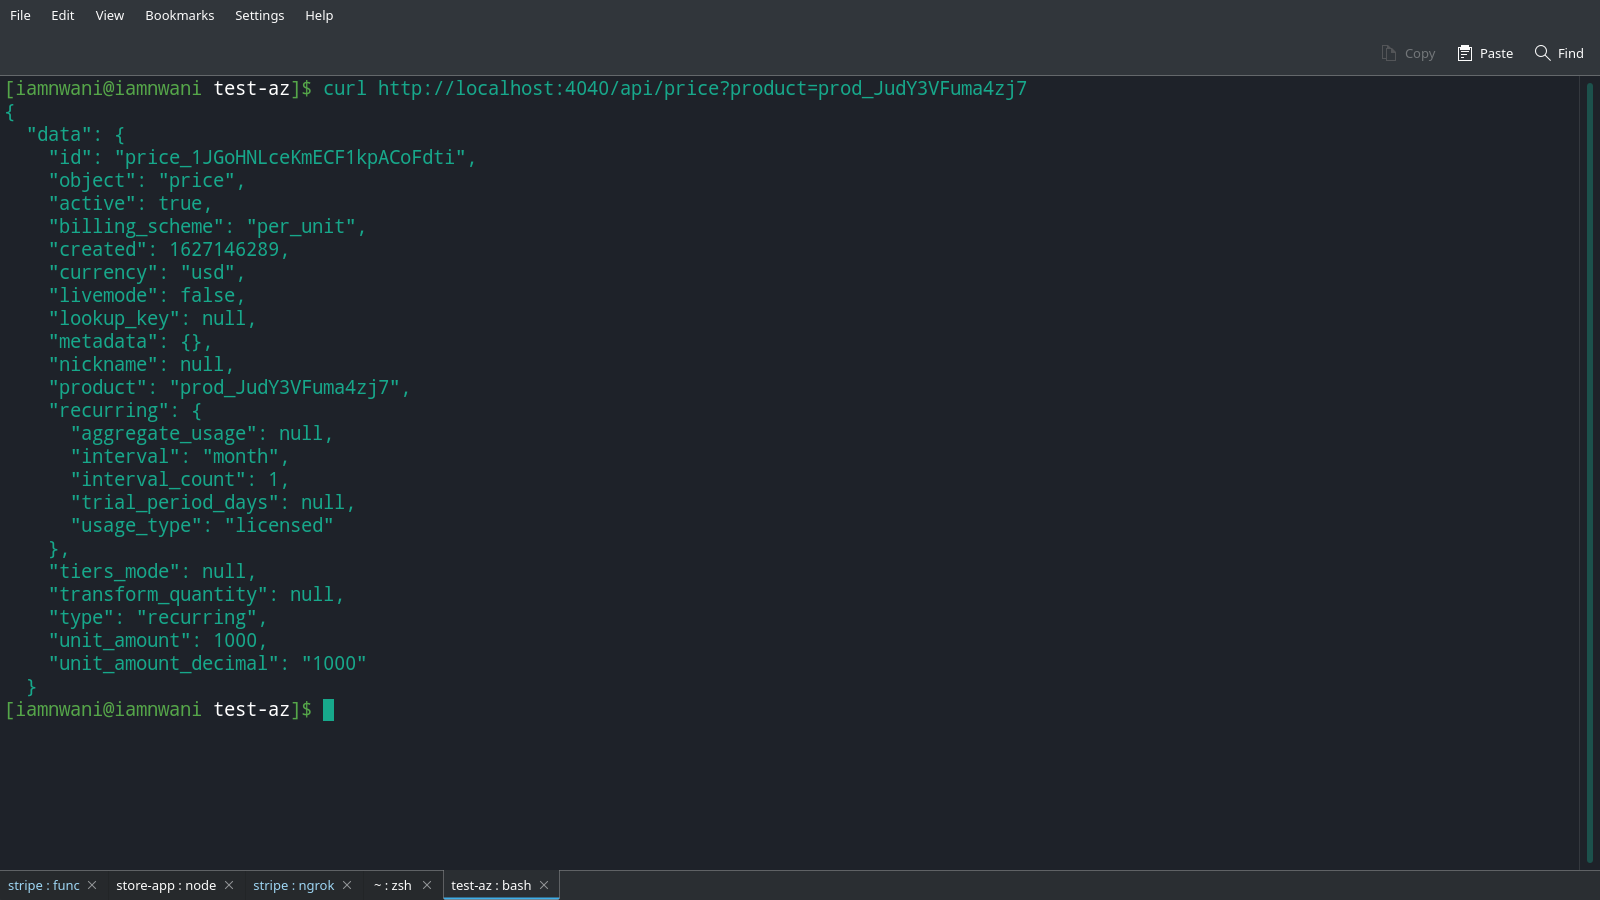
From the response shown in the sample above, we can see the price details of the product, including the currency, type, and recurring data.
Purchase Function
The purchase function app will be used either to make a one-time purchase of a product or to subscribe a user to a product. Either of these two operations involves charging a user via their bank card.
To create a new function app within the Azure Functions project, copy either the existing products or the price folder, and paste it in the same directory as a duplicate. Then, rename the duplicated folder to purchase.
In your code editor, add the contents of the code block below in the index.js file, which will handle a POST request to create either a subscription or a one-time purchase for a user.
// ./purchase/index.js
require("dotenv").config();

const stripe = require("stripe")(process.env.STRIPE_SECRET_KEY);
const headers = {
  "Access-Control-Allow-Methods": "*",
  "Access-Control-Allow-Origin": "*",
  "Access-Control-Allow-Headers": "Content-Type",
  "Content-Type": "application/json",
};

module.exports = async function (context, req) {
  const {
    number,
    purchaseCurrency,
    cvc,
    exp_month,
    exp_year,
    purchaseAmount,
    email,
    purchaseType,
    priceEntityId,
  } = req.body;

  try {
    // Create a payment method for user using the card details
    const { id: paymentID } = await stripe.paymentMethods.create({
      type: "card",
      card: {
        number,
        cvc,
        exp_year,
        exp_month,
      },
    });

    const { id: customerID } = await stripe.customers.create({
      email,
      description: "Artwork gallery customer",
      payment_method: paymentID,
    });

    await stripe.paymentMethods.attach(paymentID, { customer: customerID });
    if (purchaseType === "recurring") {
      const subscriptionData = await stripe.subscriptions.create({
        customer: customerID,
        default_payment_method: paymentID,
        items: [
          {
            price: priceEntityId,
          },
        ],
      });
      context.res = {
        headers,
        body: {
          message: "SUBSCRIPTION CREATED",
          userStripeId: customerID,
          userSubscriptionId: subscriptionData.id,
        },
      };
    } else {
      const { id: paymentIntentId } = await stripe.paymentIntents.create({
        amount: purchaseAmount,
        currency: purchaseCurrency || "usd",
        customer: customerID,
        payment_method: paymentID,
      });
      const { amount_received } = await stripe.paymentIntents.confirm(
        paymentIntentId,
        {
          payment_method: paymentID,
        }
      );
      context.res = {
        headers,
        body: {
          message: `PAYMENT OF ${amount_received} RECIEVED`,
        },
      };
    }
  } catch (e) {
    context.res = {
      status: 500,
      body: e,
    };
  }
};
The function app in the code block above uses the Stripe package to create either a one-time payment or a subscription for a user based on the purchaseType value gotten from the request body. Here is a run down of what happened above:
- First, a
payment_methodentity is created using the credit card number, name, CVC, and expiration details, destructured from the data sent in the function’s request body. - Next, a customer is created in Stripe using the
emailvalue sent in the request body, a description, and the payment method previously created. Thecustomerobject is also attached to thepayment_methodentity by using theattachmethod and specifying thepayment_methodID string that was returned when the payment method was created, and specifying acustomeroption with the customer ID that was returned when thecustomerentity was created. - The last part of the function handler has an
ifcondition that evaluates thepurchaseTypevalue sent in the request body. If thepurchaseTypevalue is recurring, then thesubscriptionentity would contain the customer ID returned from thecustomerentity, adefault_payment_methodwith the value of thepayment_methodID returned from thepaymententity, and anitemsarray with a singleitemobject containing the ID of apriceentity.
A web application built using React will serve as the web client that directly accesses the Azure Functions apps that we’ve built up to now. As explained earlier, the interface has already been built, and the data has been retrieved from a mock JSON file. We will only make some minimal changes and add the HTTP requests to use the Azure Functions endpoint.
Clone the web application from the GitHub repository by executing the Git command below from your local CLI:
git clone https://github.com/vickywane/stripe-art-app.gitNext, move into the cloned application’s directory and install the dependencies listed in the package.json file.
# change directory
cd stripe-art-app

# install dependencies
yarn install
Once the dependencies have been installed, run the yarn start command from your CLI to view the home page of the web application from your web browser at http://localhost:3000.
Before diving into the code base of the web application, let’s note a few things about the existing structure of the application.
First, user management, including authentication and the storing of a user’s personal data from the application, was implemented using Auth0 through the use of the auth0-react SDK for React applications.
To use Auth0 in the cloned application, we need to supply the credentials from an Auth0 single-page application type in the .env file within the web application folder in the format shown below.
Note: See the Auth0 quickstart guide for more details on how to get started with a single-page application.
# ./env

REACT_APP_AUTHO_DOMAIN=<AUTH0_DOMAIN>
REACT_APP_AUTHO_SECRET_KEY=<AUTH0_SECRET>
REACT_APP_FUNCTION_ENDPOINT="http://localhost:5050/api"
The REACT_APP_FUNCTION_ENDPOINT defined in the .env file above will be accessed with the application components to make HTTP requests to the running function apps. Currently, the Azure Functions apps are being served locally on your computer’s localhost, but this will change to a live URL when the function apps are deployed to Azure Functions.
The second thing to note is that the data of art products displayed on the home page are static, retrieved from a JSON file in the data directory.
In this part of this article, we will extend the functionalities above as follows:
- Home page
We will refactor the home page to fetch and display products created in Stripe using theGETproducts Azure function created previously, and we will discard themock.jsonfile containing the prototype art products. - Checkout page
We will build a new checkout page for users who want to purchase either an art print or a subscription with their credit card.
The home page is displayed for all users, whether authenticated or unauthenticated, and it displays a list of all available artwork products, using a child artworkCard component exported from the artworkCard.js file.
We need to make a few changes to this component, because we want the button in the artworkCard component to prompt the user to purchase an artwork. Modify the existing artworkCard.js file in the components directory with the highlighted portions of the code block below.
// ./src/components/artworkCard.js

import { navigate } from "@reach/router";
import React, { useState, useEffect } from "react";

const ArtworkCard = ({ name, description, img_uri, productId }) => {
  const [priceData, setPriceData] = useState({});

  useEffect(() => {
    (async () => await fetchPrice())();
  }, []);

  const fetchPrice = async () => {
    const res = await fetch(
      '${process.env.REACT_APP_FUNCTION_ENDPOINT}/price?product=${productId}'
    );
    const { data } = await res.json();
    setPriceData(data);
  };

  return (
    <div className="artwork-card">
      <div
        className="card-top"
        style={{
          backgroundImage: 'url(${img_uri})',
        }}
      ></div>
      <div className="artwork-details">
        <div className={"align-center"}>
          <h5> {name} </h5>
        </div>
        <hr />
        <div style={{ justifyContent: "space-between" }} className="flex">
          <div className="align-center">
          <p> {'$${priceData.unit_amount}'} </p>
          </div>
          <div>
            <button
              className="btn"
              onClick={() =>
                navigate('/checkout/${productId}', {
                  state: {
                    name,
                    productId,
                    priceEntityId: priceData.id,
                    price: priceData.unit_amount,
                    purchaseType: priceData.type,
                  },
                })
              }
            >
              Purchase
            </button>
            </div>
        </div>
        <br />
        <p> {description} </p>
      </div>
    </div>
  );
};

export default ArtworkCard;
In the highlighted parts of the file above, we introduced a useEffect hook to make an HTTP request to the price function app to retrieve the price object attached to the product being displayed in the card. Once the promise from the fetch method is resolved, the data stream is further converted to JSON and stored in the component’s local state.
A button labelled Purchase was also added to the artworkCard component. When clicked, it navigates the user to the checkout page, where the user can input their bank card details to purchase the product.
In your code editor, open the Home.js file in the pages directory, and modify it with the highlighted portions of the code block below, which will fetch all available products in Stripe through the products function app and then display them.
# ./src/pages/home.js

import React, { useState, useEffect } from "react";
import Header from "../components/header";
import "../App.css";
import Banner from "../components/banner";
import ArtworkCard from "../components/artworkCard";

const Home = () => {

  const [artworks, setArtworks] = useState([]);
  useEffect(() => {
    (async () => await fetchArtworks())();
  }, []);

  const fetchArtworks = async () => {
    const res = await fetch(${process.env.REACT_APP_FUNCTION_ENDPOINT}/products);
    const { data } = await res.json();
    setArtworks(data);
  };

  return (
    <div style={{ backgroundColor: "#F3F6FC", height: "100vh" }}>
      <Header />
      <Banner />
      <br />
      <br />
      <div className="page-padding">
        <div style={{}}>
          <div className="flex">
            <div className="align-center">
              <h4> My Rated Art Paints </h4>
            </div>
          </div>
          <p>
            Every artist dips his brush in his own soul, <br />
            and paints his own nature into his pictures.
          </p>
        </div>
        <br />
        <div>
          <ul className="artwork-list">
            {artworks.map(({ id, name, img_uri, images, description }) => (
              <li key={id}>
                <ArtworkCard
                  productId={id}
                  description={description}
                  img_uri={images[0]}
                  name={name}
                />
              </li>
            ))}
          </ul>
        </div>
      </div>
    </div>
  );
};

export default Home;
In the code block above, a GET request is made as soon as the component is loaded in a useEffect hook using the browser’s fetch API. The stream response from the request made is further converted into JSON format, and the data is stored in the local component state for further use.
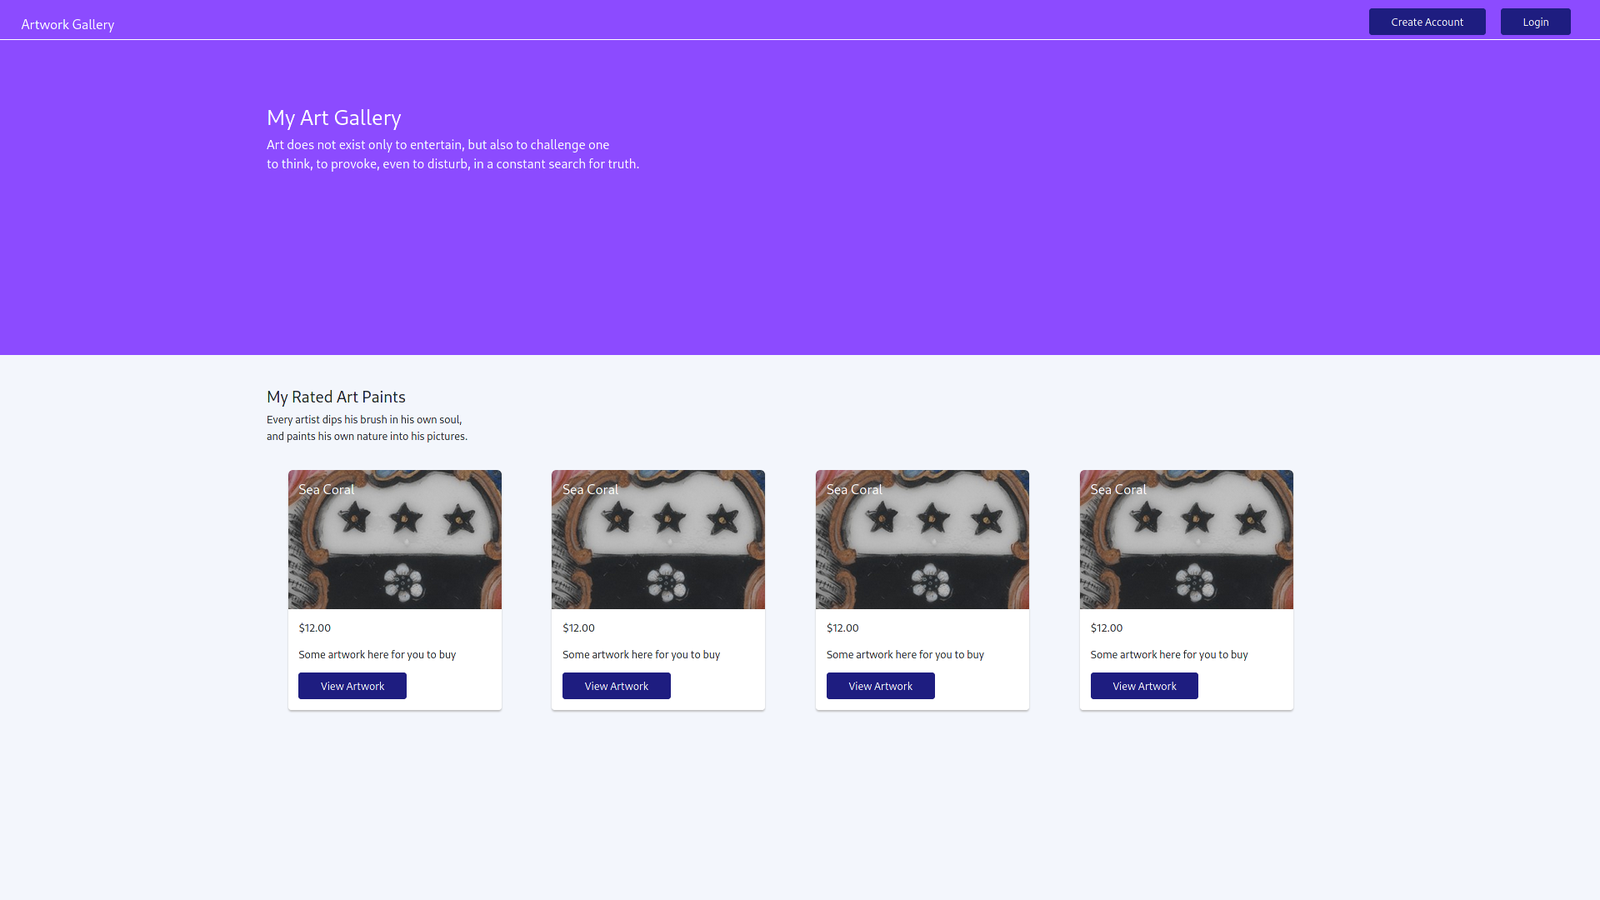
With this change, the data.json file is no longer being used. Also, when you view the web application in your browser, you will find the products created in Stripe displayed in a grid, as shown below:

From the details shown in the image above, you will notice that the products displayed on the home page were the ones created at the beginning of this article.
Checkout PageCreate a checkout.js file in the pages directory. This new file will contain the component that will be displayed to collect the user’s credit card details, after they are routed to /checkout upon clicking the “Purchase” button to purchase an art print.
Add the contents of the code block below to create the checkout component that contains the form elements to collect the credit card details:
# ./src/pages/checkout.js

import React, { useState } from "react";
import { useAuth0 } from "@auth0/auth0-react";
import Header from "../components/header";
import "../App.css";

const Checkout = (props) => {
  const { purchaseType, productId, priceEntityId, name, price } =
    props.location.state;

  const [cardNumber, setCardNumber] = useState("");
  const [cardName, setCardName] = useState("");
  const [cvc, setcvc] = useState("");
  const [cardExpiryMonth, setCardExpiryMonth] = useState("");
  const [cardExpiryYear, setCardExpiryYear] = useState("");
  const [loading, setLoading] = useState(false);
  const [paymentSuccess, setPaymentSuccess] = useState(false);
  const { user } = useAuth0();

  const makePayment = async () => {
    setLoading(true);
    try {
      const res = await fetch(
        `${process.env.REACT_APP_FUNCTION_ENDPOINT}/purchase`,
        {
          method: "POST",
          body: JSON.stringify({
            number: cardNumber,
            exp_month: cardExpiryMonth,
            exp_year: cardExpiryYear,
            purchaseAmount: price,
            purchaseType,
            priceEntityId,
            cvc,
            email: user.email,
          }),
        }
      );

      if (res.status === 200) {
        const { paymentId } = await res.json();
        await fetch(`${process.env.REACT_APP_FUNCTION_ENDPOINT}/billing-data`, {
          method: "POST",
          body: JSON.stringify({
            productId,
            userId: user.sub,
            paymentId,
          }),
        });
        setPaymentSuccess(true);
      }
    } catch (e) {
      console.log(e);
    } finally {
      setLoading(false);
    }
  };

  return (
    <div
      style={{
        height: "100vh",
        background: "#F3F6FC",
      }}
    >
      <Header />
      <div
        className="product-page-padding"
        style={{
          height: window.innerHeight,
          display: "flex",
          justifyContent: "center",
          alignItems: "center",
        }}
      >
        <div className="align-center">
          <div className="payment-card">
            <h5 className="align-center">
              <b>{name} Checkout </b>
            </h5>
            <p>
              <b>Total Price:</b> {`$${price}`}
            </p>
            <p>
              <b> Payment Type: </b> {purchaseType.toUpperCase()}
            </p>
            <hr />
            {!paymentSuccess ? (
              <form
                onSubmit={(e) => {
                  e.preventDefault();
                  makePayment();
                }}
              >
                <h5> Payment Details </h5>
                <br />
                <div className="input-container">
                  <label id="name"> Cardholder Name </label>
                  <input
                    value={cardName}
                    onChange={(e) => setCardName(e.target.value)}
                    className="payment-input"
                    placeholder="Bank Cardholder Name"
                    type="text"
                  />
                </div>
                <br />
                <div className="input-container">
                  <label id="name"> Card Number </label>
                  <input
                    value={cardNumber}
                    onChange={(e) => setCardNumber(e.target.value)}
                    className="payment-input"
                    placeholder="Bank Card Numbers"
                    type="number"
                  />
                </div>
                <br />
                <div className="input-container">
                  <label id="name"> Card CVC </label>
                  <input
                    value={cvc}
                    onChange={(e) => setcvc(e.target.value)}
                    className="payment-input"
                    placeholder="Bank Card CVC"
                    type="text"
                  />
                </div>
                <br />
                <div className="input-container">
                  <label id="name"> Card Expiry Month </label>
                  <input
                    value={cardExpiryMonth}
                    onChange={(e) => setCardExpiryMonth(e.target.value)}
                    className="payment-input"
                    placeholder="Bank Card Expiry Month"
                    type="text"
                  />
                </div>
                <br />
                <div className="input-container">
                  <label id="name"> Card Expiry Year </label>
                  <input
                    value={cardExpiryYear}
                    onChange={(e) => setCardExpiryYear(e.target.value)}
                    className="payment-input"
                    placeholder="Bank Card Expiry Year"
                    type="text"
                  />
                </div>
                <br />
                <button
                  disabled={loading}
                  style={{ width: "100%" }}
                  onClick={(e) => {
                    e.preventDefault();
                    makePayment();
                  }}
                  className="btn"
                >
                  {!loading ? "Confirm" : "Confirming"} My Payment
                </button>
              </form>
            ) : (
              <div>
                <br />
                <h5 className="align-center">
                  Your {`$${price}`} purchase of {name} was successfull{" "}
                </h5>
                <br />
              </div>
            )}
          </div>
        </div>
      </div>
    </div>
  );
};

export default Checkout;
As described earlier, the form component above contains four input fields for the user to type in their name, number, expiration and CVC details. These details are further stored in the component’s local state, and, upon a click of the “Confirm my payment” button, the stored credit card details are used to purchase the product.
Of particular interest in the checkout component above is the makePayment function, because it handles the functionality of the checkout page. When executed, the makePayment function sends a POST request containing the credit card details in its request body using fetch to the /purchase cloud function. Once the first POST request is resolved successfully, with a 200 status code indicating a successful payment, a new POST request is made to the /billing-data cloud function to store the details of the purchased product.
Note: As explained when we were designing the productCard component, the purchased product details stored in Auth0 will be used to identify products purchased by the user from the home page.
To test this component, we will fill the input fields with the details of one of the basic test cards provided by Stripe for applications still in test mode, and then click the “Confirm payment” button, as shown below:
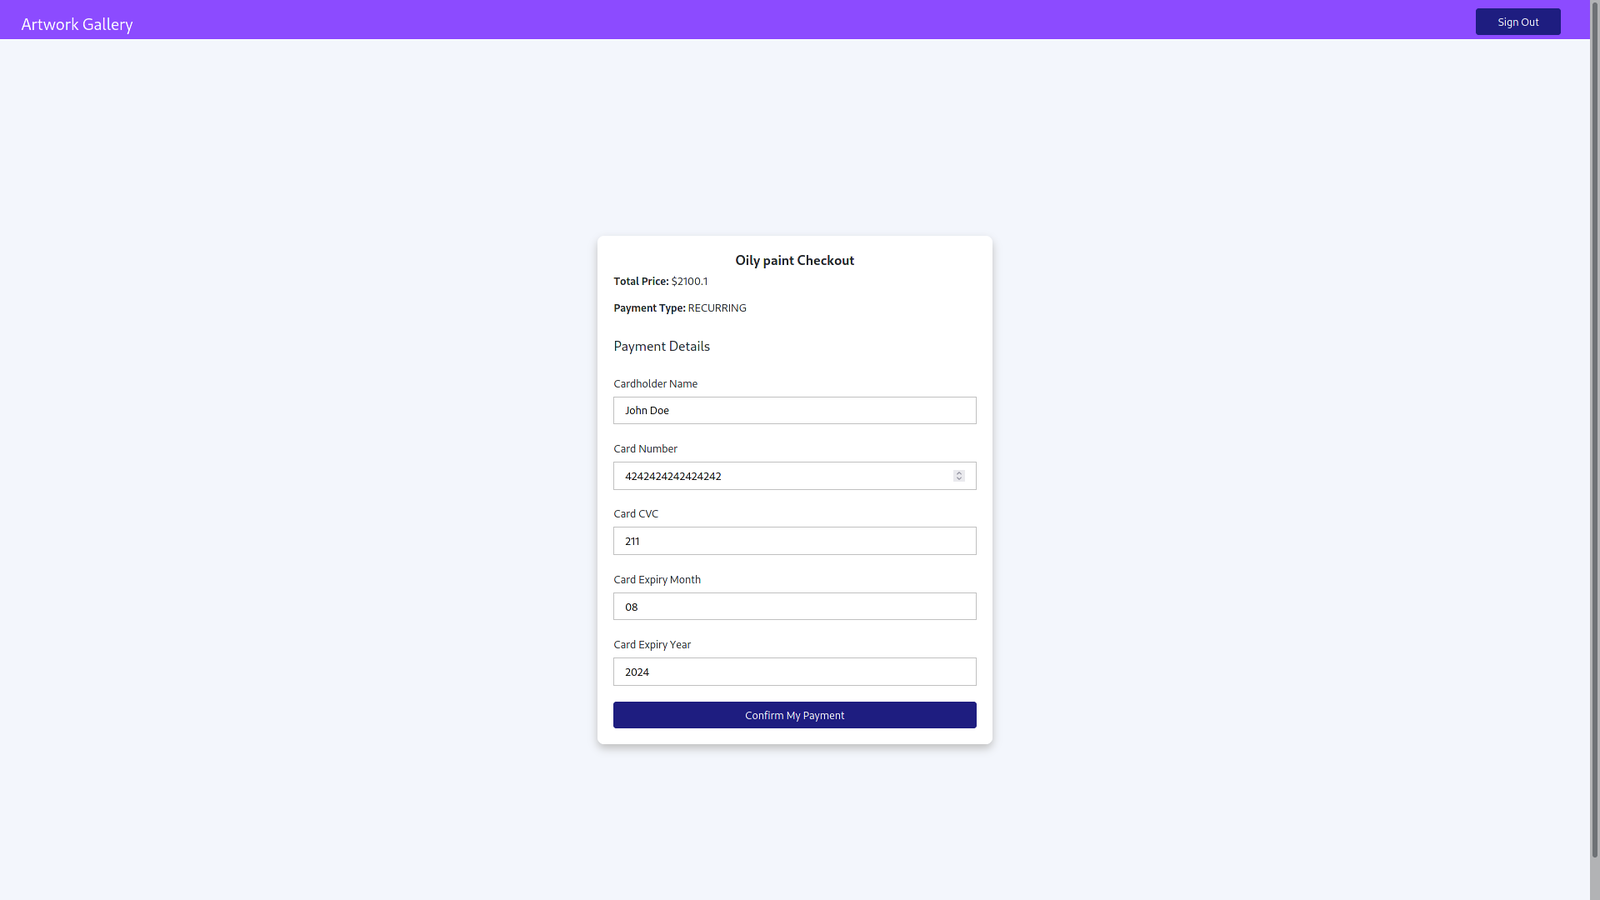
Note: The credit card used in the image above is one of the basic test cards provided by Stripe and not a real credit card. Stripe accounts in test mode must use one of the basic test cards.
Once the “Confirm my payment” button in the checkout card is clicked, a payment for the product is made from the credit card provided, and the checkout card interface is changed to reflect the successful response.

Going to the “Reports” section of your Stripe admin dashboard, you will see a reflection of the last payment made when the gallery subscription was created on the checkout page above.

From the charts shown in the image above, taken from the test Stripe card used in this tutorial, you will see that a gross volume of $150.00 was attained once the gallery subscription was created.
Note: The image also shows statistics from test operations that were made on the Stripe account while this article was being developed.
At this point, we have fully set up the entire payment flow. You can repeat the process of creating a product through the Stripe dashboard and purchasing it using the React application or any other client that consumes Azure Functions.
SummaryCongratulations on completing this hands-on tutorial.
By going through the steps in this tutorial, we have worked with Stripe, Azure Functions, and React. We started by building an API layer that uses the Stripe API through a Node.js package. Then, we moved on to consuming the Azure Functions app endpoints from a web application, using the function app to retrieve products and make payments for the products.
References
- Documentation, Stripe
- auth0-react (SDK for React single-page applications)
- Auth0