How to Create a Snapchat Filter
Have you ever wanted to create your own filter on Snapchat, but weren’t sure how to get started?
People create their own personal filters all the time for weddings, birthdays, graduation, and even prom, while businesses use them to promote products and spread brand awareness. Follow these simple steps to set up your filter today, and you’ll be ready to go in no time!
1. Choosing a Snapchat filter design
Before you get started, you’ll have to choose whether you’ll be creating your own custom-designed filter or editing a pre-made filter provided by Snapchat.
If creating your own design, you’ll need to know how to use Photoshop or a similar photo editing software. If not, don’t worry! Snapchat has many pre-made options to choose from that can be customized for any occasion or business by changing colors, adding text, and inserting custom elements such as a company logo.
Create your own Snapchat filter
When choosing to create your own Snapchat filter from scratch, remember that it needs to be saved as a .PNG file.
Also, make sure the image has a transparent background, so you don’t block the user’s own picture from showing up underneath. In order for Snapchat to use the images you upload, they must be no more than 300KB and 1080px wide by 1920px high.
Once you’ve finished drawing or editing your filter and have it saved, upload it to Snapchat by going to create.snapchat.com and choosing “Create Filter”. Then, click upload and choose your file!

Customize a pre-made Snapchat filter
Not quite sure how to design your own filter without a little help? That’s ok too!
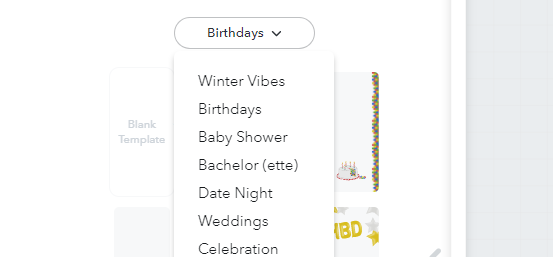
Just go to create.snapchat.com and choose “Create Filter”. You’ll notice towards the left of your screen a number of different pre-made templates to choose from. There is even a drop-down button to choose what you need the filter for, whether it’s a birthday, wedding or baby shower, or if you’re looking to create a filter to advertise your business.
Choose the filter you like best and then get ready to edit it! Once you’ve chosen a filter, you’ll see 3 options show up on the right side of your screen: color, text, and elements.
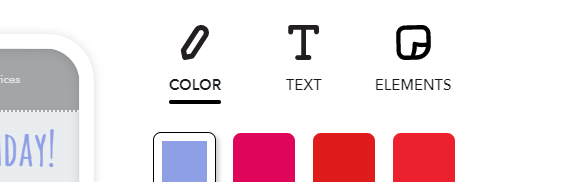
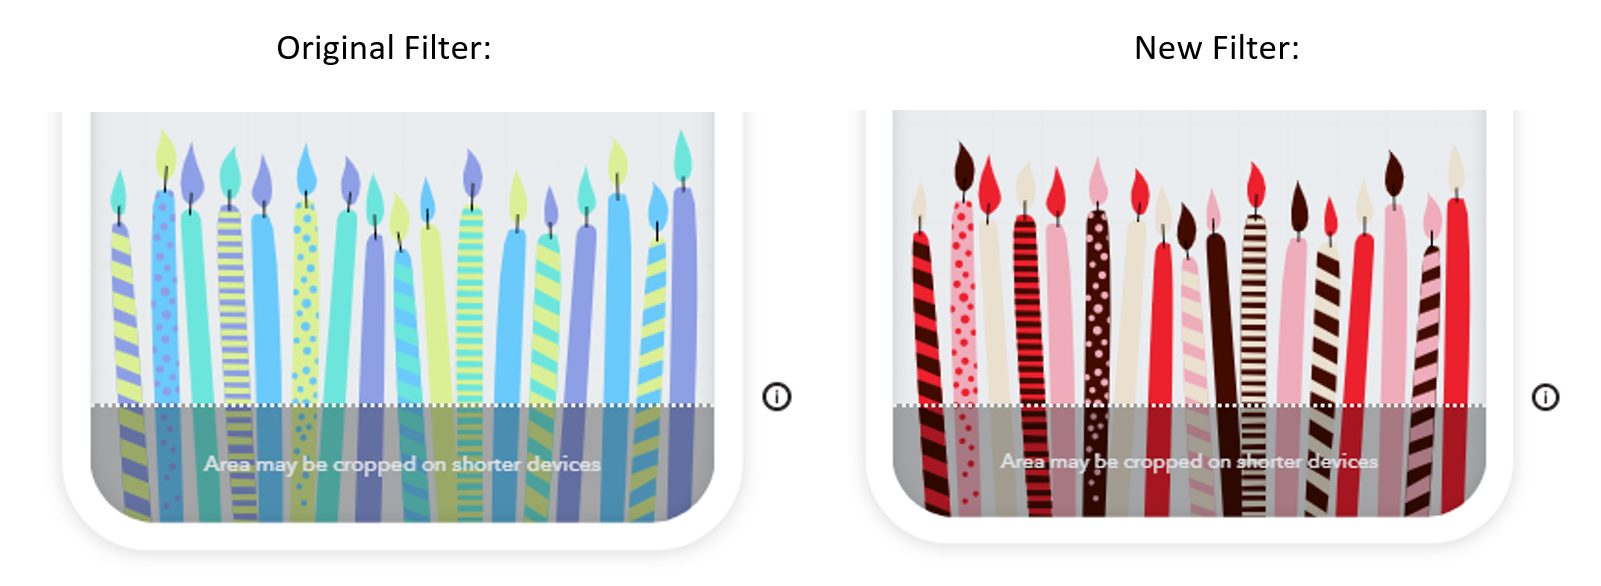
Color allows you to change the overall color theme of the filter.
Let’s say the filter you chose is currently blue, but you want the images to be red to match your company’s logo or your best friend’s favorite color. All you would have to do is choose the color you want it to be, and the image will automatically change to match your preference!
If you click on the text button, you can add text to your filter.
Some filters already have text that you can edit just by clicking on it. You can choose different fonts and colors, and even adjust the size and rotation of the text.
A great way to make your text stand out is to choose a large, bold font. Not sure if you’ll be able to see your text? Use the preview tool to see what it would look like on an actual photo by clicking the right arrow next to the phone screen.
![]()
The last button you can click is the elements button. This will allow you to add other images to your filter, such as a company logo or even your Bitmoji if you have an account. Just upload your images or log into your Bitmoji account to get started!
These images can be rotated, adjusted in size, and moved to any spot on your filter.
2. Choose your dates
Once you have finished creating the filter itself, it’s time to choose the date and time you want your filter to display. Click the “Next” button in the bottom right corner (underneath where we changed the colors and added text) to move onto the next step.
You should see a calendar pop up where you can pick out dates for your filter to run.
Simply click the first day you want your filter to start displaying, followed by the last day you want it to show. If you only want your filter to display for one day, just double-click that day.
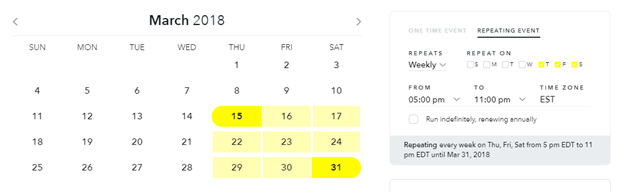
Alternately, you can have your filter run indefinitely or weekly on certain days by adjusting your selection with the options to the right of the calendar. Here, you can also select what hours of the day you want your filter to run, along with the time zone as well.
Here is an example of a filter that would run from March 15th to the 31st only on Thursdays, Fridays, and Saturdays from 5 PM to 11 PM EST:
3. Choose your location
The last item on our list is to choose a location. This location should be where you want people to see your filter, whether it’s the address of your business and the surrounding area or the house of a friend who’s having a birthday party for their sweet 16.
Either way, make sure that the location you chose is big enough that everyone you want to see your filter will see it. We suggest giving yourself a little extra room when telling Snapchat where you want your filter to be displayed because it isn’t always 100% accurate.
Creating a fence
To choose your location, you need to create a fence. To start, type in the closest address to where you want your filter displayed in the search bar seen towards the top left of the page. Usually, this will be a business address, a specific city, or a house of a friend.
![]()
Once you’re in the right area, click the “Draw Fence” button located next to your search. You can then click to create different points to outline the location of where you want your filter displayed, and can always click and drag points to edit your fence.
In this example, I created a fence to display my filter at the boardwalk along Miami Beach:
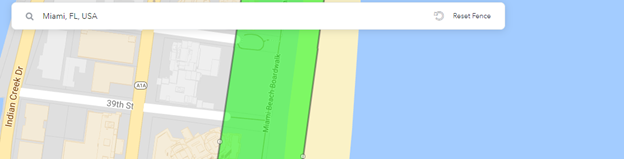
If you typed in a specific address, a fence should have already been created for you of the area surrounding that building. Not the right location? Simply adjust the fence by clicking the points and dragging them to the right spot. To completely redraw the fence, click the “Reset Fence” button in the search bar.

4. Checkout process
You’re almost done! The last step in this process is checking out.
While still on the location screen, you should be able to see the price of your filter in the top right corner after creating your fence. If you do not see your price right away, it may be because the size of your fence is too small to display.

If the price is too high, decrease the size of your fence or the number of days/hours your filter is going to be displayed. Once satisfied, click the “Checkout” button in the bottom right-hand corner.
A summary of your order will be displayed showing the filter itself, the filter location, and the start and end time of the filter. If everything is correct, fill out the form with your information and payment method. Your filter will then be submitted and reviewed by Snapchat. As long as your filter is within the acceptable guidelines, you should receive an email shortly after submitting stating that your filter has been accepted.
Congrats! You’ve successfully created your very first filter.
Snapchat filter rules to follow
Before we go, there are a few rules to follow when creating a filter, whether you are designing one on your own or using a pre-made filter. Keep in mind:
- When creating a filter for a business, you must have the necessary rights and permissions to use the company’s name, logo, or any other trademarks they may own
- You must give Snapchat the name of the business when submitting a business filter
- You can’t include emails, phone numbers, hashtags, URLs, Snapcodes, download instructions, social media usernames, personal information, or photographs of people
- Do not use more than two lines of non-stylized text
- The filter should be relevant to the location
For more details, check out Snapchat’s submission guide.
Need help with Snapchat marketing?
WebFX is a full-service digital marketing agency that can help you market your business on a variety of social media platforms, including Snapchat.
Contact us online today for more info, or give us a call at 888-601-5359!