How to design a graphic design workflow for your team
Successful graphic designs aren’t created overnight. A huge amount of hard work and planning goes into their creation. After all, it takes time to perfect a masterpiece!
Logos in particular can reveal a huge amount about a company, whilst their success can often hinge on how well that logo has been designed. We’ve even covered the importance of this in a separate blog post.
But what steps do you really need to take in order to reach that finished stage?
It’s simple. The best way that you and your design team can get A-grade results is by following a specific workflow. A workflow keeps everything in check, and everybody on the same page (this is so crucial when working in a team environment).
Think of it as a fancy term for something that gets you from point A to point B, as efficiently as possible. Explorers use maps, graphic designers use workflows. Same principle.
A useful article by Inform IT explains that in the business world, you want to get to your destination in the shortest amount of time, using the least amount of gas. This is why workflows are so important.
This video by PNMsoft is really useful for understanding the basics.
Source – PNMsoft
Ideally, your workflow needs to have six key stages.
Let’s walk through each of these stages now in more detail to illustrate what we mean.
1. Evaluate the given brief
To start out, it’s really important that your client succinctly sets the tone as to what they’re looking for. Clarity is essential at this stage, and necessary to avoid any crossed wires or differences of opinion further down the pipeline.
Once your client has given you their brief, read everything carefully. Then read it again. And again. You probably missed something, and not reading the brief properly is a recipe for disaster. Think of the brief as an instruction manual – you can keep referring back to it to double-check if you’ve made a wrong turn somewhere.
This is also a great opportunity to ask your client for clarification on any points you’re not sure about. The time is now to clear up any misunderstandings – leave it any later and things can get messy.
Use this moment to plan out any budgeting and a rough time scale of how long the project is going to take. This is just an estimate, for now, so don’t worry too much about committing yourself to a firm deadline unless the client specifically requests one. Things can always change during the course of a project. You can use an online appointment scheduling software to manage your clients and team to ensure you manage all tasks and changes.
2. Research the competition and the client
Research is an absolutely vital ingredient to success, in any field. In the graphic design world, not doing your research properly can land you in very hot water. For example, if you are working for a non-profit organization, the donation site will differ greatly in terms of the aesthetics they are looking at. It will be a marked departure from the sales-oriented clients that are looking for eye-catching graphics.
Make sure to look around at the competition and see how they’re doing things that are related to the same topic as yours. Evaluate their strengths and weaknesses in a spreadsheet, and collate the results to see what you can do to get that extra edge. This includes checking out their social media accounts and websites.
Don’t forget to research your own client too. Check out how their style has evolved over time – what did their old websites and logos look like, and how have they changed? What are they trying to achieve with their more recent designs? Has there been a significant shift in how they want to be perceived?
Make a checklist of key considerations, such as the use of colours, fonts, typography, size, etc. How are they currently marketing themselves, and to what audience?
This great article by 99designs explains how and why globally successful brands change their image over time. This should give you a good grounding in how important graphical design changes can be.
We’ve also got a fantastic blog post on redesign considerations, entitled ‘5 things to do in logo redesign’.
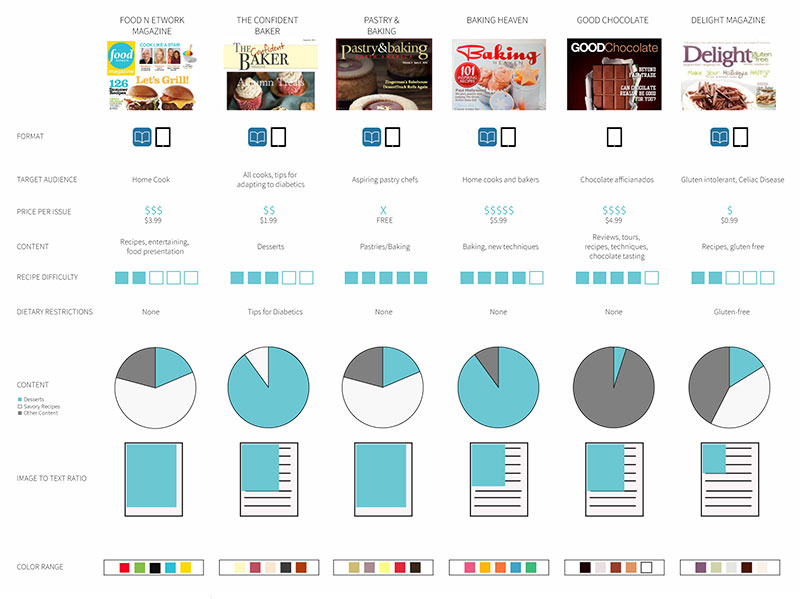
Source – Transparent PNG Images For Free
3. Create a mood board
This one’s a classic, but it’s a vital tool to use in the creative industry. It’s also a lot of fun…
A mood board is essentially a way of gathering all your team’s visual ideas onto one canvas. Think of it as the link between the ideas stage and the finished result. This is where you get to lay all your ideas out on the table and make some tough decisions as to what stays and what goes.
Stick to the original brief, but don’t be afraid to think outside the box a little. The mood board stage is where a lot of left-field ideas are born, so feel free to express yourself.
Spontaneity is often the seed of great results!
Creative Bloq also summarizes why mood boards are such an integral part of the creative process.
If you’re struggling with a few ideas, our blog post on ‘6 stunning website trends of 2021’ covers visuals, retro fonts, and scroll animations for you to get your teeth into for some inspiration.
4. Create sketches of your idea
It’s time to pick up that pencil and get drawing!
This stage is all about sketching your designs and seeing what works and what doesn’t. Of course, you can do this digitally if you like (there’s loads of graphic design software you can use to achieve this, on a range of budgets). It’s down to whatever you feel most comfortable with.
Whether you opt to sketch on paper, cardboard, or digitally, this is your chance to really show off your artistic flair and flex those graphic design muscles!
If you need any more information on how effective advertising works, including the importance of visuals, this blog post by Leadsbridge on Facebook gym ads has some really useful tips.

5. Make changes based on feedback
Crunch time! It’s time to present your work so far to your client, and get ready for their feedback, good or bad.
Constructive feedback is incredibly important. It lets you know whether you’re on the right track or not. If you are, you can push ahead. If not, rethink your ideas and keep working towards that original brief. Be prepared for bumps in the road along the way, but have faith in pushing towards that end goal eventually.
Remember, mistakes are often essential elements in the pursuit of success, so don’t be too disheartened if the client doesn’t seem as happy as you were perhaps expecting. For example, if you are a part of the marketing automation project, your project may get feedback from more than one team. It is possible that while your design is good, you did not meet all their needs.
The creative industry can be incredibly finicky, as it’s generally based on opinions rather than right or wrong answers (most of the time, at least). Don’t take criticism personally – the client may disagree with your designs, but not with you as a person.
Listen carefully to what they want, take any important advice on board and go again.
You’ve got this!
6. Create the final design
Well done! You’re on to the home straight. It’s time to polish off your work, iron out any last-minute niggles and get ready to present the final product to the client.
This is not the time to experiment or try out new ideas – you’re building on what has already been agreed and tinkered with before, so focus on tying up any loose ends rather than making any radical changes. If everything has gone to plan, this last phase should be relatively stress-free (in theory!).
Do you know how your client wants your final design? Make sure you know exactly how to conduct the handover process – this could be as simple as sending a PDF, or whatever system has been agreed. Avoid the embarrassment of technical issues by making sure everything is backed up, and that you’ve got several copies of your work in case anything goes wrong.
Ok! Once you’ve completed the handover, await any further correspondence and then wait for the finished product to appear on your client’s website or products.
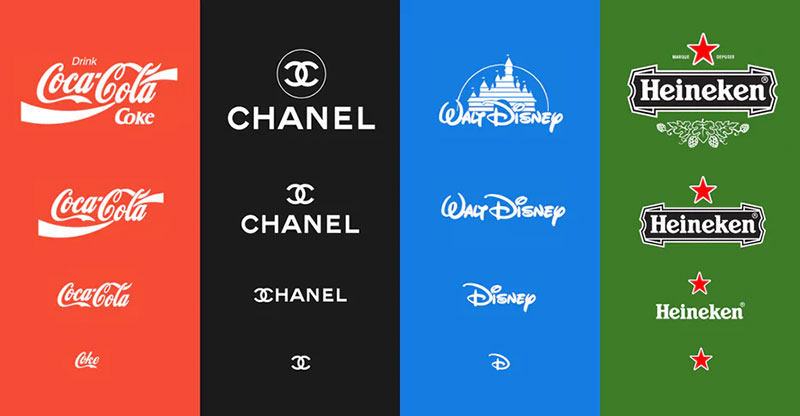
Source – 99designs
Bottom line
Every workflow is different and is specifically tailored to the client and design that you’re working on at the time. But in the graphic design world, these six steps are a great foundation to success.
At the start of any project, the endgame might seem a million miles away, but putting these steps into practice will guide you towards that finished product in a controlled and orderly manner.
Remember the saying – fail to prepare, prepare to fail. With a well-considered workflow, your preparation plans will be firmly in place and you can focus on the actual graphic design work without any distractions.
Now, go and put this plan into practice, and good luck with your next project!