How to Create a Website [Ultimate Guide]
Table of contents:
- How to choose a website platform
- What CMS is better?
- Choosing a domain and hosting
- How to get a domain name and hosting
- How to create a website using the WordPress
- How to create a website using the Joomla
- How to create a website using the Drupal
- Conclusion
Creating your own website may seem hard and complex at first sight. Since the internet is full of different guides and manuals dedicated to this particular topic, some of you may be confused or misled by wrongly interpreted information. However, in fact, creating your own website is a quick and super easy task if you use a website builder like TemplateToaster or ready-to-use website templates.
I have a question for you, my dear reader! Aren’t you tired of bullshit articles on how to build a website? Don’t you find them useless and not detailed enough?
Save time, money, and effort as you build websites with ready-made themes. TemplateMonster digital marketplace is proud to have more than 26,600 ready-made themes of different types for all purposes imaginable. Depending on what web platform you select for your future web resource, you can launch it in less than a week. Wonder how? Check out the guide!
Now Official! TemplateMonster Has Become a Digital Marketplace

Find how to become a vendor in TemplateMonster marketplace.
Read more
Personally, I checked numerous articles and site builder reviews on this topic and I found it very annoying when the manual itself looked good, but some important details were missing. So it looked like this: you take a look at your admin panel, then at the screenshot from the manual, at your admin panel again… Yeah, something went wrong.
Basically, that’s the reason why we decided to work on this article for you. It’s time to cut the crap and get it done, this internet needs a hero. Brace yourself, we prepared an ultimate guide on how to build a website from scratch for you!
Turn off the TV Show or a movie you’re watching, you’re gonna finish your Seinfeld episode later, it’s time to create your own website!

We are about to take off, take your seat, it’s gonna be a long yet exciting journey!
Choose a website platform
Whenever someone how to create a website from scratch you may hear a ‘CMS’ abbreviation. This section will explain to you in detail what the CMS is and how you should utilize this tool. If you already have this basic knowledge you may just skip this section and proceed further.
CMS stands for the ‘Content Management System’. The main purpose of these systems is to help you add, remove and manage the content on your website without touching a single line of code. So basically the CMS usually includes all the needed scripts to control your website content and deliver it to your website visitor.
There are plenty of different Content Management Systems around, but in this article, we will use the most successful and powerful ones. These are:
- WordPress
- Joomla
- Drupal
We gathered the needed information and made it possible for you to check out the current correlation of forces among the Control Management Systems.

As you may have noticed WordPress covers more than half of the websites on the internet. Millions of web developers choose WP as their primary best website builder software.
The difference between the first and the second place is huge, right? Joomla and Drupal keep the second and the third places with the small but proud numbers: 10 and 9 percent. Let’s see why web developers choose WordPress and how come it’s better than any other CMS.
What CMS is better?
Some of you may say that WordPress is just about blogging websites and magazines. That’s a common mistake, but nowadays this platform offers you much more functionalities and profits.
You can use WordPress to start a blog, magazine, e-commerce store, landing page, and portfolio, you can do literally anything. This CMS is flexible enough to start a project of any size and complexity. WordPress can be used as one of the best ecommerce website builders to create a web store.
Lots of large projects are built with WordPress, for example, New Yorker, Variety, BBC America, Wired, etc.

The credit given by these big brands can be easily explained by the multifunctionality and simplicity of WordPress. It doesn’t matter whether you are trying to build a website for your company or just a small blog for yourself to post news about how good was your breakfast today, WP will work fine for everything.

Here are the key WP benefits:
- Easy to use
Personally, I would say that ‘Take it easy!’ is an unofficial WordPress slogan that inspires the developers of this CMS to build such a great product. You will not need big 500 pages books to study how to use this CMS, you will be guided through the installation process by the CMS itself, how cool is that?
Then you’ll be able to add the functions you like by adding the plugins through the admin panel. Each of them can be configured in a few clicks and go live on your website in a blink of an eye.
- WordPress website look stunning
This is pretty simple, it really is beautiful. If you do not believe me, feel free to check out our catalog of premium WordPress themes and you’ll see what I’m talking about.

- Truly Responsive and Mobile-friendly
Once you install WordPress and kick it off with your newly created website, you will
not have to worry about how your website looks on mobile devices. The major part of WP themes nowadays is built with all the latest standards to give a possibility to convey your content to your audience through mobile devices in the most efficient way.
Just take a look at our bestsellers’ demos and check out how they look on smartphones or tablets, they are specifically designed to meet your cross-platform expectations.

These are key benefits that should interest you if you are a newbie and you are trying to select the correct CMS. Of course, there are plenty of other pros in WordPress, but we wouldn’t want this article to become all about those, let’s move on.
On the other hand, Joomla and Drupal are less popular among the web developers, but they’ve still got their market share and their own fans.
I’ve intentionally included Joomla and Drupal in one section, cause basically, they have very similar cons comparing to WordPress.
The biggest problem with these systems is complexity. It’s simply harder to work with them and you need to have a more advanced level and knowledge to be able to build a fully functional and good-looking website.
But still, they are listed in the TOP-3 for a reason, that’s why we decided to provide you with not only one, but THREE guides. Yeah, that’s right, we will show you how you can create a website using any of these three platforms.
For your best convenience, you can just decide what CMS works best for you depending on your skill and knowledge and move to the specific section. How much does it cost to build a website? Further on, I'll do my best to tell you all about it!
Choosing a domain and hosting
Each and every website needs a domain name and hosting. That’s like a home for your website, everyone needs a home, right?
We are not going to tell you about the possibility to be hosted at WordPress.com for free, we are serious people, guys, right? Using the subdomain at WordPress.com will make your website look unprofessional and that’s not what we are trying to do.
There are plenty of hosting providers around the internet and the pricing varies from being low as hell to be ridiculously high.
Personally, I would recommend you considering two hosting providers, such as:
Bluehost
These guys will give you an opportunity to get hosting for a price around $3-$6 dollars and, trust me, that’s a great deal. The best part of it is that they have great servers and for this price, they will provide you with a good customer service experience. That’s very important for everyone who is running his own website to have a good relationship with the hosting provider.

We would recommend you taking a look at the offers from both BlueHost and InMotion and choosing what will work best for you. For this article, we will show you how you can sign up for BlueHost and host a website on their servers.
The domain name should be chosen wisely.
There are 3 key things to keep in mind while selecting a domain name for your website:
- The URL of your future website is the first thing the visitor will see. A kick-ass domain name will definitely make a great and lasting impression.
- The domain name should be the same as your brand name or as close to it as possible. It will be a huge plus to your brand recognition.
- Keep it simple. No one wants to memorize the domain name. If it’s something like a ‘thincrunchpizzafromchicago1259.com’, you are going to burn in hell, my friend.
How to get a domain name and hosting
This is where we stop talking and start doing. I made a step-by-step guide on how you can start working with BlueHost. Basically, it will give you general knowledge that will help you to work with the InMotion hosting provider as well because the process is very similar on both platforms.
- First of all, open the BlueHost Homepage.

You will notice that they advertise their most popular pricing plan right in the header and they list all the benefits for you.
GOOD NEWS: You will get free 24/7 Customer Service from them.
VERY GOOD NEWS: You will get a free domain in a .com zone for a year! Isn’t that great?
Let’s click on the Get started now button and proceed further.

You will notice that they offer 3 different pricing plans. For you, as a beginner, the basic plan will work perfectly fine, it gives you an opportunity to host 1 website and gives you 50GB of the website space. It will cover all your needs, you have my word on it.
So once you click on the ‘Select’ button under the Basic plan, you will be redirected to the page where you can select the domain name for your future website. The domain name will be given completely free of charge for you by BlueHost.

You may enter any domain name you want and if such domain has already been registered by someone else, BlueHost will let you know and even offer some alternative names to work with. As an example, I decided to go with ‘mywebsite.com’. Of course, I knew that such a domain name has already been taken, but the hosting provider offered me alternatives to consider.

So I decided to go with ‘mywebsitedirectory.com’, that doesn’t sound very attractive, but that’s just an example. I have already explained to you earlier in a section above how you should choose the domain name properly.

Now it’s time for you to fill in all the personal data including your First name, Last name, Country, City, etc.
Below the account information block, you’ll notice the package and payment information blocks. That’s where you can confirm the play you want to go with and select the term.
I believe I shouldn’t explain to you how to enter your Credit Card information, right?

Once you’ve paid for your account, you will be redirected to the BlueHost control panel and it will look like this.

One of my favorite things about BlueHost is that they offer to install WordPress for you in a few clicks. You will not have to move the folders with the files around to the FTP, they will do everything for you.

You will only have to fill in the general information like the Site Title, Admin username, and e-mail address. Once you’ve entered all that info, you are done, click on the ‘Install WordPress’ button and they will... install it for you… What a surprise, right?

How to create a website using the WordPress
When WordPress is installed, you may visit the WordPress admin panel that will be located at the following link: yourwebsite.com/wp-admin/.
You should use the credentials that you have chosen while installing WordPress through the BlueHost admin panel (the username and password that you have entered there).

The WordPress admin panel (it’s also called the ‘Dashboard’) looks like this. You will see all the sections on the left and the window on the right will display all the settings you can work with.
First of all, we need to change the theme. Here at TemplateMonster, we offer lots of great-looking WordPress themes, so feel free to choose one that will suit your needs. For this article, I decided to use the Monstroid 2 theme. The reason is simple: Monstroid 2 is a multipurpose theme, so it usually works for lots of website topics.
I’m gonna create a website for the digital agency using the Monstroid 2 default skin because that’s my favorite one. But here is where it gets better: you may choose from more than 10 skins and our web designers are working on making this number bigger. That’s why Monstroid 2 is suitable for lots of websites and companies.
In order to change the WordPress theme, you should go to the ‘Appearance’ and click on the ‘Themes’ menu option.

It will redirect you to the page where all the installed themes are listed, but we are not interested in those ones, they look boring!

In order to install a new theme, you should click on the ‘Add new theme’ button and upload the template you want to use. As I have already mentioned, I will upload the Monstroid 2.

After the installation process, you should click on the ‘Activate’ button to apply the changes and set the new theme as a default one for your website.

Once it’s activated, the WordPress admin will show you a tip right above the templates area. You’ll see that it offers you to install the ‘TM Wizard’ and that’s a very good tip, you should do that, you’ll see how useful this tool is.

TM Wizard will offer you to start the skins installation process, just click on the ‘START INSTALL’ button and proceed further.

The wizard will check if all your system settings are ok and will notify you if something is wrong. When you see that everything is ok and green, just click the Next button and go on.

That will take you to the list of all the available skins. That’s where you should decide what skin may work best for your needs. As I have already mentioned, I will go with the default one, so I just click on the ‘Select skin’ button near the ‘Default’ skin.

There are two options here for you: you may select the Full or Lite installation option. The Lite one can be used in case you don’t have much website space on your hosting. So by choosing the Lite installation option you agree for getting a less amount of the blog posts and other demo data.
If you selected the BlueHost, you don’t have to worry about it, just proceed with the Full Installation option, it will work perfectly fine for you.

Now the installation wizard will download and install all the needed plugins.


In order to install the demo data, you should agree that you want the sample data to replace the existing data on your website. Basically, this warning was added just in case you are installing this theme on your website where you have lots of old content. That’s something like a trigger for you to have a turning point and save your data.

Since my WordPress website is new and it doesn’t have any data, I don’t care whether my posts will be replaced or not, so I agree and select the ‘Replace my existing content with demo content’ option.

WordPress will not be able to perform such a trick without you entering the admin password. That is because such important decisions should be confirmed on your side and you should confirm your credentials prior to going with that decision further. It’s not a problem for me, so I just type in my password here again.

It may take some time now, our Wizard will import all the sample data for you and will make sure your website looks great and operate as needed.

Once everything has been installed, you will get a website that will look exactly like our demo unit, you will have all the data imported there. I believe it’s time to start the customization process.
Let’s go to our Dashboard and start editing the Home page.

In order to do that you will need to visit the ‘Pages’ section and select the ‘Home’ page.
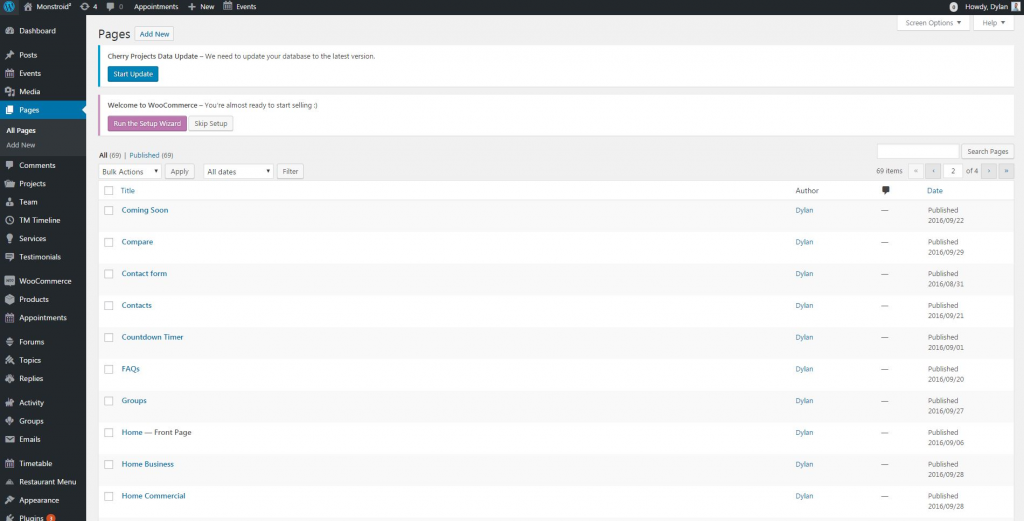
You will be redirected to the page with the Power site builder. That’s my favorite tool that helps you customize your website by simply moving around the block and content in the website maker. I believe I was clear about how much I like this website creator in one of my previous articles, so I’m glad that Monstroid 2 includes Power builder. As of today, I believe that this is the best website builder for small business, no jokes!

I removed the slider from the header section of our website and decided to go with one image on the top. Once you’ve removed the Slider itself, you’ll need to click the ‘Insert module’ button and select the ‘Image’ module from the list of modules.


So now our homepage looks like this. That’s just a beginning, let’s go deeper and get our hands dirty.
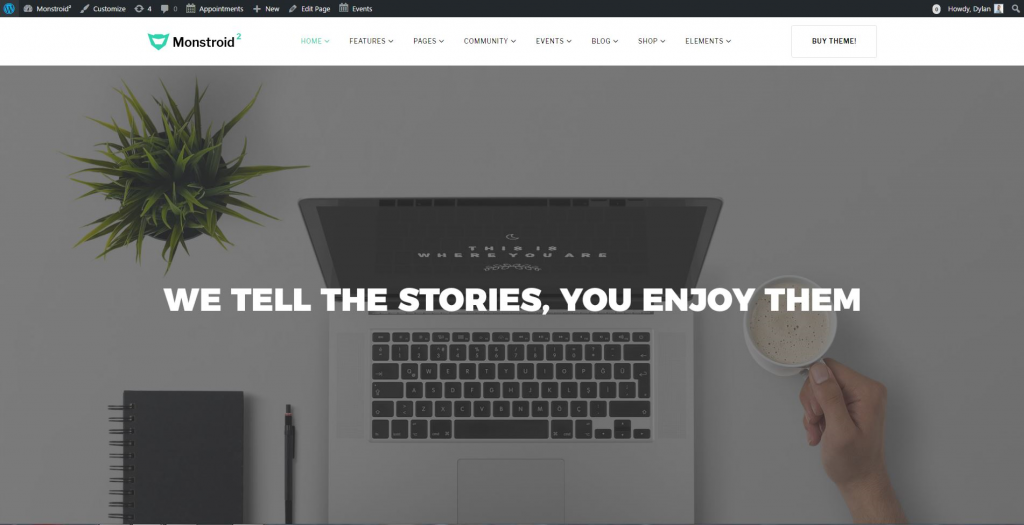
I decided to change the logo to the one I’ve prepared in photoshop for my digital agency. In order to update the logo, you should click on the ‘Customize’ button on the top panel of your website. The additional menu will be opened on the left side of your browser window.

Just click on the ‘General Site settings’ > ‘Logo & Favicon’ and upload the Logo you want to use instead of the generic Monstroid 2 logo.


While scrolling my newly created website with the demo data, I noticed that I will not need the ‘GPL3 License advantages’ block, so I just went to the Power builder tab and deleted this one.


I also do not like the ‘Buy Theme’ button. This button strikes the eye and calls to action. That’s why I will change the button sign to the ‘Order a story’, this will work for my digital agency perfectly. It will give our customers a chance to order the website content or any other service right here and right now. Oh, I love Call-To-Action buttons so much…
In order to perform this change, you should go to the ‘Header’ menu option.

Then go to the ‘Header Elements’.

Change the text of the Call-To-Action button and click on the ‘Save & Publish button.

Since we are working with the header, let’s change the menu items.
I will create the menu items that will take my clients to the following pages:
- Home
- Who we are
- What we do
- Portfolio
- Contacts
I think that these are the pages that will give my customers all the needed information regarding my company and why they should work with us.
In order to add these menu items I had to go to the ‘Menus’ > ‘Main’ and remove all the existing menu items. Then I added all the menu items I will need and linked them to the pages that I’ve created on the dashboard in the ‘Pages’ section.

So now our menu looks like this. As you can see, we have already changed the way our homepage looks once our customer opens it.

Let’s change the introductory text that goes right after the image. In order to do that, we should go back to the Power builder and open the settings of the ‘Text’ module, right after the ‘Image’ module.

That’s where we can fill in the information about our company and explain to our customers who we are and what we do. I wanted to tell the customer that we simply deliver the good content and working with us worth a try, no need to add a 5-page long read with a full history of our company.

There is this block in the default skin of the Monstroid 2 where the main pros of the template are listed.
We will use this block in order to advertise our 3 main services:
- Speech writing
- Content Marketing
- Creating website content

Let’s go to the Power builder and scroll to the module with 3 ‘BLURB’ modules. We can edit the content of each module by clicking on the settings icon on the right.

You can choose the title, the body text, and the icon for each service, it’s very simple.


I have edited all three modules and now it looks like this on the front.

If you open the Power builder you will see that there are two similar rows on our homepage.
They both include the ‘Text’ Module, but it’s located on different sides of the page. I decided to remove the second one and leave the first one only. Since I moved the ‘Services’ block above closer to the introduction text, now I have two blocks with the gray background and it doesn’t look good.

So I will change the background and image for this block. I will set the background to white color and add a picture that will be more appropriate for my website.

I decided to let our customers know that we are responsible for one of the speeches that have been a part of the President’s fundraising event.


So now it looks like this.

There is also a block with the Projects showcase. I believe we’ll need this one on our website, so I will change the pictures to the examples of the websites we created the content for.

Let’s go to the Power builder, click on the options button near the ‘Projects’ module and we’ll see that all these projects are taken from the ‘Project’ category.
So we’ll need to go to the ‘Projects’ category on the left side of our Dashboard and change each and every project or just simply remove the old ones and add the new ones.

That is very simple and looks like the regular blog post edit page. The featured image can be changed on the right and the body text is located in the middle.

After I changed the info for the projects, it will look like this on the front.


I decided to move the Testimonials module above the Projects module. It’s very easy to do in the Power builder, you can reorder the modules by moving them around using the drag and drop.
So now they will be above the ‘Projects’, but as you can see we need to change the testimonials to fit my company.

In order to do that you will have to go to the ‘Testimonials’ section in the WordPress Dashboard and change each testimonial. Basically, it looks like you are editing the article.

I just changed the company name in the testimonials, because my company is not real, but you will have to add your own testimonials from the real customers.

The only problem now is the ‘Represent Your Staff’ Title that is located here for some reason and I’d like to change it to the more appropriate sign.

Let’s go to the Power builder, select the ‘Cherry Testimonials’ module and enter the text we want to see there.

I don’t want to have all these widgets in my footer, so I will remove them. We can do that by going back to the ‘Customize’ menu and selecting the ‘Widgets’ options.

Simply remove all the widgets in this area and click on the ‘Save & Publish’ button.

You can see the final result of our work below. I believe it looks great and I would not say that it was hard to work with the Monstroid 2. You can set up a working and good-looking website in a day or so.

How to create a website using the Joomla
The installation process of the Joomla CMS will be a little tricky. That’s because not all of the hosting providers offer the 1-click installation process for Joomla. So you will need to move the files to the FTP on your own and create the database on your own.
But don’t be scared, that’s not so hard, I will show you everything and walk you through the installation step-by-step.
First of all, you will need to download the latest Joomla package. You can do it on the Joomla official website since Joomla is a free and open-source project.
Once you have downloaded the latest Joomla package, you should unpack it and move the files to our BlueHost FTP. That’s how you may access your FTP folder.
Just click on the ‘File Manager’ button in the BlueHost control panel.

Then click on the ‘Home Directory’ option and submit your request.

That will take you to the root folder where you should upload the Joomla package.

In order to install any CMS you need to have the database, let’s create one for your website. BlueHost even made a video tutorial for everyone on how to create a database, I recommend you checking it out.
Now we can start working on our website. Prior to that I would recommend you checking out our premium Joomla templates and picking one for your future website.
One of the pros of such approach is that the template goes with a so-called ‘Quickstart package’ and that’s an amazing feature.
It is a Joomla package that has our pre-installed template and in order to get a good-looking website with all the demo data you will only need to agree to the sample data installation. That’s easy as pie.
I decided to show you how to work with Joomla using our best template: Jumerix. It’s a multi-purpose template that has a few homepage layouts and lots of pre-designed solutions.

Let’s begin our work! I will create a website for my digital agency as well here. I believe that creating the websites on the same topics, but on different CMS’ will give you an understanding of how good it can get on each CMS.
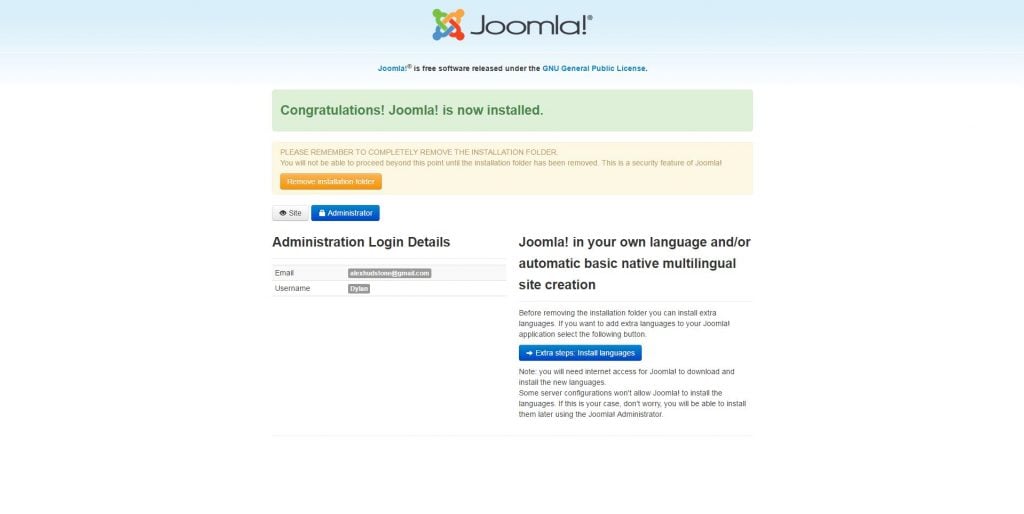
Once you moved everything on your FTP and created the database for your Joomla website, you can proceed with the installation. Open your website and you will be redirected to the installation page of the Joomla CMS.

That’s where you fill in the general info: Administrator name, e-mail, and password. You also have an option to shut down your website from the very beginning. It means that while you work on your website, no one will have a chance to see it unfinished. If they open it, they will see the message telling them that the website is currently on the reconstruction.
The next step includes filling in the database info, the host address, etc.

In the last step you should choose the ‘Install sample data’ > ‘sample_theme3311’ in order to get all the demo data installed automatically.


One of the interesting things about the Joomla installation process: it always asks you to delete the ‘Installation’ folder from your website. In the older versions you had to go to the FTP and remove it yourself, but now you can just simply click on the ‘Remove installation folder’ button and the CMS will do it for you.

That’s how the Jumerix homepage looks. This template also has a few more homepage layouts, but I decided to go with this one, because it fits my digital agency needs.

Basically all the changes are performed in the administrator panel of the Joomla CMS. You can sign in be following the link: mywebsite.com/administrator/. Here you will have to fill in the data that you have entered during the installation.

That’s how the Joomla dashboard looks like. All the menus are located on the top panel and all the settings will appear in the window area below.

Of course the standard slider images do not fit my company, so I let’s change the texts and the images.
Go to ‘Content’ > ‘Articles’ and filter the articles by the ‘Slider’ category. You will see 3 articles that are used in the slider. Each article includes the text and the picture.

Let’s change the title and the picture on the ‘Images and Links’ tab.

The slide text can be changed on the first ‘Content’ tab.

Now it looks like this. You can edit the rest of the slides the same way.

Now we need to change the logo and set the one with our agency name on it, it will be the same one I used in the WordPress tutorial. let’s click on the ‘Extensions’ > ‘Templates’ > ‘Styles’.

Click on the ‘theme3311-Default’ style and you will be redirected to the settings page. That is where the logo can be changed.

It’s time to change the ‘What we offer’ block and add the appropriate information there. All the 6 items in that block are articles and you can change them by going to the ‘Content’ > ‘Articles’ and filtering them by the ‘What we offer’ category.

I will not need all the 6 items, so I will unpublish 3 of them and leave the other 3.

Each and every item can be edited like a regular article, so you can put the title and body text there.

It gets a little tricky when you want to change the icons. In order to change the icon for each item you will need to go to the ‘Images and Links’ tab and change the icon code in the ‘caption’ field.
I believe everyone has an obvious question right now: where can we get the icon codes?
These are the codes of the Awesome Font Icons . You can review the huge library of their icons on the official Awesome Font website and choose the one you like and the one that fits the topic of your website. Once you click on the icon, you will be able to get the icon code.
For example:


Now we need to change the introductory text of the ‘What we offer’ block. In order to do that we need to go to the ‘Extensions’ > ‘Modules’ and search for the ‘What we offer’ modules.

You will have a list of modules with the same name. The one we need is the last one on the list, the one that is located on the ‘navigation’ position.

Once you start editing it, you will see the ‘Pretext’ field on the bottom of the page. That’s where you should enter the text you want to be displayed instead of the demo text.
I have changed the text to the one that works for my company and now it looks like this.

Now it’s time to unpublish the blocks that we don’t want to see on our page. First of all let’s disable the ‘Flexible pricing’ module.
Just go to the ‘Extensions’ > ‘Modules’ and unpublish both of them.

Now let’s turn off the rest of the unnecessary modules the same way we did with the pricing block.


There is this block in the demo that I’d like to change a little bit. I will change the picture on the Macbook using the Photoshop and re-upload it. I will also change the text through the admin panel.

Let’s go to the ‘Content’ > ‘Articles’ and search for the ‘You and your business look ravishing’ article.

Once you found it, feel free to edit it as needed.
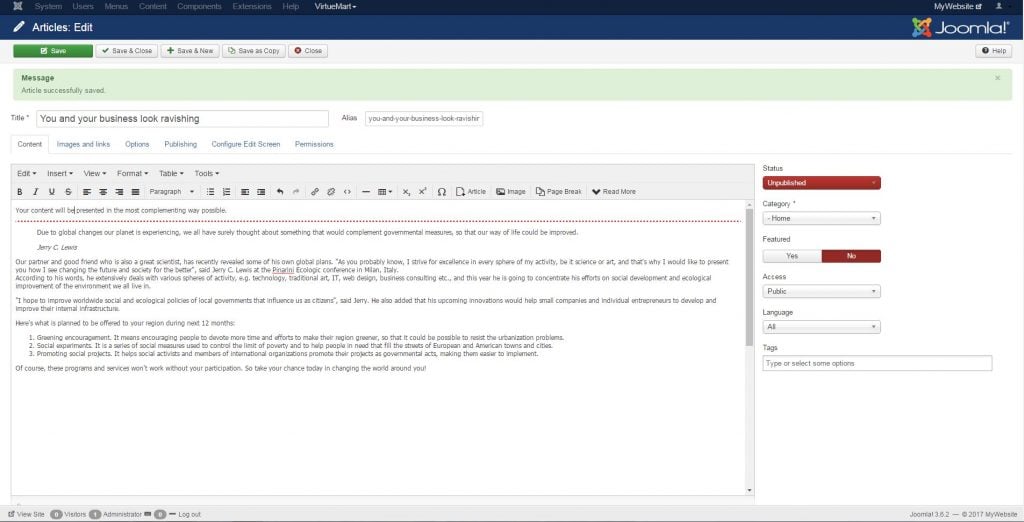
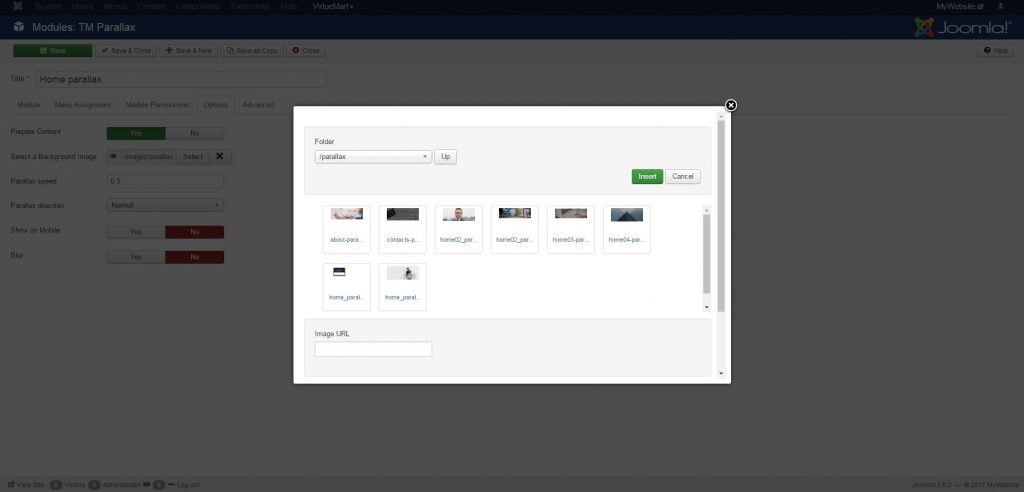
But the picture is not located in the article, so we’ll have to look for the module that displays that picture with the parallax effect.
Go to the ‘Extensions’ > ‘Modules’ and look for the ‘Home parallax’ module that is located on the ‘showcase’ position.

Open it and upload your own picture that you want to see there. Make sure that the picture is in a .png format and has a transparent background, because otherwise it will look ridiculously bad.

Now let’s change a little bit the module that displays the texts about how our company works. Go to the ‘Extensions’ > ‘Modules’ and search for the ‘How we work’ module. There are a few modules with the same name there. You will need to open the one with the ‘none’ position.

As you can see, this module is linked to an article with the same name. Just click on the ‘Edit’ button and you will be able to edit the article right from there.


As you could notice the top menu panel and the footer have the background image and as of right now it doesn’t really fit the style.
I decided that the top panel should be black and the footer should be dark grey.
We can change these settings in the template.css file of the Jumerix template. Go to the folder with the template on the FTP server and open the ‘template.css’ file in the CSS folder.

Look for the ‘#top’ id and comment or remove the background picture. Then add the following line:
background-color: #000000;
Now the top panel will look like this. I think it looks sick!

You can change the footer color the same way. Look for the ‘#copyright-top’ id and comment or remove the background picture line.

Then simply add the following line:
background-color: #1a1b1d;
Now it will look like this.

The last thing to do is changing the main menu. That’s very easy, just go to the ‘Menus’ > ‘Main Menu’ and add the links to the pages you want to display. For me, these are all the same as in my previous tutorial.


This is how the final result looks like:

How to create a website using the Drupal
A while ago I posted an article on how to build a wordpress website. I was surprised to see a comment by one of our readers asking whether we consider posting the same tutorial for the Drupal themes. So as you understand, it was obvious to me that we should definitely review the Drupal theme customization in our today’s big article.
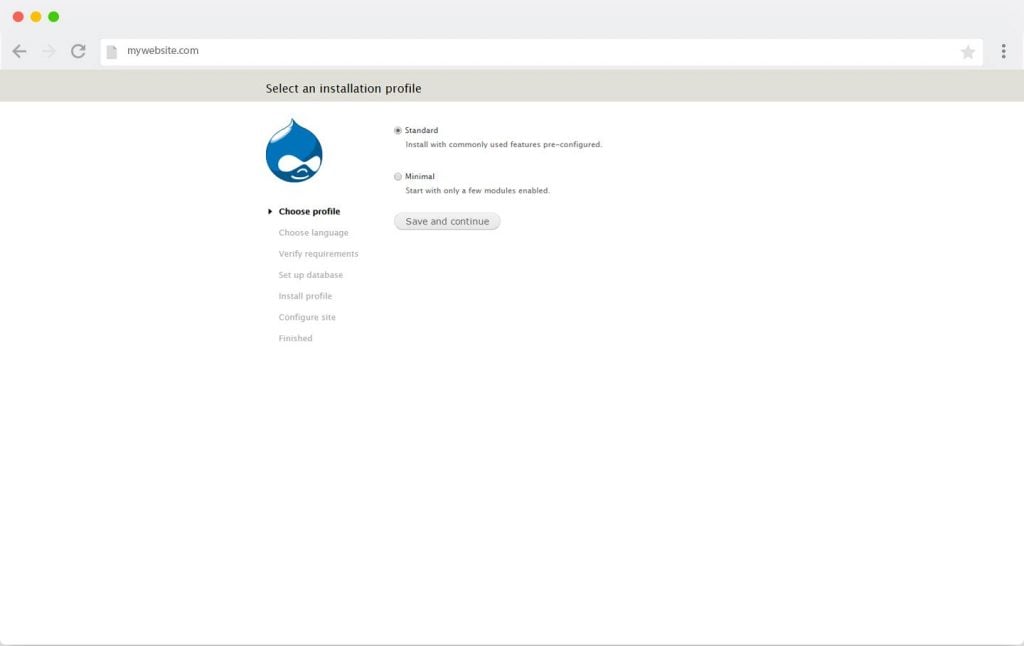
The installation process is simple and quick, so as you can see, Drupal doesn’t want to scare you away right from the beginning. Everything looks exquisitely and convenient.

Once you’ve filled in the database name, username and password, don’t forget to open the ‘Advanced settings’ and enter the Database host. That’s the host address that you can take from the Bluehost control panel. Drupal usually sets this field value to the ‘localhost’ as a default.


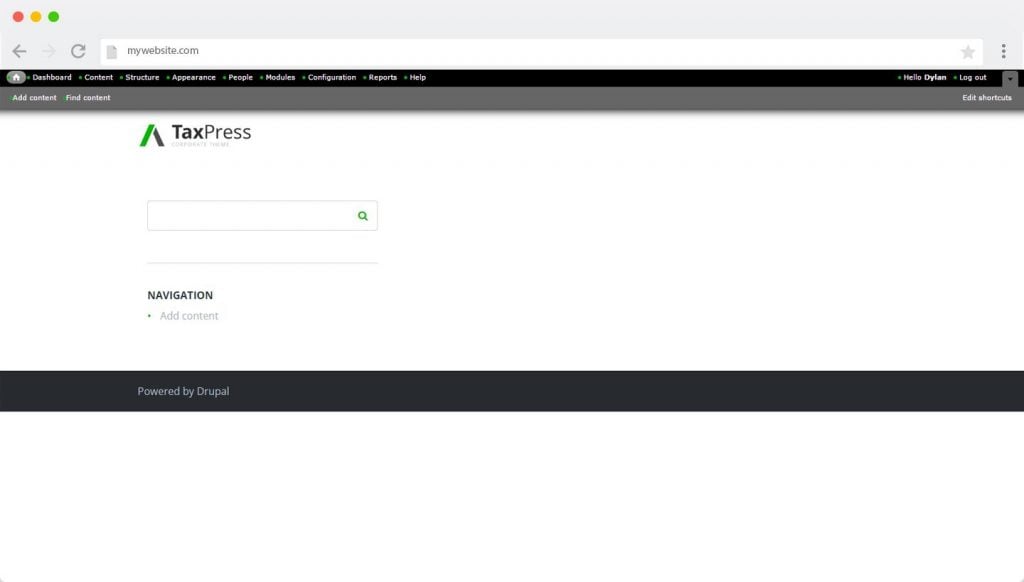
Once you’ve given Drupal all the info like your future site’s name, administrator username, password and e-mail address, the installation process is over. You will be redirected to the homepage of your newly created website. It will have a generic default Drupal theme, so we are not done yet. Let’s take our beautiful theme and install it properly, it’s very easy!

In order to install a new theme, you should go to the ‘Appearance’. You will be redirected to the page with the list of available themes. Click on the ‘Install new theme’ and choose the zip archive with our theme.

Once you’ve set the new theme as a default one, you will see that your homepage now looks different. It has a new logo now and the color scheme is different. But it doesn’t look like the demo, right? That’s because we have to perform one more step to finish our theme installation process.
Now we need our website to have the demo data installed. In order to do that, we have to go to our phpMyAdmin panel, you will see a page like this.

Let’s click on your drupal database (everyone will have a different name), that will take you to the page with all the tables available in your database. But we were not looking for those, we need to import some data.

Click on the ‘Import’ tab and ‘Select the file’.

Now we’ll have to select the .sql file from the package with your theme.
Let's get back to your website and log in to the admin panel, just go to the link: mywebsite.com/user/.
Once you have installed our theme, the username and password will be set to the default:
Username: admin
Password: admin123
You may change this setting or create a new user through the admin panel later, so no worries.

We can apply changes to the structure of your website by changing, adding or removing the block in the ‘Structure’ - > ‘Blocks’ admin panel section.

I decided to remove the top panel with the contact info and move the ‘Follow us’ section to the ‘Menu’ panel.

Now it will look like this. I think it looks cute, right?

Now it looks obvious that we need to change the slider background because this picture doesn’t work for my company.
In order to do that, you should go to the ‘Appearance’ - > ‘Settings’ - > ‘Region settings’.

Click on the ‘Select media’ and upload your picture.

Now it looks way better, because it fits the topic of my future website. I think it’s time to change the text in our slider.

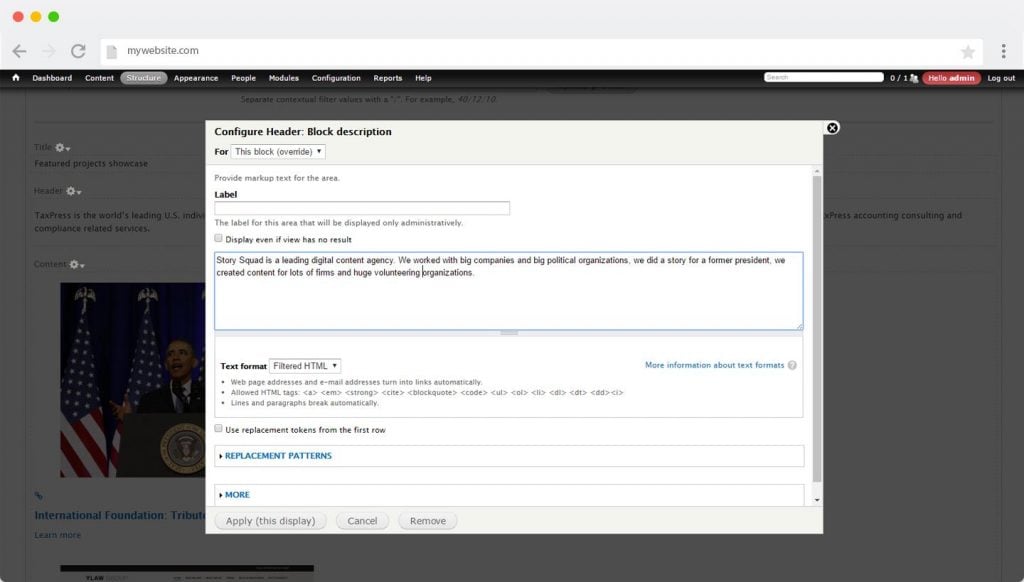
In order to do that you may go to the ‘Structure’- > ‘Blocks’ and click on the ‘configure’ button right by the ‘Header block’ row.


Once we’ve entered all the data, our slider started to look like this.

Since we are working with the header section of our website, it’s time to work with our menu. You can do it by going to the admin panel and clicking on the ‘Structure’ - > Menus.

We’ll see the list of the menu items, I decided to remove the ‘Documentation’ menu item and rename the ‘About us’ item to ‘Who we are’ and the ‘Services’ item to ‘Why us’.


We have already tuned in the slider, the menu and social links, now it’s time to upload the new logo. I decided to save the same color scheme, so our new logo will have green element on it.


We need to change the projects to suit my digital agency topic. You may change each project on the main page very easily. Just open the project and click on the ‘Edit’ tab.


I’ve filled in the title, description and uploaded the picture.

Then I did the same for all the other projects for my digital agency, so now it looks like this.

As you can see, the introduction text fits the demo topic only, let’s change it. It’s even simpler, you may just hover on this block and click on the edit button. Fill in the data you want.


We’ll need the core features module as well, it’s a great way to showcase the main services of your company.

I decided to advertise three core features for my digital agency: Speech writing, Content marketing and Creating the website content.

You can change the features look by going to the ‘Content’ and editing the articles from the ‘Services’ category.


I don’t want our website to have the latest news block, so I’m gonna go to the ‘Structure’ - > ‘Blocks‘ and disable all the blocks I don’t want to see on our website.

Now let’s go to the ‘Appearance’ - > ‘Settings’ - > ‘Region Settings’ and change the footer image. It’s optional, but I have an image that I’d really like to see right there, so I decided to put it to a good use.


This is how the final result looks like:

Conclusion
Let’s wrap our today’s tutorials by summarizing the information we gathered.
- Use WordPress. If you want to build a website of any complexity, a huge store or a small blog, a landing page, or a magazine, you can use WordPress and you will be more than happy with the number of great features that this CMS offers. It’s unbelievably easy to use and it’s also very easy to understand it and learn how to make a website from scratch.
There are plenty of premium WordPress themes around the internet, so you will not have to worry about how you can make your website stand out.
Working with the Joomla and Drupal probably will not make you that happy, but they certainly have their pros. Joomla is a little bit more complex, Drupal is complex as hell, so keep it in mind while choosing the right CMS for your website.
The pool of Drupal themes and Joomla premium templates is a little bit smaller due to the fact that a smaller percentage of users prefer these platforms. However, you can always find some ready-made solutions for those too.
We created this extensive article for you and we hope that it will help you to make a WordPress website without any issues.
We will keep this guide updated and we’d like to let you know that you may ask your questions in the comments below on how to create a WordPress website and we will try to help you out with the issues you may have.
Just keep calm and create great websites!