Everything Developers Need To Know About Figma
If you aren’t using it yet the name Figma is surely a name that you’ve heard more and more over the last few years.
Figma is a relatively new design tool that is browser-based. This means you don’t need to install it locally or buy expensive licenses to give team members access to design files. This has made design more accessible than ever and that’s why many developers now find themselves needing to learn how to work with design tools.
Since many developers don’t have a lot of experience playing around in design tools we’ll cover all the basics developers need to know about so you can confidently navigate around Figma and extract any information you might need when working with the designs sent to you by a designer.
I’ll also cover some specific Figma features that make it easier for developers such as providing CSS information about elements used within the design.
A Quick Note About Shortcuts
Most shortcuts are written for both Windows and Mac, where the Ctrl key on Windows corresponds to the Cmd key on the Mac, and Alt is used for both Alt (Windows) and Option/Alt (Mac).
For example, Ctrl/Cmd + Alt + C is Ctrl + Alt + C on Windows and Cmd + Alt/Option + C on the Mac.
Developer Handoff
To understand the hype around Figma and why you suddenly find yourself needing to learn how design tools work as a developer, it’s helpful to look back on the developer handoff process before Figma was around as it has changed significantly.
Design teams used to send an email to the development team with dozens of attachments containing static images of the design, exported assets, and even word documents with the page copy. Developers usually didn’t have access to the full design files as licenses for design software were expensive and not strictly necessary. Communication and feedback were scattered across email, project management tools, and meeting notes. Everyone was struggling with keeping track of changes to the design; every time the design was updated, it needed to be sent to everyone involved — yet again.
As design tools modernized, this process got more streamlined. Designers would often use separate tools like Zeplin or Invision to handoff the designs to developers. Developers now had better access to the designs and had more tools available to extract information about typography, colors, and measurements. Although it was easier to find the latest version of a design for everyone, designers needed to work in separate tools and keep them in sync. A big improvement but still not perfect.
Figma is a design tool that is rapidly gaining in popularity and shakes up the design handoff process once again. Figma is browser-based so everyone can use it regardless of their operating system and without installing anything. It’s also completely cloud-based so everyone is always looking at the latest version of the design and has built-in collaboration tools making collaborating and communicating easier than ever.
If you want to follow along with this article (or just play around with Figma), I’ll be using this file to explain everything in this tutorial:
- Figma startup landing page dark (download)
The Basics
When you are added as a collaborator on a Figma design you can choose to open it in the browser or you can download the desktop app (available on Windows and macOS). The desktop app is not a native app but a cross-platform electron app like Slack and Visual Studio Code. The functionality of the browser and desktop versions is largely the same. The desktop app does have built-in support for using local fonts whereas the browser version requires installing the Figma Font Helper before you can use local fonts.
Figma’s interface is split into three major parts. In the middle, you’ll find a big canvas where all the designs are located. On the left side, there is a sidebar that contains the layers, assets, and pages of a file. The right toolbar contains all information about elements in the file.
A file can have multiple pages and every page has one canvas. Designers often use pages to separate and organize different parts of the file with separate pages for the design system, icons, or other file assets.
When opening up a new file for the first time, make sure to familiarize yourself with the different pages within the file. If the designer you are working with has made a separate page for all colors, typography, and icons it can save you time while building out the design.

Navigating Figma
Before we get to the good stuff, it’s important that you can quickly navigate around in Figma so you can work more efficiently.
When you open a file you’ll start on the largest zoom level that fits all the frames in the visible area.
- You can zoom in or out by holding Cmd ⌘ and scrolling up/down or by pressing the + and - keys.
- If you want to scroll horizontally on the canvas you hold the spacebar and drag with your mouse.
- You can zoom in quickly on a single frame or element by selecting it and pressing Shift + 2.
- Quickly return to where all elements fit in the canvas by pressing Shift + 1.
Don’t worry too much about remembering these shortcuts for now, just know that they are available and you can always view these and other available shortcuts by pressing Cmd + Shift + ?.

Once you have used a shortcut it will be colored blue so you can easily see which ones you still need to learn.
Project Styles
When you’re opening a brand new project it’s helpful to set up all the basic styles first. Figma displays all the project styles in the right sidebar. Here you can easily find all the typography, colors, grids, and other styles used in the design.

Note that the project styles will only display if no element is selected. If you want to cancel your selection and view the project styles, simply click somewhere in the canvas or use the Esc key.
You can use this information to set up your layout, variables, and fonts in CSS. Simply click on the edit icon next to the style element to view all information about that style.

If you double click an element, it will select one nesting level lower every time you double click. This is a great way to drill down into an element until you get to the desired selection.
There are many more ways to select and navigate layers, this article just covers the basics that are used 80% of the time. Figma’s documentation teaches more ways to select and navigate layers.
Once you select an element, you can click the Code tab in the right sidebar to display all the CSS information about that element.

It’s important to note that the CSS is automatically generated and is not perfect, especially for positioning elements. Don’t copy all CSS 1-to-1 to your project but instead use it as a guide and a quick way to get information about elements.
Dimensions And Measuring
Whenever you want to measure spaces between elements, correctly position elements, or even set the right margin or padding, all you need to do is select the element that you want to measure from, then hold the Alt and hover your mouse over the element you’d like to measure the distance to.

Depending on what type of file you are exporting there will be different export settings you can tweak. Images only have a scale multiplier and you can choose the file type (PNG, JPG, SVG or PDF). Figma will use the name of the layer as the file name but you can add a file name suffix. You can then export the selected element using the export button.
Quick tip: You can also quickly export an asset by right-clicking it, hovering on Copy/paste and copying the image or SVG code. This is useful if you don’t need to have custom export settings and just need a quick copy of a single element.
Export all Assets
You can export each individual asset by selecting it and clicking the export button but you can also export all assets that are exportable at once.
If you want to export all the assets from the design in one go you can go to the main menu, and click Export.. under the File menu. You can also use the keyboard shortcut Shift + Cmd + E on MacOS or Shift + Ctrl + E on Windows.

This will display a list of all the items in the file that are marked for export. You can then inspect the dimensions, file type and exclude any files before making the final export. If you hover over the thumbnail of the assets it will display the file name that the asset will have when it’s exported.
If you need to make adjustments, clicking on the thumbnail of an asset will select that element in the canvas where you can easily adjust the export settings.

If you have a lot of exportable assets in a single file, you can use a slash “/” in your layer name to mark it as a group of assets. Figma will then automatically create a folder for that group and export the assets within that group to the subfolder.
User Flow And Animations
Figma also supports a variety of animations for transition between states or pages, for opening modals or menus, for dragging and swiping actions on mobile and much more. You can preview these animations by clicking the play icon in the top right to open Presentation view.
To view the information about an animation, select the Prototype tab in the right sidebar and you’ll see the user flow displayed in blue arrows in the canvas.
Clicking on the arrow shows you all the information about that specific animation. Each animation consists of a trigger, an action, and a transition.
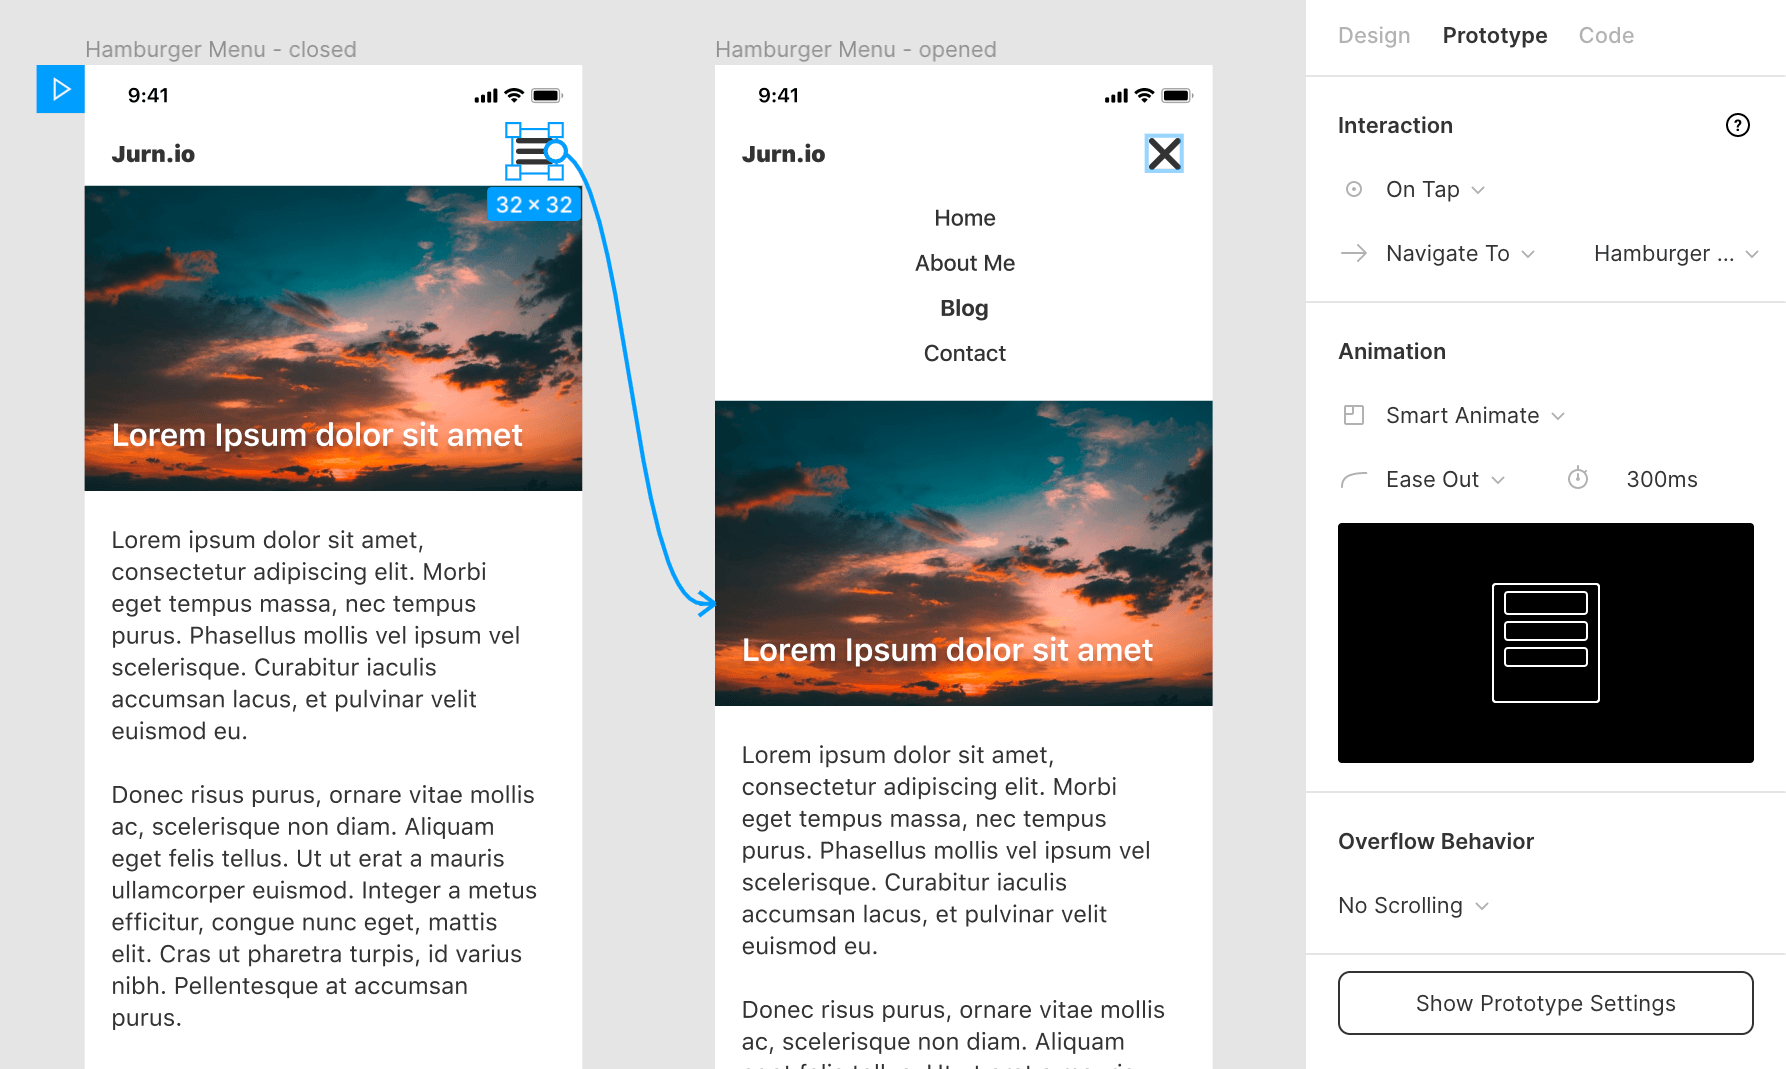
This simple animation opens a hamburger menu. You can see that the hamburger icon has an On Tap trigger, once it is triggered it will Navigate To the screen where the mobile menu is in an opened state. The transition type is a Smart Animate transition which means Figma automatically interpolates between these two states. It does this using an Ease Out animation function with a duration of 300ms.
This information is necessary to exactly replicate the animations in CSS but unlike all other element information, animations can not be found in the Code tab!
Communication
If anything isn’t clear and you’d like to ask someone else on the project for clarification. All you have to do is click on the chat bubble icon in the top toolbar or hit the C key to switch to the Comment tool.

You can now click anywhere in the design and start typing a comment or question about that element. Once you’ve finished writing your comment, you can use the V key to return to the normal cursor.
Note that not everyone will automatically receive a notification that you left a comment. If you want to be sure someone sees your comment you should mention them using the @ symbol just like on Slack or Twitter.
Every comment is visible to everyone who has access to the design as there are no private comments/chats. Once the issue has been resolved it can be marked as such and the comment will gray out.
Conclusion
We’ve covered a lot of ground so far in Figma and you should be able to navigate around and extract all the information you need from any Figma design file sent your way. Getting information about typography and colors, measuring margins, padding and position of elements, exporting assets and collaborating with other team members.
If you want to learn more about the tool, Figma’s documentation is a great place to start or search when you want to learn more about a specific feature.