Migrating to a New Web Host? Read This Guide First (2024 Updated)

When you first start your online business, you likely choose a hosting provider that fits what your business needs at the time.
As your business gets bigger, you might find that your current hosting isn’t good enough anymore because you need better email services, more traffic capacity, better help from the provider, or more storage space.
If your current hosting provider can’t give you what you need, it’s smart to move to a different one. Let’s talk about how to change your web hosting smoothly so you don’t have to worry!
What do you need for hosting migration?
If you want to move your website to a new hosting provider, there are the initial steps you should follow.
Domain Name: If you already have a domain name, great! If not, you’ll need to buy one from a domain registrar before you can move your website.
New Hosting Plan: You’ll need to sign up for a hosting plan with your new hosting provider. Look for a hosting plan that suits your needs.
Website Files and Database: Make sure you have copies of your website files and your database. You can store them on your computer or in a cloud storage service like Dropbox or Google Drive. Some hosting providers also allow you to upload them directly to their servers.
FTP Client: You might need an FTP client (like FileZilla) to upload your website files from your computer to the new hosting provider’s server.
If you don’t have copies of your website files or a way to upload them, don’t worry. I’ll explain how to do that next.
How to transfer web hosting to a new hosting service provider: a step-by-step guide
Now, let’s talk about the steps you need to follow to move your website to a new hosting provider.
First, you have two options for how you want to do this:
Manual Transfer: This means you do all the work yourself. You’ll need to back up your website, transfer the files, upload them to your new hosting, and update the settings. It can be a bit of work, but you have full control.
Managed Migration: If you don’t want to deal with all the technical stuff, you can use a service provided by your new hosting company to help you move your website. They’ll take care of everything for you, making it easier, but it might cost you a bit.
For example, WPX hosting offers free website migration, and you can also use their email service. They do the migration in 24 hours, and if you need it faster, they also offer express migration transfer. This option is designed for new customers who are in a hurry to switch from their current hosting provider to WPX. It’s like an emergency exit for your website, allowing you to move your website to WPX hosting quickly and smoothly.
If you want to attempt the process by yourself, you can follow the step-by-step instructions in this guide. But don’t worry, if you run into any problems or have questions, you can contact the customer support team for assistance. They are available to help you whenever you need it.
Step 1: Choose Your Hosting Plan
The first thing you need to do is pick the right hosting plan for your website. This step is essential, so take your time to decide which one suits your needs. Here are some general types of hosting plans you might come across:
Website Hosting: This type of hosting works for various websites and offers features like 24/7 security, regular backups, access to a control panel (like a dashboard for your website), global data centers (places where your website’s data is stored), and more.
WordPress Hosting: If you have a website built with WordPress, you can choose these hosting plans. They are designed for both regular websites and online stores using WordPress. They often include easy migration tools, daily backups, and even free email for the first year.
Servers: These plans include options like virtual private servers (VPS hosting) and dedicated servers. They provide higher performance and more control over your hosting environment. These plans are usually preferred by businesses with specific needs.
Once you’ve figured out which plan is right for you, it’s time to set up your hosting account. This part is typically easy and quick to do, and you can usually find step-by-step instructions to help you along the way.
Step 2: Backup Your Website Files
In this step, you’ll want to create a copy of all your website’s files as a safety net. Here’s how you can do it:
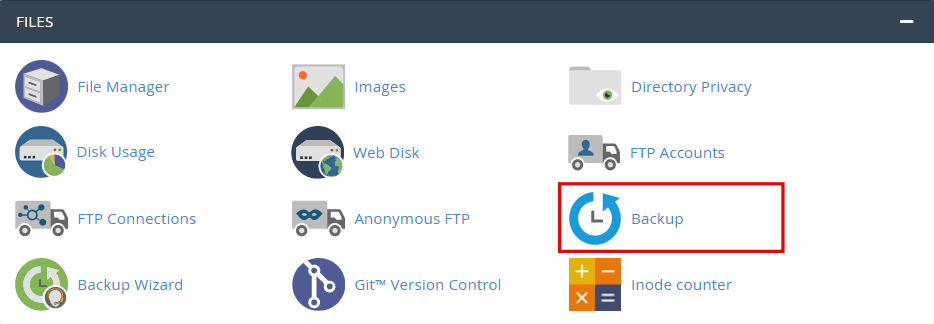
Use cPanel (if available): You can make a backup using the File Manager tool in your hosting account’s cPanel. Look for options like “File Manager” or “Website Backups” and choose to create a backup. After it’s done, download this backup to your computer. Make sure to get the most recent backup if you’ve done this before.
If you don’t have cPanel: If you can’t use cPanel or prefer not to, you can use an FTP client like FileZilla. Here’s how to do it:
a. Download FileZilla for free from their website.
b. Open FileZilla and enter your hosting account’s FTP credentials, which are usually provided by your hosting provider. This includes the host (like yourdomain.com or an IP address), your username, and your password.
c. Click the “Quickconnect” button. The right side of your screen will display a list of the files attached to your website (this is your hosting server).
d. Select the files and folders you want to back up and click the “download” button.
e. A window will pop up, asking you to choose where on your computer you want to save these files. Pick a location and click “OK.”
f. The selected files will start downloading to your computer and will appear on the left side of the FileZilla screen (this is your computer).
This backup is like a spare copy of your website in case anything goes wrong during the migration process. It’s always good to have a backup handy!
Step 3: Export Your Database (if applicable)
Not all websites have a database; some are just simple static pages. If your website doesn’t use a database, you can skip this step and the next few. Ask your current hosting provider if you’re unsure whether your website has a database.

However, if your website does use a database (common with content management systems like WordPress, Joomla!, or Drupal), you’ll need to export a copy to move it. Here’s how to do it:
You can access phpMyAdmin by logging into your hosting account’s control panel. In most cases, it is used to manage databases.
Select Your Database: The left-hand side of phpMyAdmin shows you a list of databases. Choose the one that belongs to your website.
Export Your Database: Look for an “Export” option at the top of the screen. Choose the “Quick” export method from the dropdown menu and click “Go.”
Download the .sql File: A file with a “.sql” extension will start downloading to your computer. This file is your database backup. Save it in the same place where you stored your website files for safekeeping.
This backup contains all the important data your website relies on, so it’s essential for a smooth migration.
Step 4. Create your new database:
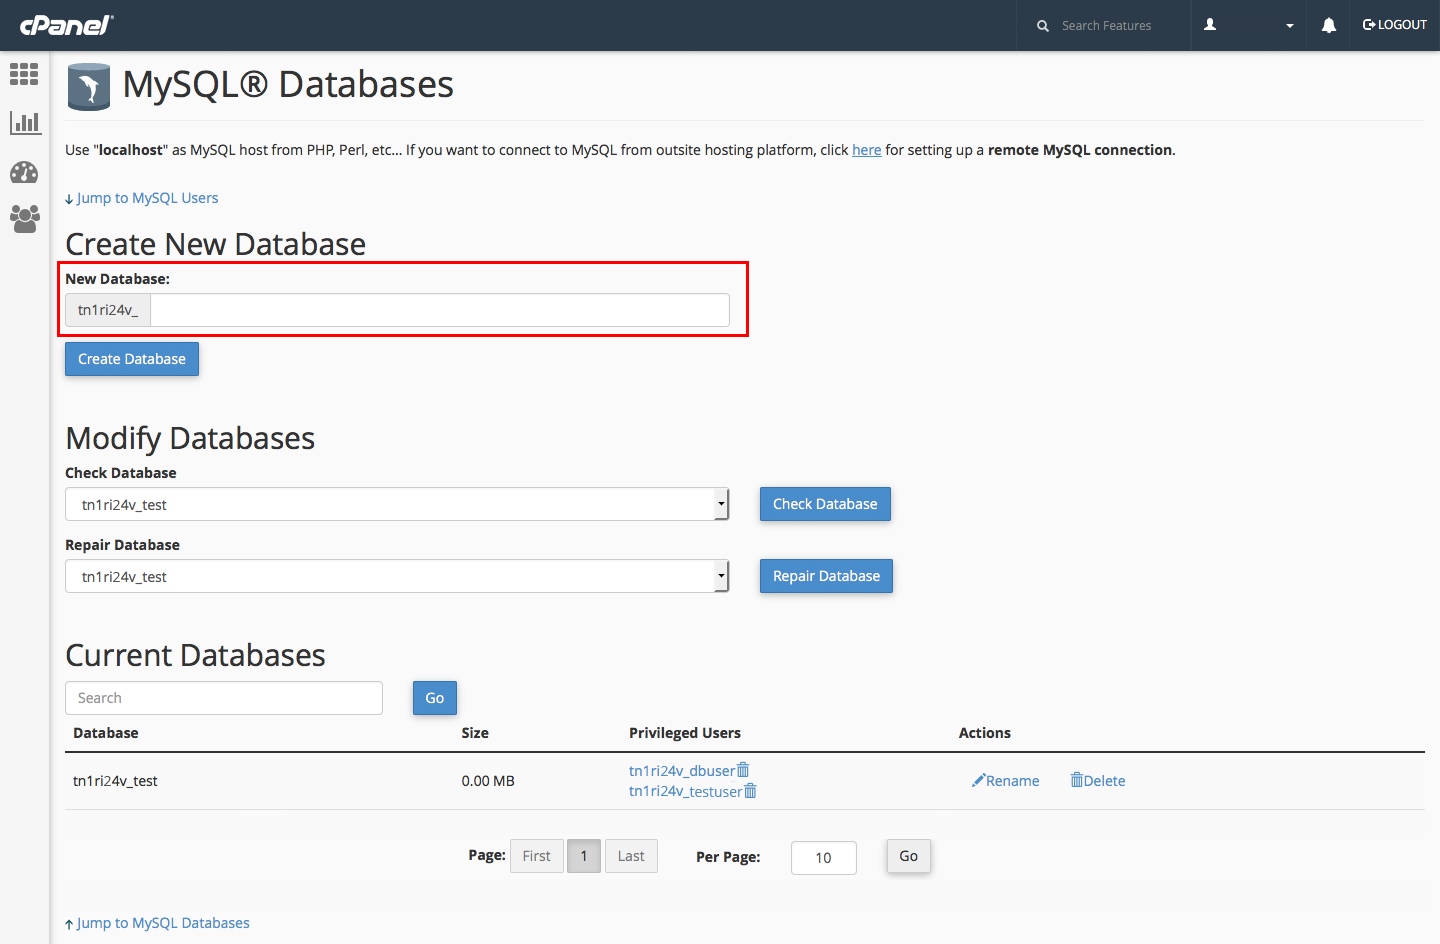
Start by Logging In: First, log in to your hosting account, where you plan to manage your website.
Find Web Hosting Section: Look for the section labeled “Web Hosting” or something similar on your dashboard.
Access Control Panel: Within your web hosting section, you should find a way to access your control panel. This is often referred to as “cPanel” or “Hosting Dashboard.”
Use the Database Wizard: Inside your control panel, there’s usually a tool or wizard specifically for creating databases. Follow the prompts or steps provided by this tool to set up a new database.
Step 5: Importing Your Database
After you’ve created your new database, you’ll need to fill it with your data. Here’s how you can import your existing database information into the new one:
Go Back to Control Panel: If you’re not already there, navigate back to your hosting account’s control panel.
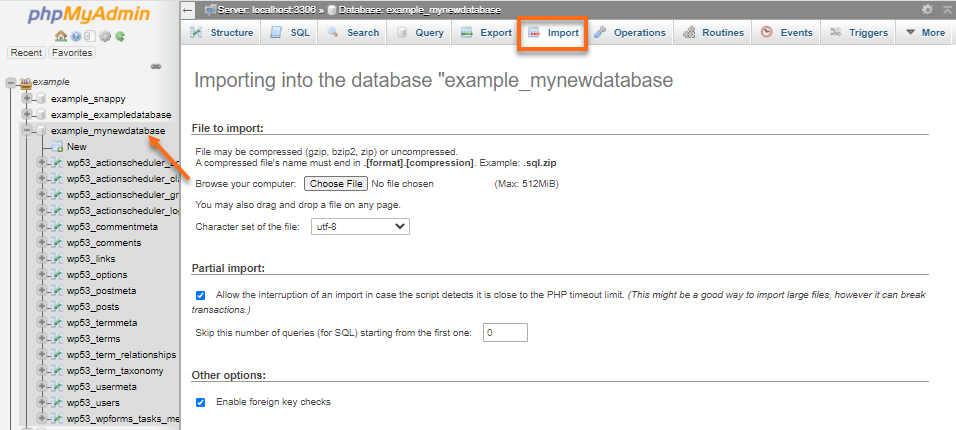
Open phpMyAdmin: Find and open phpMyAdmin, a tool used to manage databases directly.
Select Your Database: In phpMyAdmin, you’ll see a list of databases on the left. Click on the name of the database you’ve just created.
Import Data: Look for the “Import” tab at the top of the page and click on it.
Choose Your Database File: Click on the “Choose File” button to select the database file you want to import. This file should be a backup of your old database.
Start the Import: After selecting the file, click on the “Go” button at the bottom of the page to begin importing your data into the new database.
Step 6. Update Your Website’s Files:
If you’ve changed details like the database name, username, or password, you’ll need to adjust your website’s settings to match. This means updating your website’s files to connect to the new database. The steps might vary depending on the system your website uses to manage content.
Let me explain to you how you can do it simply: –
Edit the Database Export File:
- First, find the .sql file you saved earlier. Open it with a basic text editing program (like Notepad on Windows or TextEdit on Mac).
- Look for any mentions of your old website’s domain name or IP address and replace them with the new domain name.
- Save your changes and close the editor.
Update Your Website’s Configuration File:
- Next, open your website’s main settings file. This file is where your website’s core settings, like database connection details, are stored. Its name depends on your website platform. For example, it’s wp-config.php for WordPress sites and settings.php for Drupal sites.
- In this file, find any mentions of your old database name and replace them with the new database name you set up. Do the same for any old domain names, swapping them out for your new one.
- Save the file and close it after you’ve made all the necessary changes.
By following these steps, you ensure that your website points to the right database and domain, making your site work correctly with the new settings.
Step 7. Upload Your Website Files:
Now, it’s time to move your website files from your computer to your hosting account. You can do this using a tool your hosting service provides, like File Manager, or through an FTP (File Transfer Protocol) application such as FileZilla.
Using an FTP Application (like FileZilla):
- Open FileZilla or any FTP application you prefer.
- Enter your hosting account’s FTP details (like host, username, and password) and connect to your hosting account by clicking “Quickconnect” or a similar button.
- Once connected, you’ll see two main sections. The “Remote site” section shows your hosting account’s files and the “Local site” section shows your computer’s files.
- Find your website’s root directory in the “Remote site” section. This is where your website files should go.
- On your computer (in the “Local site” section), navigate to the folder where you’ve saved your website files.
- Select all the files and folders you need to upload.
- Drag them from the “Local site” section to the “Remote site” section. This starts the upload process.
Using Your Hosting’s File Manager:
- Log into your hosting account and open the File Manager tool.
- Navigate to your website’s root directory. This is the location within your hosting account where your website files need to be.
- Use the upload option within File Manager to select the files from your computer that you want to upload.
- Start the upload process. Once the files are uploaded, they’re live on your hosting account.
After following these steps, your website files will be uploaded to your hosting account, making your website accessible online.
Step 8: Check Your Website
Now that you’ve uploaded your website files and added your database, it’s time to see if everything is working right. Here’s what to do:
- Look at your website from the outside (what visitors see) and from the inside (the part you control).
- Find any problems early on. This way, your website won’t have to go offline unexpectedly.
- Take a moment to learn how to use the new control panel where you manage your website.
If you don’t see any issues, well done! You’ve moved your website to a new host on the internet without a hitch.
Step 9. Update Your Website’s DNS (Domain Name System) settings:
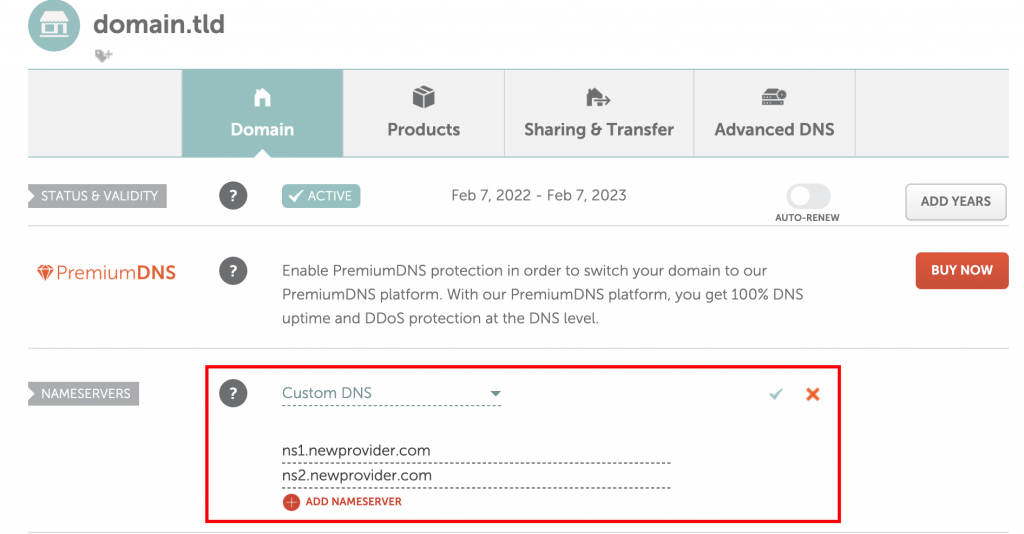
The final step is to tell the internet where your website lives now by updating the DNS settings.
- Get the new nameserver details from your new website hosting service.
- Think of DNS as the internet’s address book. It connects your website’s name (for example, www.yoursite.com) to its internet address so people can find it.
- Change your website’s DNS settings to point to your new host’s nameservers.
It might take up to two days for these changes to take effect everywhere on the internet. This wait is normal and expected.
Once the DNS update is complete, your website will start working from its new home.
Conclusion
That’s all! By doing these things, you have smoothly moved your website to a new hosting service. After checking, everything is working fine. Don’t forget to close your old hosting account so you’re not paying for two.
Also, if you are stuck somewhere, you can always consult the customer support of the hosting provider. I always prefer WPX hosting as they take care of the migration from start to finish.
Featured image by Pixabay