Authenticating React Apps With Auth0
Authentication is a critical aspect of most apps, as developers must ensure the apps they build are secure and can only be accessed by verified users. While custom authentication solutions can be built, the cost and resources involved to build, maintain, host, and secure them can be heavy. This is where Auth0 comes in.
Auth0 provides SDKs for all popular web, mobile, and native platforms, allowing for deep integration with the language and stack of your preference. You can also set up different login options so your users can login to your app with their preferred method.
This article does not cover an in-depth explanation of how authentication works under the hood. Auth0 has a resource that covers that.
Note: To follow along, you’ll need a basic understanding of React and React Hooks.
What Is Auth0?
Auth0 is a flexible solution to add authentication and authorization to your apps. You can connect any app to Auth0 and define the identity providers you want to use, whether Google, Facebook, Github or others. Whenever a user logs into your app, Auth0 will verify their identity and send the authentication data back to your app.
While Auth0 comes with with different login forms, their Universal Login is the safest and faster to get started with. Auth0 also recommends you use this. With Universal Login, the user is redirected to the login page, authenticated by Auth0’s servers, and then they are redirected back to your app. When using Universal Login, you can start off using a simple username and password, and later on, add other login methods, based on your app’s requirements.
Another benefit of using Universal Login is that you don’t need to set up a custom login page. However, you can customize the Universal Login to suit your needs.
How Does Auth0 Work?
When Auth0’s servers redirect a user back to your app, the redirect URL is populated with information about the authenticated user. This allows us to access data about the user from the information we get back from the identity provider. A user profile in Auth0 is the information obtained from an identity provider. The user data we get back will differ from one identity provider to another.
When the user is redirected back to the app, the information sent along in the redirect URL is as follows:
- access token
This is used to inform an API that the bearer of the token is authorized to access the API and perform some action. Access tokens are not intended to carry information about the user. They are only used to authorize access to a resource. - id token
This is a security token granted by the OpenID Provider that contains information about a user. This information tells your client app that the user is authenticated, and can also give you information like their username. It comes in JSON Web Token (JWT) format. - expires in
This tells us how many seconds until the access token is no longer valid. By default, this is 1200 seconds (20 minutes). When the access token expires, the app will be forced to make the user sign in again. - scope
OpenID Connect (OIDC) scopes are used by an app during authentication to authorize access to a user's details, like name and picture. Each scope returns a set of user attributes, which are called claims. The scopes an app should request depend on which user attributes the app needs. Once the user authorizes the requested scopes, the claims are returned in an ID Token and are also available through the /userinfo endpoint.
Auth0 Authentication Methods
Auth0 provides several platform integrations. In this article, we will take a look at the JavaScript SDK and the React SDK.
- JavaScript SDK: This is a client-side JavaScript toolkit for Auth0 API.
- React SDK: The Auth0 React SDK (auth0-react.js) is a JavaScript library for implementing authentication and authorization in React apps with Auth0.
Configuring Your Auth0 App
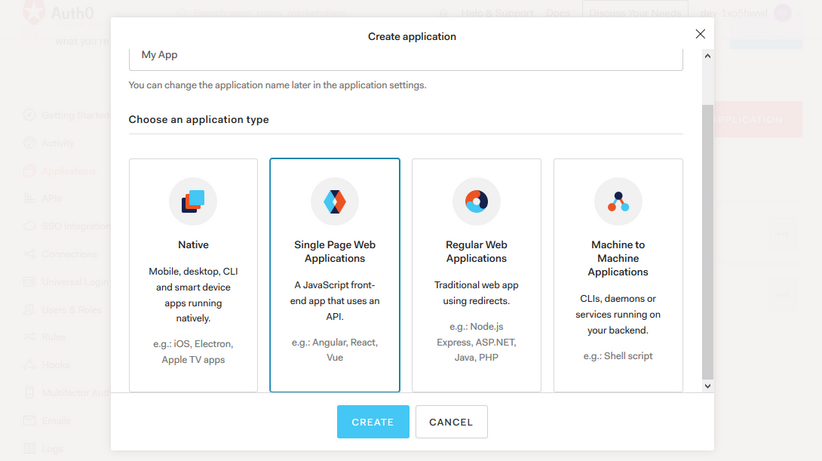
- Create your Auth0 app on your dashboard.

- Select the type of app. Ours is a SPA.
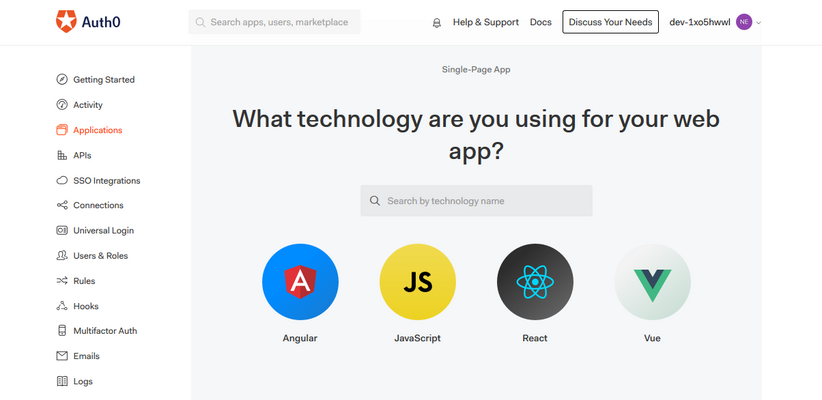
- Select the technology.
- Take note of your app credentials. We’ll need them to integrate Auth0 into our react app.

We configure the URLs of the app in its settings for the login and logout functionality to work properly.
A callback URL is a URL in your app where Auth0 redirects the user after they have authenticated. For our app, set the Allowed Callback URL to http://localhost:3000.
After Auth0 logs the user out of the authorization server, the logout URL is the URL the user is redirected to. We also set this to http://localhost:3000. Callback URLs can be manipulated by unauthorized parties, so Auth0 recognizes only URLs in the Allowed Callback URLs field of an app's Settings as valid.
Allowed Web Origins handles checking for current authentication sessions. This ensures the user login persists when they leave your app or refresh the page. We also set this to http://localhost:3000.
Authentication Using Auth0 JavaScript SDK
Let’s use this SDK to simulate a basic Auth0 login flow. The source code for this section is available on GitHub. The components of this demo app are:
App.js: this is the root component. We pass theAuthclass we will create later to each component from here.Nav.js: this will contain the login and logout buttons, helping the user properly navigate from one page to another.Profile.js: the user profile. It will only be accessible if the user has logged into the app.Home.js: the Home component.Auth.js: we define the authentication utilities here in anAuthclass we will define.Callback.js: the component Auth0 redirects the user to once they login.
Let’s set up our app’s credentials as environment variables.
REACT_APP_AUTH0_DOMAIN=your-domain
REACT_APP_AUTH0_CLIENTID=your-client-id
REACT_APP_AUTH0_CALLBACK_URL=your-callback-url
Create a .env to store the domain and cleintId credentials of your app. Also, set the callback URL in the file. In this app, I will be using http://localhost:3000 as my callback URL.
Adding Auth0 Instance
npm i auth0-js
import auth0 from 'auth0-js';
To use the JavaScript SDK in our app we, first install the SDK. Next, we create an Auth.js file where we set up the authentication functionality. Import auth0 from auth0-js into the Auth.js file.
export default class Auth {
  constructor(history){
    this.history = history;
    this.auth0 = new auth0.WebAuth({
      domain: process.env.REACT_APP_AUTH0_DOMAIN,
      clientID: process.env.REACT_APP_AUTH0_CLIENTID,
      redirectUri: process.env.REACT_APP_AUTH0_CALLBACK_URL,
      responseType: "token id_token",
      scope: "openid profile email"
    })
}
Next, we initialize a new instance of the Auth0 app. To do this, create a class called Auth. Here, we initialize a new Auth0 instance. We pass in an options object that contains some parameters.
There are several parameters we can add to the Auth0 instance, and of those parameters, only the domain and clientID are required.
domain: your Auth0 account domain.clientID: your Auth0 client ID.redirectUri: the URL Auth0 redirects your user when they have been authenticated. By default the URL you specified for your app’s Callback URL will be used, so this parameter is not required.responseType: we define the response we want to get back from Auth0 when it authenticates our user. We specify that we want to get theid_tokenback from the response.scope: we define what information we want to get from the user. This way, we will be able to access their email address and whatever information is stored in their profile. The information we will be able to get from the user depends on the identity provider they use to sign in. We will be making use of the OpenID Connect protocol to access information about the user.
The Auth class accepts react-router's history prop as an argument. Later on, we will use this to redirect the user to different pages in our app.
We create a new instance of auth0 and pass in the configurations. We assign the new instance to this.auth0. We get values of domain, clientID and redirectUri are from the .env file we created earlier.
Adding Login Functionality
We need to add a login method to the class we created in Auth.js.
login = () => {
  this.auth0.authorize()
}
To do that, we add Auth0’s authorize() method to login. authorize() is used for logging in users through the Universal Login. When authorize() is called, it redirects the user to Auth0’s login page.
The Auth class needs to the passed to other components, the Nav, Home and Callback components.
import Auth from './Auth';

function App({history}) {
  const auth = new Auth(history)
  return (
    <div className="App">
      <Nav auth={auth}/>
      <Switch>
        <div className="body">
          <Route exact path="/" render={props => <Home auth={auth} {...props} />} />
          <Route exact path="/callback" render={props => <Callback auth={auth} {...props} />} />
          <Route exact path="/profile" render={props => <Profile auth={auth} {...props} />} />
        </div>
      </Switch>
    </div>
  );
}

export default withRouter(App);
Here, we create a new instance of the Auth class and pass it to the components that need it as a prop.
Since the Auth class needs history, we’ll make use of withRouter so we can be able to access history.
import { Link } from 'react-router-dom'

const Nav = ({auth}) => {
  return (
    <nav>
      <ul>
        <li><Link to="/">Home</Link></li>
        <li>
          <button onClick={auth.login}>log in</button>
        </li>
      </ul>
    </nav>
  )
}
export default Nav
Now that we have defined the login() method, we can use it in the login button. The user will be redirected to Auth0’s login page and then to the callback URL once they have been authenticated.
Next, we have to create the component the user gets redirected to once they log in.
import React from 'react'

const Callback = () => {
  return (
    <div>
      <h1>I am the callback component</h1>
    </div>
  )
}
export default Callback
Create a Callback.js file, and set up a Callback component in it. Now when the user logs in, they are redirected to the Callback component.
Handling Authentication
When Auth0 redirects the user back to the app, it sends along some authentication data in the callback URL. This data contains encoded information about the authenticated user.
To access the data Auth0 sends back in the redirect URL, we set up a handleAuth() method in the Auth class. This method will be called in the Callback component.
handleAuth = () => {
    this.auth0.parseHash((err, authResult) => {
      if(authResult && authResult.accessToken && authResult.idToken) {
        this.setSession(authResult);
        this.history.push("/");
      } else if (err) {
        alert(Error: ${err.error})
        console.log(err);
      }
    })
}
After the user is redirected, we can use the parseHash method to parse the information that is sent back along in the callback URL. After parsing, we get back an error object and an authResult. We check to see if there is an authResult, and an accessToken and idToken. If true, we pass in the authResult to the setSession method and redirect the user to the homepage.
We will use setSession() to create a session for the authenticated user and store the authentication data in local storage later on. If there are any errors, we use the alert method to show them and also log the error object to the console.
We call the handleAuth() method we defined above in the useEffect whenever Callback mounts, that is, when the user gets redirected after logging in.
import React, {useEffect} from 'react'
const Callback = ({auth}) => {
  useEffect(() => {
    auth.handleAuth()
  }, [])

  return (
    <div>
      <h1>I am the callback component</h1>
    </div>
  )
}
export default Callback
We do this because when Auth0 redirects the user to the Callback component, we want to be able to access the response data it sends along in the redirect URL, and the handleAuth() method is where we call Auth0’s parseHash method. So when the component mounts, we call handleAuth() in the useEffect.
Tracking Authentication State
We don’t want the profile page to be accessible if a user has not logged in. We need to be able to check if the user is authenticated and then give them access to the profile page. We can make use of the setSession() method we called in the handleAuth() method we have in the Auth class.
setSession = authResult => {
    //set the time the access token will expire
    const expiresAt = JSON.stringify(
      authResult.expiresIn * 1000 + new Date().getTime()
    )

    localStorage.setItem("access_token", authResult.accessToken)
    localStorage.setItem("id_token", authResult.idToken)
    localStorage.setItem("expires_at", expiresAt)
}
In setSession() we add an expiresAt variable to hold the time the access token will expire. expiresIn is a string containing the expiration time (in seconds) of the accessToken. We convert the expiration time we get from expiresIn to Unix epoch time. Next, we save expiresAt, and the authResult's accessToken and idToken to local storage.
The next step in setting up a tracker for the authentication state is to create an isAuthenticated method.
isAuthenticated = () => {
    const expiresAt =JSON.parse(localStorage.getItem("expires_at"));
    return new Date().getTime() < expiresAt;
}
In the method above, we parse the expires_at value that we saved to local storage and check if the current time is less than the time the token expires. If true, then the user is authenticated.
Now that we can track the isAuthenticated state, we can use it in our app. Let’s use it in the Nav.js file.
import React from 'react';
import { Link } from 'react-router-dom'

const Nav = ({auth}) => {
  return (
    <nav>
      <ul>
        <li><Link to="/">Home</Link></li>
        <li>
          <button onClick={auth.isAuthenticated() ? auth.logout : auth.login}>
            {auth.isAuthenticated() ? "log out" : "log in"}
           </button>
        </li>
      </ul>
    </nav>
  )
}

export default Nav
Instead of hard-coding a login button and using the login() method, we dynamically render either the login button with the login() method or the logout button with the logout() method based on the isAuthenticated state. In the Nav component we make use of a ternary operator to determine the text that gets displayed on the button and the method that gets called when the user clicks the button. The displayed text and called method is dependent on the value of auth.isAuthenticated().
Now we can go ahead to implement the Home component.
import {Link} from 'react-router-dom'
const Home = ({auth}) => {
  return (
    <div>
      <h1>home</h1>
      {
        auth.isAuthenticated() && (
          <h4>
            You are logged in! You can now view your{' '}
            <Link to="/profile">profile</Link>
          </h4>
        )
        }
    </div>
  )
}
export default Home
In the Home component above, we use the isAuthenticated state to dynamically display a link to the user’s profile if the user is logged in.
We want to display information about a user when they login to the app. To do this, we have to create two method in the Auth class that will get that information.
getAccessToken = () => {
    const accessToken = localStorage.getItem("access_token")
    if(!accessToken){
      throw new Error("No access token found")
    }
    return accessToken
}
The access token is required to get the user data. We create a getAccessToken() method that gets the access token from local storage. If there is no access token, we throw an error.
The getProfile() method gets the user data for us and here is what it should look like.
getProfile = callback => {
  this.auth0.client.userInfo(this.getAccessToken(), (err, profile) => {
    callback(profile);
  });
}
The getProfile() method calls the userInfo() method which will make a request to the /userinfo endpoint and return the user object, which contains the user information. The access token is required for the /userinfo endpoint, so we pass getAccessToken() as an argument.
The user profile information included in the response depends on the scopes we set. Earlier on, we set the scope for our app to profile and email, so those are the only pieces of information about the user we will get back.
Let us set up the Profile component.
import React, { useEffect, useState } from "react";

const Profile = ({ auth }) => {
  const [profile, setProfile] = useState(null);
  useEffect(() => {
    auth.getProfile((profile) => {
      setProfile(profile);
    });
  }, [auth]);

  if (!profile) {
    return <h1>Loading...</h1>;
  }

  return (
    <div>
      <h1>profile</h1>
      <>
        <p>{profile.name}</p>
        <p>{profile.nickname}</p>
        <img src={profile.picture} />
        <pre>{JSON.stringify(profile, null, 2)}</pre>
      </>
    </div>
  );
};
export default Profile;
In Profile.js, we create a profile state, and in the useEffect we call the getProfile method to access the user’s profile. Then we display the user data we get from the profile state.
Adding Logout Functionality
We define a logout() method in the Auth class.
logout = () => {
    localStorage.removeItem("access_token")
    localStorage.removeItem("id_token")
    localStorage.removeItem("expires_at")
    this.auth0.logout({
      clientID: process.env.REACT_APP_AUTH0_CLIENTID,
      returnTo: "http://localhost:3000"
    });
}
Here, we remove the authResult, accessToken, and idToken we previously stored in the local storage. Then we direct the user to the homepage.
To log a user out from Auth0’s servers, use the Auth0 logout() method. This method accepts an options object that contains the clientID and a returnTo property. returnTo is where you specify the URL in your app the user should be redirected to once they logout. The returnTo URL that is provided must be listed in the app's Allowed Logout URLs in the Auth0 dashboard.
Authentication Using React SDK
Unlike the JavaScript SDK, the React SDK is easier to use. The code for this section is available on GitHub.
Let’s set it up in our app. The components of this demo app are:
App.js: this is the root component.LoginButton.js: handles the login functionality.LogoutButon.js: handles the logout functionality.Navbar.js: this holds the logout and login buttons.Profile.js: this will hold the information of the logged-in user.
First, we install Auth0’s React SDK in our React app.
npm install @auth0/auth0-reactSimilarly to how we set up using the JavaScript SDK, we set up the Auth0 credentials we need. We create a .env to store the domain and cleintId credentials of your app.
import {Auth0Provider} from '@auth0/auth0-react';

const domain = process.env.REACT_APP_AUTH0_DOMAIN
const clientId = process.env.REACT_APP_AUTH0_CLIENT_ID

ReactDOM.render(
  <Auth0Provider
    domain={domain}
    clientId={clientId}
    redirectUri={window.location.origin}
  >
    <App />
  </Auth0Provider>,
  document.getElementById('root')
);
To use the SDK, we need to wrap our app in an Auth0Provider component. This will provide the React Context to the components that are inside your app. We also set a redirectUri, which is where Auth0 redirects the user to when they log in. Under the hood, the Auth0 React SDK uses React Context to manage the authentication state of your users.
Setting Up Login
Here, we set up the login button.
import {useAuth0} from '@auth0/auth0-react';
import {Button} from './Styles';

const LoginButton = () => {
  const {loginWithPopup} = useAuth0()
 return(
   <Button onClick={() => loginWithPopup()}>
    Log in
   </Button>
 )
}
Auth0 provides us two ways of setting up login in our apps. We can use the loginWithPopup() or loginWithRedirect() methods. In this case, I used loginWithPopup().
We destructure loginWithPopup() from the useAuth0 hook the SDK provides. Then we pass loginWithPopup() to the button's onClick event. With that, we’ve set up the login button. If we had used loginWithRedirect(), the user would be redirected to Auth0 Login Page. Once the user has been authenticated, Auth0 redirects the back to your app.
Setting Up Logout
Let’s set up the logout functionality.
import {Button} from './Styles';
import {useAuth0} from '@auth0/auth0-react';

const LogoutButton = () => {
  const {logout} = useAuth0()
  return(
    <Button onClick={() => logout()}>
      Log Out
    </Button>
 )
}
What we have here is similar to the login button setup. The only difference is that what we pulled out from the SDK is the logout function, and that is what we pass to the button’s onClick event.
Calling logout() redirects your users to your Auth0 logout endpoint (https://YOUR_DOMAIN/v2/logout) and then immediately redirects them to the URL you specified in the Allowed Logout URLs filed of your app’s settings.
Tracking Authentication State
We want to conditionally render either the LogoutButton or the LoginButton based on the authentication state.
import {StyledNavbar} from './Styles';
import {useAuth0} from '@auth0/auth0-react';
import LoginButton from './LoginButton';
import LogoutButton from './LogoutButton';

const Navbar = () => {
  const {isAuthenticated} = useAuth0()
  return (
    <StyledNavbar>
     { isAuthenticated ? <LogoutButton/> :  <LoginButton/> }
    </StyledNavbar>
  )
}
We get isAuthenticated from useAuth0. isAuthenticated is a boolean that tells us if someone has signed in or not. In our Navbar, we use isAuthenticated to conditionally render the buttons. We do not have to go through the tedious process of setting up several custom methods just to track the authentication state as we did with the JavaScript SDK. The isAuthenticated boolean makes our lives easier.
Displaying User Data
We want to display the user’s data once they successfully login to our app.
import {useAuth0} from '@auth0/auth0-react'
import {ProfileBox, Image, P} from './Styles';

const Profile = () => {
const {user, isAuthenticated} = useAuth0()
 return(
  isAuthenticated && (<ProfileBox>
    <Image src={user.picture} alt={user.name}/>
    <P>Name: {user.name}</P>
    <P>Username: {user.nickname}</P>
    <P>Email: {user.email}</P>
   </ProfileBox>)
 )
}
Once logged in, we have access to a user object, which we can get from useAuth0 and making it possible to access information about the user from the object. Here, we also get isAuthenticated from useAuth0 because we want to only display the data when a user is logged in.
Unlike the JavaScript SDK where we had to use the getAccessToken() and getProfile() methods to access the user’s profile, we don’t have to do that with the React SDK.
Adding Social Logins
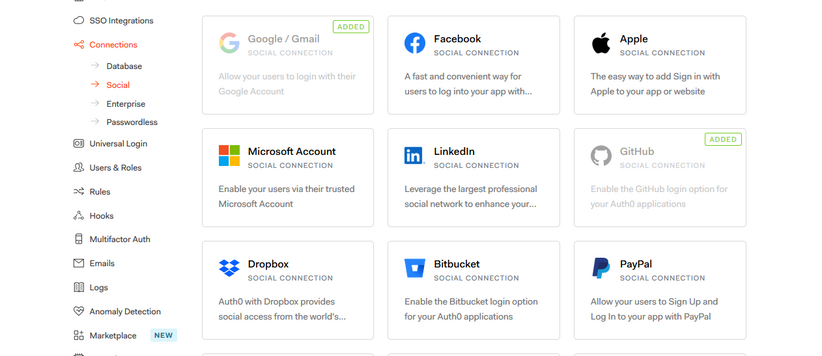
By default, Auth0 comes with Google login activated. However, you may want to give your user more options to login to your app. Let’s add Github Login to our app.
- On your dashboard, go to the Connections tab and select Social. There, you’ll see the connections you have set up. Click on the Create Connection button. I have already enabled Github in my app, and that is why you see it here.

- Select the Github connection. We will get the
clientIDand theclientSecretfrom Github and put that into the social connection settings.

- Next, you have to register a new app on Github.
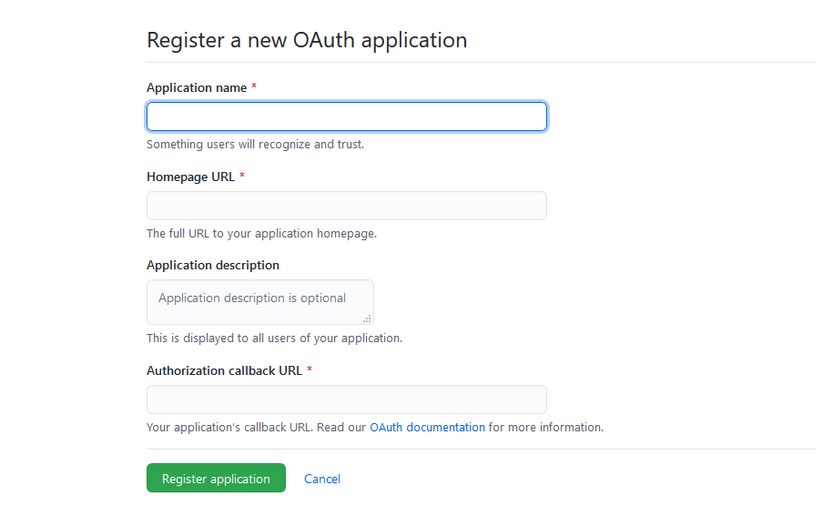
For the Homepage URL and the Authorization callback URL fields, you can use https://localhost:3000 or whatever URL your project needs.
Next, pass the client ID and Secret into the Github connection in your Auth0 account. With that, you’ve set up Github login into your app.
Conclusion
In this article, we have seen how to authenticate our React apps using Auth0. We also went through the process of setting up Github social login in our app. Have fun adding authentication to your React app with Auth0.
We have also seen how to authenticate our app with Auth0, and the developer-experience benefits of using the React SDK over the JavaScript SDK.
Resources
- Auth0 Docs
- OpenID Connect Scopes
- OpenID Connect Protocol
- Tokens
- JSON Web Tokens
- Access Token Lifetime
- Scope
- JavaScript SDK
- React SDK