Motion Controls In The Browser
In this article, I’m going to explain how to implement motion controls in the browser. That means you’ll be able to create an application where you can move your hand and make gestures, and the elements on the screen will respond.
Here’s an example:

Here’s some boilerplate to get started (adapted from MediaPipe’s JavaScript API example):
<script src="https://cdn.jsdelivr.net/npm/@mediapipe/camera_utils/camera_utils.js" crossorigin="anonymous"></script>
<script src="https://cdn.jsdelivr.net/npm/@mediapipe/control_utils/control_utils.js" crossorigin="anonymous"></script>
<script src="https://cdn.jsdelivr.net/npm/@mediapipe/drawing_utils/drawing_utils.js" crossorigin="anonymous"></script>
<script src="https://cdn.jsdelivr.net/npm/@mediapipe/hands/hands.js" crossorigin="anonymous"></script>

<video class="input_video"></video>
<canvas class="output_canvas" width="1280px" height="720px"></canvas>

<script>
const videoElement = document.querySelector('.input_video');
const canvasElement = document.querySelector('.output_canvas');
const canvasCtx = canvasElement.getContext('2d');

function onResults(handData) {
  drawHandPositions(canvasElement, canvasCtx, handData);
}

function drawHandPositions(canvasElement, canvasCtx, handData) {
  canvasCtx.save();
  canvasCtx.clearRect(0, 0, canvasElement.width, canvasElement.height);
  canvasCtx.drawImage(
      handData.image, 0, 0, canvasElement.width, canvasElement.height);
  if (handData.multiHandLandmarks) {
    for (const landmarks of handData.multiHandLandmarks) {
      drawConnectors(canvasCtx, landmarks, HAND_CONNECTIONS,
                     {color: '#00FF00', lineWidth: 5});
      drawLandmarks(canvasCtx, landmarks, {color: '#FF0000', lineWidth: 2});
    }
  }
  canvasCtx.restore();
}

const hands = new Hands({locateFile: (file) => {
  return https://cdn.jsdelivr.net/npm/@mediapipe/hands/${file};
}});
hands.setOptions({
  maxNumHands: 1,
  modelComplexity: 1,
  minDetectionConfidence: 0.5,
  minTrackingConfidence: 0.5
});
hands.onResults(onResults);

const camera = new Camera(videoElement, {
  onFrame: async () => {
    await hands.send({image: videoElement});
  },
  width: 1280,
  height: 720
});
camera.start();

</script>
The above code does the following:
- Load the library code;
- Start recording the video frames;
- When the hand data comes in, draw the hand landmarks on a canvas.
Let’s take a closer look at the handData object since that’s where the magic happens. Inside handData is multiHandLandmarks, a collection of 21 coordinates for the parts of each hand detected in the video feed. Here’s how those coordinates are structured:
{
  multiHandLandmarks: [
    // First detected hand.
    [
      {x: 0.4, y: 0.8, z: 4.5},
      {x: 0.5, y: 0.3, z: -0.03},
      // ...etc.
    ],

    // Second detected hand.
    [
      {x: 0.4, y: 0.8, z: 4.5},
      {x: 0.5, y: 0.3, z: -0.03},
      // ...etc.
    ],

    // More hands if other people participate.
  ]
}
A couple of notes:
- The first hand doesn’t necessarily mean the right or the left hand; it’s just whichever one the application happens to detect first. If you want to get a specific hand, you’ll need to check which hand is being detected using
handData.multiHandedness[0].labeland potentially swapping the values if your camera isn’t mirrored. - For performance reasons, you can restrict the maximum number of hands to track, which we did earlier by setting
maxNumHands: 1. - The coordinates are set on a scale from
0to1based on the size of the canvas.
Here’s a visual representation of the hand coordinates:
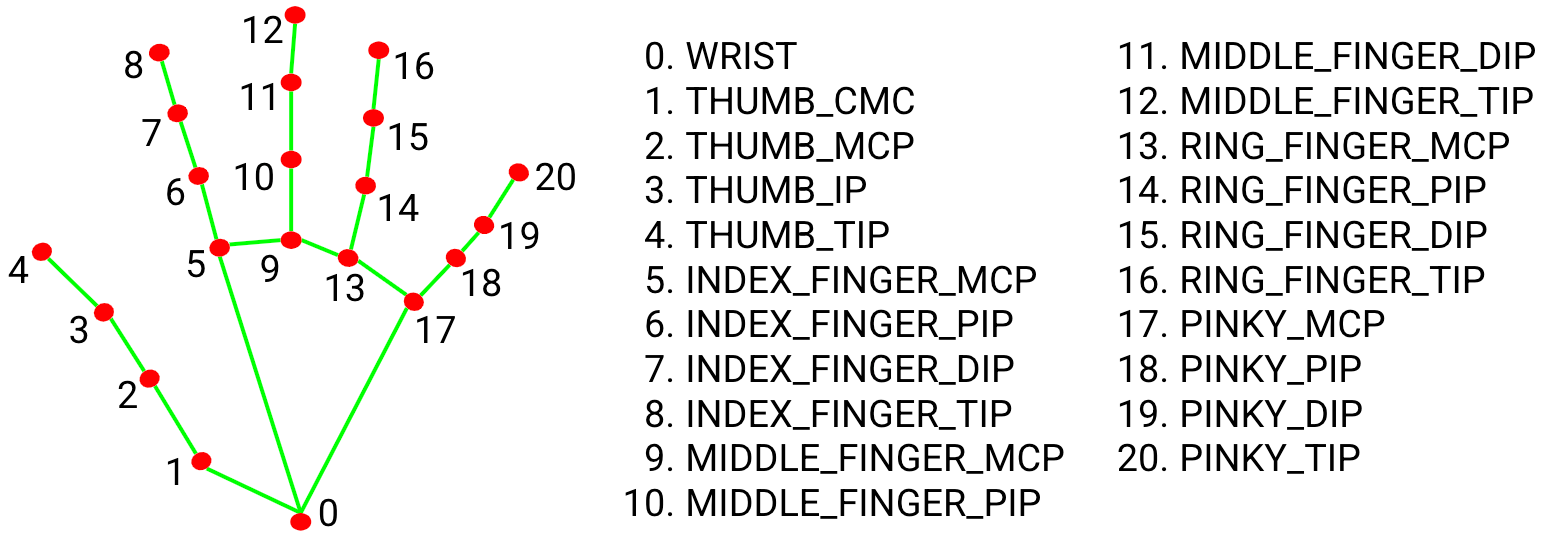
Now that you have the hand landmark coordinates, you can build a cursor to follow your index finger. To do that, you’ll need to get the index finger’s coordinates.
You could use the array directly like this handData.multiHandLandmarks[0][5], but I find that hard to keep track of, so I prefer labeling the coordinates like this:
const handParts = {
  wrist: 0,
  thumb: { base: 1, middle: 2, topKnuckle: 3, tip: 4 },
  indexFinger: { base: 5, middle: 6, topKnuckle: 7, tip: 8 },
  middleFinger: { base: 9, middle: 10, topKnuckle: 11, tip: 12 },
  ringFinger: { base: 13, middle: 14, topKnuckle: 15, tip: 16 },
  pinky: { base: 17, middle: 18, topKnuckle: 19, tip: 20 },
};
And then you can get the coordinates like this:
const firstDetectedHand = handData.multiHandLandmarks[0];
const indexFingerCoords = firstDetectedHand[handParts.index.middle];
I found cursor movement more pleasant to use with the middle part of the index finger rather than the tip because the middle is more steady.
Now you’ll need to make a DOM element to use as a cursor. Here’s the markup:
<div class="cursor"></div>
And here are the styles:
.cursor {
  height: 0px;
  width: 0px;
  position: absolute;
  left: 0px;
  top: 0px;
  z-index: 10;
  transition: transform 0.1s;
}

.cursor::after {
  content: '';
  display: block;
  height: 50px;
  width: 50px;
  border-radius: 50%;
  position: absolute;
  left: 0;
  top: 0;
  transform: translate(-50%, -50%);
  background-color: #0098db;
}
A few notes about these styles:
- The cursor is absolutely positioned so it can be moved without affecting the flow of the document.
- The visual part of the cursor is in the
::afterpseudo-element, and thetransformmakes sure the visual part of the cursor is centered around the cursor’s coordinates. - The cursor has a
transitionto smooth out its movements.
Now that we’ve created a cursor element, we can move it by converting the hand coordinates into page coordinates and applying those page coordinates to the cursor element.
function getCursorCoords(handData) {
  const { x, y, z } = handData.multiHandLandmarks[0][handParts.indexFinger.middle];
  const mirroredXCoord = -x + 1; /* due to camera mirroring */
  return { x: mirroredXCoord, y, z };
}

function convertCoordsToDomPosition({ x, y }) {
  return {
    x: ${x * 100}vw,
    y: ${y * 100}vh,
  };
}

function updateCursor(handData) {
  const cursorCoords = getCursorCoords(handData);
  if (!cursorCoords) { return; }
  const { x, y } = convertCoordsToDomPosition(cursorCoords);
  cursor.style.transform = translate(${x}, ${y});
}

function onResults(handData) {
  if (!handData) { return; }
  updateCursor(handData);
}
Note that we’re using the CSS transform property to move the element rather than left and top. This is for performance reasons. When the browser renders a view, it goes through a sequence of steps. When the DOM changes, the browser has to start again at the relevant rendering step. The transform property responds quickly to changes because it is applied at the last step rather than one of the middle steps, and therefore the browser has less work to repeat.
Now that we have a working cursor, we’re ready to move on.
Step 3: Detect GesturesThe next step in our journey is to detect gestures, specifically pinch gestures.
First, what do we mean by a pinch? In this case, we’ll define a pinch as a gesture where the thumb and forefinger are close enough together.
To designate a pinch in code, we can look at when the x, y, and z coordinates of the thumb and forefinger have a small enough difference between them. “Small enough” can vary depending on the use case, so feel free to experiment with different ranges. Personally, I found 0.08, 0.08, and 0.11 to be comfortable for the x, y, and z coordinates, respectively. Here’s how that looks:
function isPinched(handData) {
  const fingerTip = handData.multiHandLandmarks[0][handParts.indexFinger.tip];
  const thumbTip = handData.multiHandLandmarks[0][handParts.thumb.tip];
  const distance = {
    x: Math.abs(fingerTip.x - thumbTip.x),
    y: Math.abs(fingerTip.y - thumbTip.y),
    z: Math.abs(fingerTip.z - thumbTip.z),
  };
  const areFingersCloseEnough = distance.x < 0.08 && distance.y < 0.08 && distance.z < 0.11;

  return areFingersCloseEnough;
}
It would be nice if that’s all we had to do, but alas, it’s never that simple.
What happens when your fingers are on the edge of a pinch position? If we’re not careful, the answer is chaos.
With slight finger movements as well as fluctuations in coordinate detection, our program can rapidly alternate between pinched and not pinched states. If you’re trying to use a pinch gesture to “pick up” an item on the screen, you can imagine how chaotic it would be for the item to rapidly alternate between being picked up and dropped.
In order to prevent our pinch gestures from causing chaos, we’ll need to introduce a slight delay before registering a change from a pinched state to an unpinched state or vice versa. This technique is called a debounce, and the logic goes like this:
- When the fingers enter a pinched state, start a timer.
- If the fingers have stayed in the pinched state uninterrupted for long enough, register a change.
- If the pinched state gets interrupted too soon, stop the timer and don’t register a change.
The trick is that the delay must be long enough to be reliable but short enough to feel quick.
We’ll get to the debounce code soon, but first, we need to prepare by tracking the state of our gestures:
const OPTIONS = {
  PINCH_DELAY_MS: 60,
};

const state = {
  isPinched: false,
  pinchChangeTimeout: null,
};
Next, we’ll prepare some custom events to make it convenient to respond to gestures:
const PINCH_EVENTS = {
  START: 'pinch_start',
  MOVE: 'pinch_move',
  STOP: 'pinch_stop',
};

function triggerEvent({ eventName, eventData }) {
  const event = new CustomEvent(eventName, { detail: eventData });
  document.dispatchEvent(event);
}
Now we can write a function to update the pinched state:
function updatePinchState(handData) {
  const wasPinchedBefore = state.isPinched;
  const isPinchedNow = isPinched(handData);
  const hasPassedPinchThreshold = isPinchedNow !== wasPinchedBefore;
  const hasWaitStarted = !!state.pinchChangeTimeout;

  if (hasPassedPinchThreshold && !hasWaitStarted) {
    registerChangeAfterWait(handData, isPinchedNow);
  }

  if (!hasPassedPinchThreshold) {
    cancelWaitForChange();
    if (isPinchedNow) {
      triggerEvent({
        eventName: PINCH_EVENTS.MOVE,
        eventData: getCursorCoords(handData),
      });
    }
  }
}

function registerChangeAfterWait(handData, isPinchedNow) {
  state.pinchChangeTimeout = setTimeout(() => {
    state.isPinched = isPinchedNow;
    triggerEvent({
      eventName: isPinchedNow ? PINCH_EVENTS.START : PINCH_EVENTS.STOP,
      eventData: getCursorCoords(handData),
    });
  }, OPTIONS.PINCH_DELAY_MS);
}

function cancelWaitForChange() {
  clearTimeout(state.pinchChangeTimeout);
  state.pinchChangeTimeout = null;
}
Here's what updatePinchState() is doing:
- If the fingers have passed the pinch threshold by starting or stopping a pinch, we’ll start a timer to wait and see if we can register a legitimate pinch state change.
- If the wait is interrupted, that means the change was just a fluctuation, so we can cancel the timer.
- However, if the timer is not interrupted, we can update the pinched state and trigger the correct custom change event, namely,
pinch_startorpinch_stop. - If the fingers have not passed the pinch change threshold and are currently pinched, we can dispatch a custom
pinch_moveevent.
We can run updatePinchState(handData) each time we get hand data so that we can put it in our onResults function like this:
function onResults(handData) {
  if (!handData) { return; }
  updateCursor(handData);
  updatePinchState(handData);
}
Now that we can reliably detect a pinch state change, we can use our custom events to define whatever behavior we want when a pinch is started, moved, or stopped. Here’s an example:
document.addEventListener(PINCH_EVENTS.START, onPinchStart);
document.addEventListener(PINCH_EVENTS.MOVE, onPinchMove);
document.addEventListener(PINCH_EVENTS.STOP, onPinchStop);

function onPinchStart(eventInfo) {
  const cursorCoords = eventInfo.detail;
  console.log('Pinch started', cursorCoords);
}

function onPinchMove(eventInfo) {
  const cursorCoords = eventInfo.detail;
  console.log('Pinch moved', cursorCoords);
}

function onPinchStop(eventInfo) {
  const cursorCoords = eventInfo.detail;
  console.log('Pinch stopped', cursorCoords);
}
Now that we’ve covered how to respond to movements and gestures, we have everything we need to build an application that can be controlled with hand motions.
Here are some examples:
See the Pen Beam Sword - Fun with motion controls! [forked] by Yaphi.
See the Pen Magic Quill - Air writing with motion controls [forked] by Yaphi.
I’ve also put together some other motion control demos, including movable playing cards and an apartment floor plan with movable images of the furniture, and I’m sure you can think of other ways to experiment with this technology.
ConclusionIf you’ve made it this far, you’ve seen how to implement motion controls with a browser and a webcam. You’ve read camera data using browser APIs, you’ve gotten hand coordinates via machine learning, and you’ve detected hand motions with JavaScript. With these ingredients, you can create all sorts of motion-controlled applications.
What use cases will you come up with? Let me know in the comments!