Supercharge Testing React Applications With Wallaby.js
One thing you will discover very quickly when you start writing tests for an application is that you want to run your tests constantly when you are coding. Having to switch between your code editor and terminal window (or in the case of VS Code, the integrated terminal) adds an overhead and reduces your productivity as you build your application. In an ideal world, you would have instant feedback on your tests right in your editor as you are writing your code. Enter Wallaby.js.
What Is Wallaby.js?
Wallaby.js is an intelligent test runner for JavaScript that continuously runs your tests. It reports code coverage and other results directly to your code editor immediately as you change your code (even without saving the file). The tool is available as an editor extension for VS Code, IntelliJ Editors (such as WebStorm and IntelliJ IDEA), Atom, Sublime Text, and Visual Studio.

Why Wallaby.js?
As stated earlier, Wallaby.js aims to improve your productivity in your day to day JavaScript development. Depending on your development workflow, Wallaby can save you hours of time each week by reducing context switching. Wallaby also provides code coverage reporting, error reporting, and other time-saving features such as time-travel debugging and test stories.
Getting Started With Wallaby.js In VS Code
Let’s see how we can get the benefits of Wallaby.js using VS Code.
Note: If you are not using VS Code you can check out here for instructions on how to set up for other editors.
Install The Wallaby.js VS Code Extension
To get started we will install the Wallaby.js VS Code extension.
After the extension is installed, the Wallaby.js core runtime will be automatically downloaded and installed.
Wallaby License
Wallaby provides an Open Source license for open source projects seeking to use Wallaby.js. Visit here to obtain an open-source license. You may use the open-source license with the demo repo for this article.
You can also get a fully functional 15-day trial license by visiting here.
If you want to use Wallaby.js on a non-open-source project beyond the 15-day trial license period, you may obtain a license key from the wallaby website.
Add License Key To VS Code
After obtaining a license key, head over to VS Code and in the command palette search for "Wallaby.js: Manage License Key", click on the command and you will be presented with an input box to enter your license key, then hit enter and you will receive a notification that Wallaby.js has been successfully activated.
Wallaby.js And React
Now that we have Wallaby.js set up in our VS Code editor, let’s supercharge testing a React application with Wallaby.js.
For our React app, we will add a simple upvote/downvote feature and we will write some tests for our new feature to see how Wallaby.js plays out in the mix.
Creating The React App
Note: You can clone the demo repo if you like, or you can follow along below.
We will create our React app using the create-react-app CLI tool.
npx create-react-app wallaby-js-demo
Then open the newly scaffolded React project in VS Code.
Open src/App.js and start Wallaby.js by running: "Wallaby.js: Start" in VS Code command palette (alternatively you can use the shortcut combo — Ctrl + Shift + R R if you are on a Windows or Linux machine, or Cmd + Shift + R R if you are on a Mac).

When Wallaby.js starts you should see its test coverage indicators to the left of your editor similar to the screenshot below:

Wallaby.js provides 5 different colored indicators in the left margin of your code editor:
- Gray: means that the line of code is not executed by any of your tests.
- Yellow: means that some of the code on a given line was executed but other parts were not.
- Green: means that all of the code on a line was executed by your tests.
- Pink: means that the line of code is on the execution path of a failing test.
- Red: means that the line of code is the source of an error or failed expectation, or in the stack of an error.
If you look at the status bar you will see Wallaby.js metrics for this file and it’s showing we have a 100% test coverage for src/App.js and a single passing test with no failing test. How does Wallaby.js know this? When we started Wallaby.js, it detected src/App.js has a test file src/App.test.js, it then runs those tests in the background for us and conveniently gives us the feedbacks using its color indicators and also giving us a summary metric on our tests in the status bar.
When you also open src/App.test.js you will see similar feedback from Wallaby.js
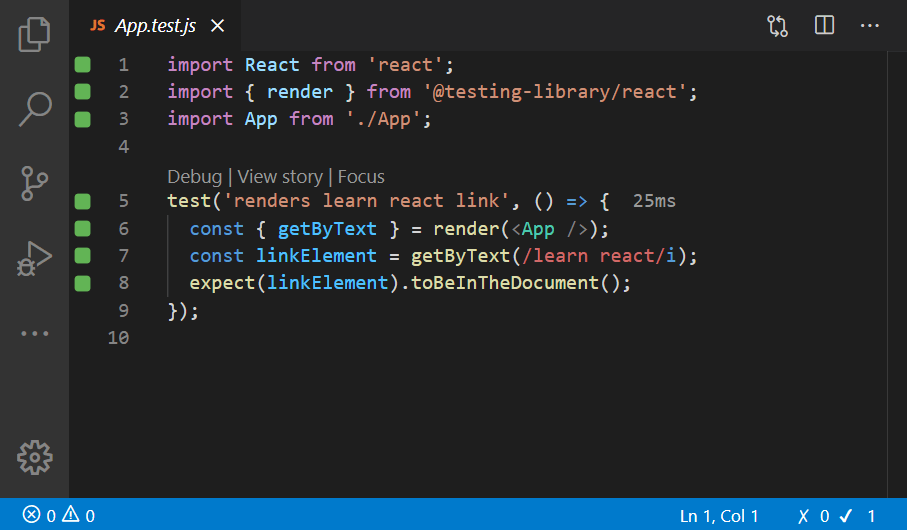
Currently, all tests are passing at the moment so we get all green indicators. Let’s see how Wallaby.js handles failing tests. In src/App.test.js let’s make the test fail by changing the expectation of the test like so:
// src/App.test.js
expect(linkElement).not.toBeInTheDocument();
The screenshot below shows how your editor would now look with src/App.test.js open:

You will see the indicators change to red and pink for the failing tests. Also notice we didn’t have to save the file for Wallaby.js to detect we made a change.
You will also notice the line in your editor in src/App.test.js that outputs the error of the test. This is done thanks to Wallaby.js advanced logging. Using Wallaby.js advanced logging, you can also report and explore runtime values beside your code using console.log, a special comment format //? and the VS Code command, Wallaby.js: Show Value.
Now let’s see the Wallaby.js workflow for fixing failing tests. Click on the Wallaby.js test indicator in the status bar to open the Wallaby.js output window. ("✗ 1 ✓ 0")

In the Wallaby.js output window, right next to the failing test, you should see a “Debug Test” link. Pressing Ctrl and clicking on that link will fire up the Wallaby.js time travel debugger. When we do that, the Wallaby.js Tools window will open to the side of your editor, and you should see the Wallaby.js debugger section as well as the Value explorer and Test file coverage sections.
If you want to see the runtime value of a variable or expression, select the value in your editor and Wallaby.js will display it for you.

Also, notice the "Open Test Story" link in the output window. Wallby.js test story allows you to see all your tests and the code they are testing in a single view in your editor.
Let’s see this in action. Press Ctrl and click on the link — you should be able to see the Wallaby.js test story open up in your editor. Wallaby’s Test Story Viewer provides a unique and efficient way of inspecting what code your test is executing in a single logical view.

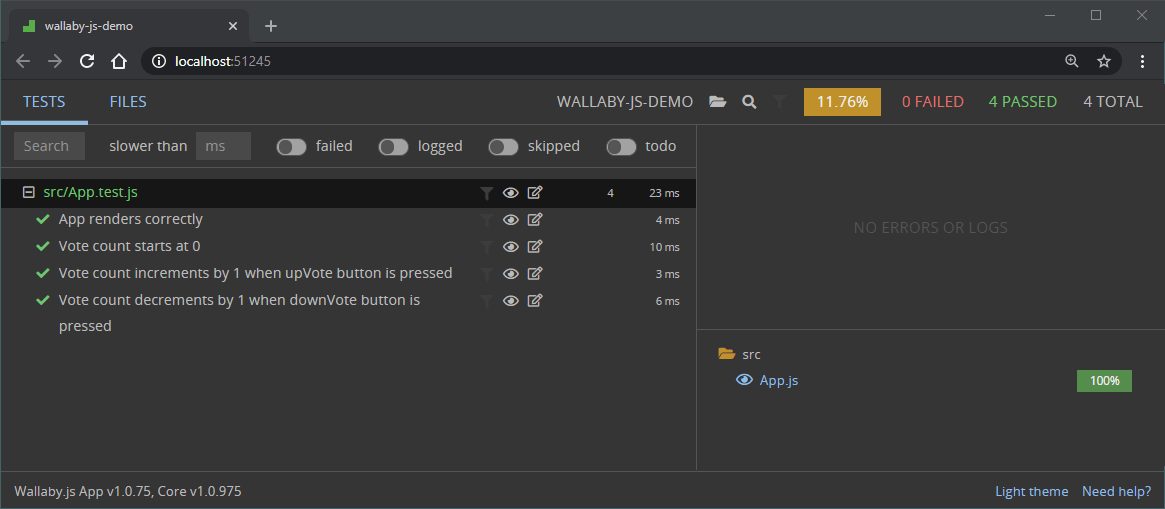
Another thing we will explore before fixing our failing test is the Wallaby.js app. Notice the link in the Wallaby.js output window: “Launch Coverage & Test Explorer”. Clicking on the link will launch the Wallaby.js app which will give you a compact birds-eye view of all tests in your project.
Next, click on the link and start up the Wallaby.js app in your default browser via http://localhost:51245/. Wallaby.js will quickly detect that we have our demo project open in our editor which will then automatically load it into the app.
Here is how the app should now look like:

You should be able to see the test’s metrics on the top part of the Wallaby.js app. By default, the Tests tab in the app is opened up. By clicking on the Files tab, you should be able to see the files in your project as well as their test coverage reports.

Back on to the Tests tab, click on the test and you should see the Wallaby.js error reporting feature to the right:

Now we’ve covered all that, go back to the editor, and fix the failing test to make Wallaby.js happy by reverting the line we changed earlier to this:
expect(linkElement).toBeInTheDocument();
The Wallaby.js output window should now look like the screenshot below and your test coverage indicators should be all passing now.

Implementing Our Feature
We’ve explored Wallaby.js in the default app created for us by create-react-app. Let’s implement our upvote/downvote feature and write tests for that.
Our application UI should contain two buttons one for upvoting and the other for downvoting and a single counter that will be incremented or decremented depending on the button the user clicks. Let’s modify src/App.js to look like this.
// src/App.js
import React, { useState } from 'react';
import logo from './logo.svg';
import './App.css';

function App() {
  const [vote, setVote] = useState(0);

  function upVote() {
    setVote(vote + 1);
  }

  function downVote() {
    // Note the error, we will fix this later...
    setVote(vote - 2);
  }
  return (
    <div className='App'>
      <header className='App-header'>
        <img src={logo} className='App-logo' alt='logo' />
        <p className='vote' title='vote count'>
          {vote}
        </p>
        <section className='votes'>
          <button title='upVote' onClick={upVote}>
            <span role='img' aria-label='Up vote'>
              👍🏿
            </span>
          </button>
          <button title='downVote' onClick={downVote}>
            <span role='img' aria-label='Down vote'>
              👎🏿
            </span>
          </button>
        </section>
      </header>
    </div>
  );
}

export default App;
We will also style the UI just a bit. Add the following rules to src/index.css
.votes {
  display: flex;
  justify-content: space-between;
}
p.vote {
  font-size: 4rem;
}
button {
  padding: 2rem 2rem;
  font-size: 2rem;
  border: 1px solid #fff;
  margin-left: 1rem;
  border-radius: 100%;
  transition: all 300ms;
  cursor: pointer;
}

button:focus,
button:hover {
  outline: none;
  filter: brightness(40%);
}
If you look at src/App.js, you will notice some gray indicators from Wallaby.js hinting us that some part of our code isn’t tested yet. Also, you will notice our initial test in src/App.test.js is failing and the Wallaby.js status bar indicator shows that our test coverage has dropped.

These visual clues by Wallaby.js are convenient for test-driven development (TDD) since we get instant feedback on the state of our application regarding tests.
Testing Our App Code
Let’s modify src/App.test.js to check that the app renders correctly.
Note: We will be using React Testing Library for our test which comes out of the box when you run create-react-app. See the docs for usage guide.
We are going to need a couple of extra functions from @testing-library/react, update your @testing-library/react import to:
import { render, fireEvent, cleanup } from '@testing-library/react';
Then let’s replace the single test in src/App.js with:
test('App renders correctly', () => { render(<App />); });
Immediately you will see the indicator go green in both the src/App.test.js line where we test for the render of the app and also where we are calling render in our src/App.js.

Next, we will test that the initial value of the vote state is zero(0).
it('Vote count starts at 0', () => {
  const { getByTitle } = render(<App />);
  const voteElement = getByTitle('vote count');
  expect(voteElement).toHaveTextContent(/^0$/);
});
Next, we will test if clicking the upvote 👍🏿 button increments the vote:
it('Vote increments by 1 when upVote button is pressed', () => {
  const { getByTitle } = render(<App />);
  const upVoteButtonElement = getByTitle('upVote');
  const voteElement = getByTitle('vote count');
  fireEvent.click(upVoteButtonElement);
  expect(voteElement).toHaveTextContent(/^1$/);
});
We will also test for the downvote 👎🏿 interaction like so:
it('Vote decrements by 1 when downVote button is pressed', () => {
  const { getByTitle } = render(<App />);
  const downVoteButtonElement = getByTitle('downVote');
  const voteElement = getByTitle('vote count');
  fireEvent.click(downVoteButtonElement);
  expect(voteElement).toHaveTextContent(/^-1$/);
});
Oops, this test is failing. Let’s work out why. Above the test, click the View story code lens link or the Debug Test link in the Wallaby.js output window and use the debugger to step through to the downVote function. We have a bug... we should have decremented the vote count by 1 but instead, we are decrementing by 2. Let’s fix our bug and decrement by 1.
src/App.js
function downVote() {
    setVote(vote - 1);
}
Watch now how Wallaby’s indicators go green and we know that all of our tests are passing:
Conclusion
From this article, you have seen how Wallaby.js improves your developer experience when testing JavaScript applications. We have investigated some key features of Wallaby.js, set it up in VS Code, and then tested a React application with Wallaby.js.
Further Resources
- VS Code Tutorial, Wallaby.js
- The demo app for this project can be found on GitHub.