Using The WordPress Editor And CPTs To Configure Plugins
WordPress 5.9 was released recently shipping with Full Site Editing (FSE), which enables using blocks to create the layout for any page in the website (as was already possible to write posts via the WordPress editor). Slowly but surely, blocks are becoming the main user interface for creating WordPress sites.
However, FSE does not fully help us configure WordPress sites. While it already does provide global settings via theme.json, that’s mainly for configuring the theme’s visual options, such as fonts, colors and paddings; for a theme or plugin’s invisible settings, usually defined as some entry in the wp_options table, FSE offers no support (yet).
Providing a settings page for our themes and plugins that is fully powered by blocks would provide a compelling user experience. Through it, we could allow our users to input configuration values using components tailored to that type of value, such as calendars to input dates, interactive maps to input location coordinates, sliders to pick a number from within a range (such as WooCommerce’s slider block to filter prices, displayed below), and so on.

If we want to implement custom settings pages powered by blocks, for the time being, we will need to implement a custom solution.
We may eventually be able to create a page in the wp-admin that directly renders — and allows to interact with — the needed blocks, as I recently described in my recent article, “Implications Of WordPress Joining The Block Protocol,” but that's currently only under consideration — nowhere near of it becoming a reality (if it ever does).
A related approach that is doable already today, is to create a standard page in the wp-admin that loads React and reuses the components powering our blocks (that is, the components making up the blocks, but not the blocks themselves). However, we would then be reinventing the wheel, to produce a GUI of lower quality than the one from the WordPress editor.
A better approach is to still use the WordPress editor, but altering its objective: instead of creating content for a blog post, we can produce the configuration required for our plugin. This is not difficult: because the WordPress editor can power custom post types (CPTs), we can then create a specific CPT that models the required configuration, and have the plugin retrieve the stored data from within the custom post content.
In this scenario, we must limit which blocks are available when editing the CPT and, quite likely, lock them using a predefined template. We must also be careful: the CPT content is of private use to the plugin, not intended for public consumption, so we must make sure it cannot be loaded on the public-facing website.
This is the strategy I employed for my WordPress plugin. In this write-up, I will describe my implementation (fully available in the the leoloso/PoP repo), which aims to leverage the WordPress editor to provide a great user experience for configuring our themes and plugins.
I’ll first give an overview of what’s the objective: what functionality I’ve planned for my plugin to support.
My plugin installs a GraphQL server that supports persisted queries. To retrieve data for a persisted query in the WordPress site, I decided to create a new CPT called persisted-query, and retrieve its data simply by requesting its permalink.
The CPT uses the standard WordPress editor, powered by blocks:

Persisted queries can be configured according to rules, involving access control and HTTP caching. Selecting what rules must be applied could be done within the persisted-query CPT itself, via some custom block. However, different persisted queries will usually require the same set of rules, and if the set changes, then all persisted queries would need to be updated. That is something I’d rather avoid.
So, I decided to create a new CPT containing the selected rules, which could then be applied across different persisted queries. This CPT, called schema-config, contains custom blocks to allow users to select which Access Control Lists and Cache-Control Lists must be applied:

The relationship between a persisted query and its schema configuration must be provided by the user. If the user had the Advanced Custom Fields plugin installed, then providing the interface to create this relationship would be very easy. However, I cannot make such an assumption, or I’d be excluding many potential users.
So, I had to code my own solution, for which I created a custom block that displays the list of all the schema configurations, and had it embedded in the editor of the persisted query CPT:
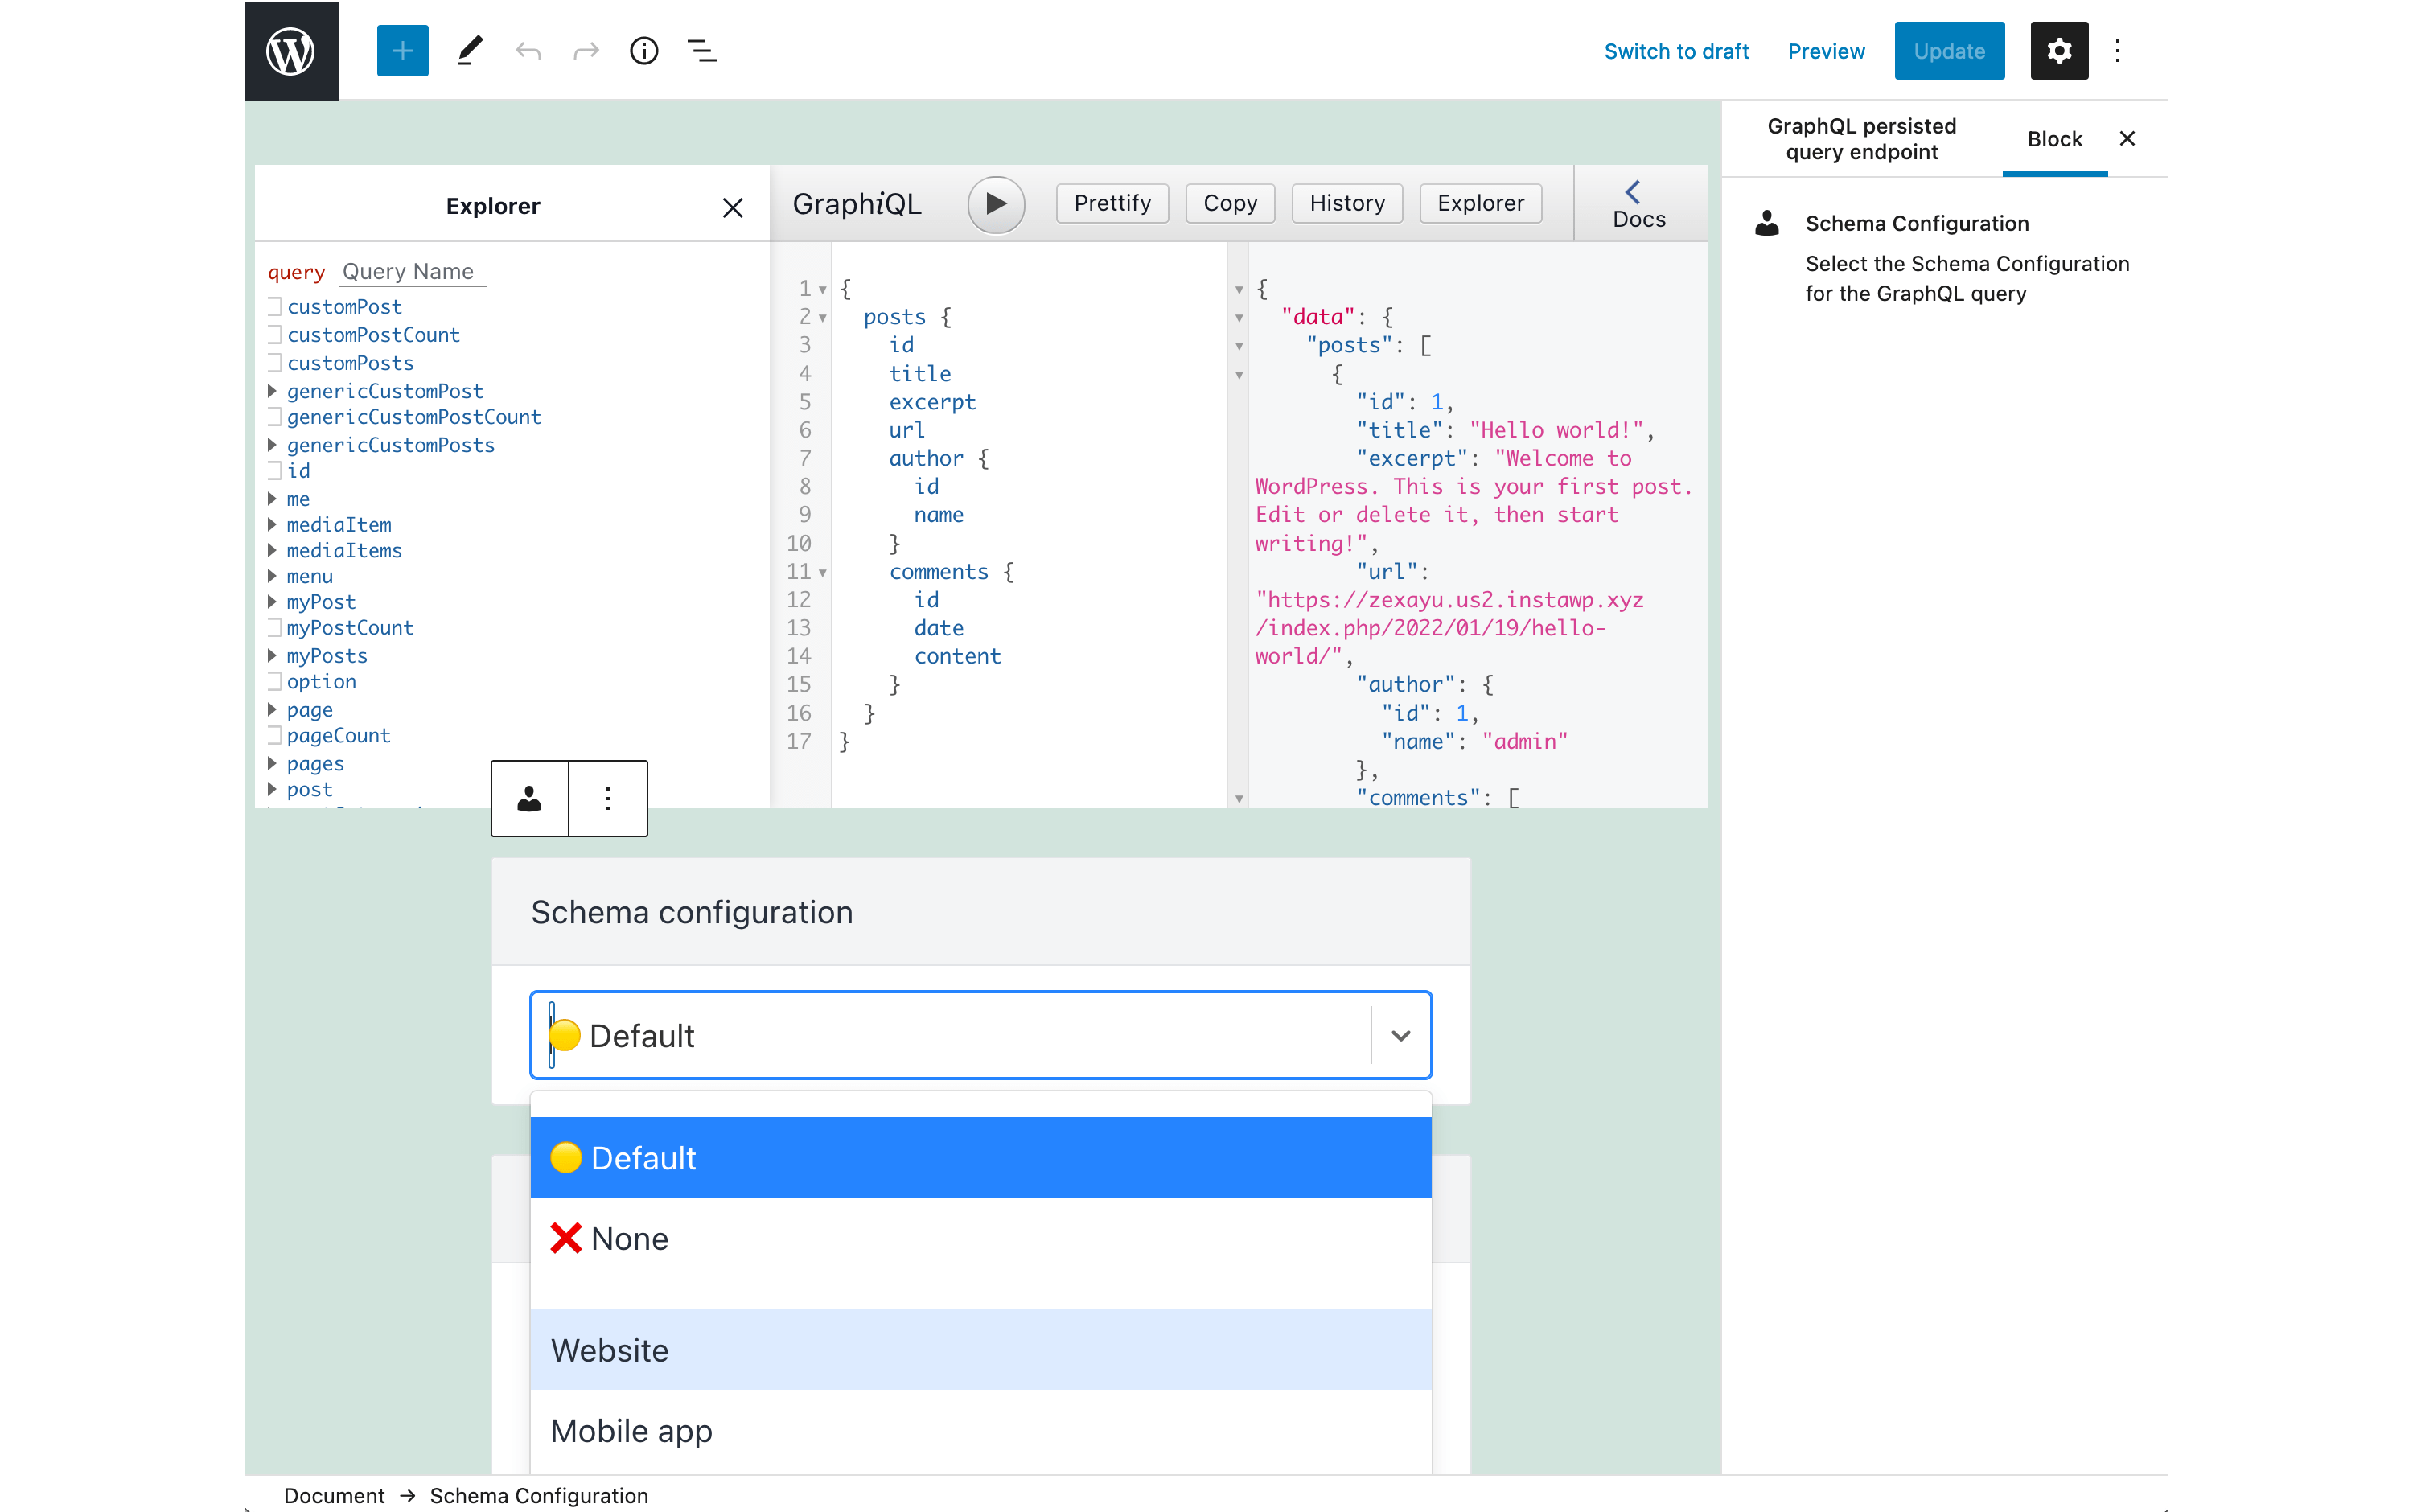
In this solution, both CPTs are created using the WordPress editor, and I can create custom blocks for each of them. The persisted-query CPT is public since users must be able to load it as to retrieve the response from the query. The schema-config CPT, though, is private; it must be accessed only by the plugin, to retrieve configuration data used to render the persisted query.
Let’s explore next how to implement it.
Creating The CPTsTo create a custom post type we use the register_post_type method:
function create_persisted_query_cpt(): void
{
  $labels = [
    'name'               => 'Persisted queries',
    'singular_name'      => 'Persisted query',
    'menu_name'          => 'Persisted queries',
    'name_admin_bar'     => 'Persisted query',
    'add_new'            => 'Add New',
    'add_new_item'       => 'Add New Persisted query',
    'new_item'           => 'New Persisted query',
    'edit_item'          => 'Edit Persisted query',
    'view_item'          => 'View Persisted query',
    'all_items'          => 'All Persisted queries',
    'search_items'       => 'Search Persisted queries',
    'parent_item_colon'  => 'Parent Persisted query',
    'not_found'          => 'No Persisted queries found',
    'not_found_in_trash' => 'No Persisted queries found in Trash'
  ];
  $args = [
    'labels'              => $labels,
    'public'              => true,
    'show_in_rest'        => true,
    'rewrite'             => ['slug' => 'persisted-query'],
  ];

  register_post_type('persisted-query', $args);
}
add_action('init', 'create_persisted_query_cpt');
The code above applies to creating the public CPT. To create a private CPT, we need only switch the public argument to false; argument show_in_rest must still be true, as to be able to retrieve its data via the WP REST API (which powers the blocks in the WordPress editor):
function create_schema_config_cpt(): void
{
  $labels = [
    'name'               => 'Schema configurations',
    'singular_name'      => 'Schema configuration',
    // All the rest...
  ];
  $args = [
    'public'              => false,
    'show_in_rest'        => true,
    // ...
  ];
}
add_action('init', 'create_schema_config_cpt');
For finer control, we can also set the value of the other arguments, including: exclude_from_search, publicly_queryable, show_ui, show_in_nav_menus, show_in_menu and show_in_admin_bar.
As a side note, please notice how, due to the effort to avoid introducing breaking changes in each new release of WordPress (mostly on the PHP side; the JS side powering the WordPress editor has undergone some instability), old guides on the topic, such as this Smashing article from 2015, will still be mostly up to date. The show_in_rest argument (and also template, used later on) is not explained there but, otherwise, everything else still works. And the CPT will by default use the new WordPress editor, instead of the “Classic” editor.
By now, I have created my public and private CPTs. The next step is to link them up, by embedding a custom block that lists all entries from the private CPT schema-config in the editor for the public CPT persisted-query.
The easiest way to set up a new block is through @wordpress/create-block, which by default generates a new WordPress plugin containing a single block. If we already have the plugin, after running command npx @wordpress/create-block my-block, we can copy the PHP code for registering the block, and the JS/CSS files for the block, copy them to our plugin and discard everything else.
I did this to create my custom block, of type graphql-api/schema-configuration:
import { registerBlockType } from '@wordpress/blocks';
import { __ } from '@wordpress/i18n';

registerBlockType( 'graphql-api/schema-configuration', {
  title: __( 'Schema Configuration', 'graphql-api' ),
  description: __( 'Select the Schema Configuration for the GraphQL persisted query', 'graphql-api' ),
  icon: 'admin-users',

  // ...
} );
The custom block must be given the following behavior.
First: It must store the ID of the selected schema-config CPT entry, for which I register an attribute schemaConfiguration of type integer:
registerBlockType( 'graphql-api/schema-configuration', {
  // ...

  /**
   * 1. Store the ID of the selected schema configuration entry
   */
  attributes: {
    schemaConfiguration: {
      type: 'integer',
      default: 0,
    },
  },
} );Second: It must only be available to the persisted-query CPT, and nowhere else.
For this, I define the inserter attribute to false, making the block unavailable in the editor, and it must be explicitly set via a template (more on this later on).
registerBlockType( 'graphql-api/schema-configuration', {
  // ...

  /**
   * 2. The block can only be accessible to the "persisted-query" CPT
   */
  supports: {
    inserter: false,
  },
} );Third: Don’t render the configuration.
This option shouldn’t matter much, because the block should not be printed on screen. Its only purpose is to store configuration to power some other functionality, such as rendering a persisted query.
However, just to be on the safe side and avoid unintended leaks, we’d rather not print the configuration data. More since the WordPress editor stores block data within an HTML comment, like this:
<!-- wp:graphql-api/schema-config {"key1": "value1", "key2": "value2"} /-->This comment may be printed on the page without us being aware of it. While displaying the chosen schema configuration ID is not dangerous, we may as well store sensitive configuration data, such as API keys.
Then, for peace of mind, let’s produce some safe content in the block’s save method:
registerBlockType( 'graphql-api/schema-configuration', {
  // ...

  /**
   * 3. Don't render the configuration
   */
  save() {
    return <p>You should not be reading this! 😈</p>;
  },
} );Last: The block must retrieve the list of the schema configuration entries, allow the user to select one by displaying them on suitable input control, and persist the selected entry in the DB.
This item will require a couple of steps:
- Retrieving the schema configuration entries from the server.
- Creating components to render the block.
To retrieve the list of entries from the schema-config CPT, the block uses a store which works by executing a GraphQL query against the server:
import {
  receiveSchemaConfigurations,
  setSchemaConfigurations,
} from './action-creators';

export const FETCH_SCHEMA_CONFIGURATIONS_GRAPHQL_QUERY = query GetSchemaConfigurations {
    schemaConfigurations {
      id
      title
    }
  }

export default {
  * getSchemaConfigurations() {

    const response = yield receiveSchemaConfigurations( FETCH_SCHEMA_CONFIGURATIONS_GRAPHQL_QUERY );
    const schemaConfigurations = response.data?.schemaConfigurations || [];
    return setSchemaConfigurations( schemaConfigurations );
  },
};
To create components to render the block, we can conveniently use any React component to power our blocks, including those freely available in npm. I took advantage of this and imported the wonderful Select component offered by the react-select package, as to allow the user to pick the schema configuration entry through a good-looking select input.
I created the hierarchy of components composing each other as to make the code reusable. At the bottom-most layer there is <Select />, which is wrapped by a custom SelectCard component, which is itself wrapped by a top-level SchemaConfigurationSelectCard component. This latter component displays a select input with all the schema configuration entries, and onChange will persist the value of the selected entry to the DB:
import { withSelect } from '@wordpress/data';
import { compose, withState } from '@wordpress/compose';
import { __ } from '@wordpress/i18n';
import { SelectCard } from '@graphqlapi/components';

const SchemaConfigurationSelectCard = ( props ) => {
  const {
    schemaConfigurations,
    attributes: {
      schemaConfiguration
    }
  } = props;

  const schemaConfigurationOptions = schemaConfigurations.map( schemaConfiguration => (
    {
      label: schemaConfiguration.title,
      value: schemaConfiguration.id,
    }
  ) );
  const metaOptions = [
    {
      label: 🟡 ${ __('Default', 'graphql-api') },
      value: 0,
    },
    {
      label: ❌ ${ __('None', 'graphql-api') },
      value: -1,
    },
  ];
  const groupedOptions = [
    {
    label: '',
    options: metaOptions,
    },
    {
    label: '',
    options: schemaConfigurationOptions,
    },
  ];
  const selectedOptions = schemaConfigurationOptions.filter( option => option.value == schemaConfiguration );
  const defaultValue = selectedOptions[0];

  return (
    <SelectCard
      { ...props }
      isMulti={ false }
      options={ groupedOptions }
      defaultValue={ defaultValue }
      onChange={ selected => setAttributes( {
        ['schemaConfiguration']: selected.value
      } ) }
    />
  );
}

export default compose( [
  withState( {
    label: __('Schema configuration', 'graphql-api'),
  } ),
  withSelect( ( select ) => {
    const {
      getSchemaConfigurations,
    } = select ( 'graphql-api/schema-configuration' );
    return {
      schemaConfigurations: getSchemaConfigurations(),
    };
  } ),
] )( SchemaConfigurationSelectCard );
Finally, I embedded <SchemaConfigurationSelectCard /> within the block's edit method:
import SchemaConfigurationSelectCard from './schema-configuration';

registerBlockType( 'graphql-api/schema-configuration', {
  // ...

  /**
   * 4. Display all schema configuration entries, and persist the selected entry to DB
   */
  edit(props) {
    const { className } = props;
    return (
      <div class={ className }>
        <SchemaConfigurationSelectCard
          { ...props }
        />
      </div>
    )
  },
} );
The resulting index.js file is this one:
import { registerBlockType } from '@wordpress/blocks';
import { __ } from '@wordpress/i18n';
import SchemaConfigurationSelectCard from './schema-configuration';

registerBlockType( 'graphql-api/schema-configuration', {
  title: __( 'Schema Configuration', 'graphql-api' ),
  description: __( 'Select the Schema Configuration for the GraphQL query', 'graphql-api' ),
  icon: 'admin-users',

  /**
   * 1. Store the ID of the selected schema configuration entry
   */
  attributes: {
    schemaConfiguration: {
      type: 'integer',
      default: 0,
    },
  },

  /**
   * 2. The block can only be accessible to the "persisted-query" CPT
   */
  supports: {
    inserter: false,
  },

  /**
   * 3. Don't render the configuration
   */
  save() {
    return <p>You should not be reading this! 🤔</p>;
  },

  /**
   * 4. Display all schema configuration entries, and persisted the selected entry to DB
   */
  edit(props) {
    const { className } = props;
    return (
      <div class={ className }>
        <SchemaConfigurationSelectCard
          { ...props }
        />
      </div>
    )
  },
} );By now, we have created the public and private CPTs, and the custom block that links them together. Next, we need to embed the custom block within the public CPT.
The schema configuration is mandatory, and it must be set only once. Hence, it makes no sense for the block to be added via the inserter in the editor, which would allow the user to not insert the block, or insert it multiple times. For that reason, earlier on we defined attribute inserter as false when registering the block.
Instead, we will “lock” a predefined template in the editor for the CPT, which specifies which blocks are to be used. For the persisted query, there will be two blocks:
- The GraphiQL client (implemented here),
- The “schema configuration” block.
To do this, we can define the template already when registering the post type, or by setting properties template and template_lock from the CPT object:
function register_persisted_query_template(): void
{
  $post_type_object = get_post_type_object( 'persisted-query' );
  $post_type_object->template = [
    ['graphql-api/graphiql'],
    ['graphql-api/schema-configuration'],
  ];
  $post_type_object->template_lock = 'all';
}
add_action( 'init', 'register_persisted_query_template' );
Now, when editing a persisted query, the predefined blocks will appear in the order and quantity specified, and be ready to be filled by the user.
Retrieving The CPT Configuration DataBy now, the system is mostly in place: we have created our public and private CPTs and linked them both together via a custom block. By this stage, our plugin users can create schema configuration entries, and select the required one when creating a persisted query. As a result, we will have all this data stored in the database, under the corresponding custom post entry.
Finally, we need to render the persisted query dynamically, making use of the schema configuration. Let’s see how to read the configuration data in our PHP code.
We can access the schema configuration ID in the template persisted-query.php (or anywhere the CPT will be rendered). First, we parse the content of the persisted query via parse_blocks, as to have access to the block data:
$persistedQueryObject = \get_post($persistedQueryID);
$persistedQueryBlocks = \parse_blocks($persistedQueryObject->post_content);
To retrieve the “schema-configuration” block, we must filter it by its name:
$schemaConfigurationBlock = null;
foreach ($persistedQueryBlocks as $block) {
  if ($block['blockName'] === 'graphql-api/schema-configuration') {
    // We found the block
    $schemaConfigurationBlock = $block;
    break;
  }
}
Once we have the block, we can access its data under attrs and the name of the attribute we chose to store the data when registering the block, which was "schemaConfiguration":
$schemaConfigurationID = $schemaConfigurationBlock['attrs']['schemaConfiguration'];We have now retrieved the selected schema configuration ID. Repeating the same sequence, we can retrieve the block data saved in this custom post entry, which is our private configuration data.
The schema configuration CPT stores the selected access control entries under block schema-config-access-control-lists, and the selected cache control entries under block schema-config-cache-control-lists:
$schemaConfigurationObject = \get_post($schemaConfigurationID);
$schemaConfigurationBlocks = \parse_blocks($schemaConfigurationObject->post_content);
$accessControlBlock = $cacheControlBlock = null;
foreach ($schemaConfigurationBlocks as $block) {
  if ($block['blockName'] === 'graphql-api/schema-config-access-control-lists') {
    $accessControlBlock = $block;
  } elseif ($block['blockName'] === 'graphql-api/schema-config-cache-control-lists') {
    $cacheControlBlock = $block;
  }
}

// Retrieve the stored configuration from the private CPT
$accessControlLists = $accessControlBlock['attrs']['accessControlLists'];;
$cacheControlLists = $cacheControlBlock['attrs']['cacheControlLists'];
Finally, we have retrieved the private configuration data, which we can use to decide how to render the persisted query (how my plugin then goes on to render this response is not important to the topic of this article):
// Do something with the configuration data
// ...

/**

    ffffffffffffffff    iiii
   f::::::::::::::::f  i::::i
  f::::::::::::::::::f  iiii
  f::::::fffffff:::::f
  f:::::f       ffffffiiiiiiinnnn  nnnnnnnn
  f:::::f             i:::::in:::nn::::::::nn
 f:::::::ffffff        i::::in::::::::::::::nn
 f::::::::::::f        i::::inn:::::::::::::::n
 f::::::::::::f        i::::i  n:::::nnnn:::::n
 f:::::::ffffff        i::::i  n::::n    n::::n
  f:::::f              i::::i  n::::n    n::::n
  f:::::f              i::::i  n::::n    n::::n
 f:::::::f            i::::::i n::::n    n::::n
 f:::::::f            i::::::i n::::n    n::::n
 f:::::::f            i::::::i n::::n    n::::n
 fffffffff            iiiiiiii nnnnnn    nnnnnn

*/
Tadaaaaa! We have created a public custom post type that retrieves configuration data from a private custom post type, and both CPTs are powered by blocks. Success! 🙏
Wrapping UpIf we want to configure our plugins using blocks, since the recently-released Full Site Editing feature cannot yet be used to create settings pages, we must then implement a custom solution.
In this article, I described one solution, based on creating a private custom post type to store the configuration data, and using the WordPress editor as the interface to fill this data.
As a result, we can provide a compelling experience for our users, thanks to the editor’s WYSIWYG, and the ability of blocks to provide controls that suit the type of content that must be provided, such as calendars, sliders, maps, or any other format.
Further Resources
- “WordPress 5.9 “Josephine””, Matt Mullenweg
- Introducing WordPress 5.9, YouTube video by WordPress
- “What’s New in WordPress 5.9”, Carlo Daniele
- Block Editor Handbook, wordpress.org
- “The (Upcoming) WordPress Renaissance”, Leonardo Losoviz
- “Implications Of Thinking In Blocks Instead Of Blobs”, Leonardo Losoviz