How To Build Your Own Comment System Using Firebase
A comments section is a great way to build a community for your blog. Recently when I started blogging, I thought of adding a comments section. However, it wasn’t easy. Hosted comments systems, such as Disqus and Commento, come with their own set of problems:
- They own your data.
- They are not free.
- You cannot customize them much.
So, I decided to build my own comments system. Firebase seemed like a perfect hosting alternative to running a back-end server.
First of all, you get all of the benefits of having your own database: You control the data, and you can structure it however you want. Secondly, you don’t need to set up a back-end server. You can easily control it from the front end. It’s like having the best of both worlds: a hosted system without the hassle of a back end.
In this post, that’s what we’ll do. We will learn how to set up Firebase with Gatsby, a static site generator. But the principles can be applied to any static site generator.
Let’s dive in!
What Is Firebase?
Firebase is a back end as a service that offers tools for app developers such as database, hosting, cloud functions, authentication, analytics, and storage.
Cloud Firestore (Firebase’s database) is the functionality we will be using for this project. It is a NoSQL database. This means it’s not structured like a SQL database with rows, columns, and tables. You can think of it as a large JSON tree.
Introduction to the Project
Let’s initialize the project by cloning or downloading the repository from GitHub.
I’ve created two branches for every step (one at the beginning and one at the end) to make it easier for you to track the changes as we go.
Let’s run the project using the following command:
gatsby developIf you open the project in your browser, you will see the bare bones of a basic blog.

The comments section is not working. It is simply loading a sample comment, and, upon the comment’s submission, it logs the details to the console.
Our main task is to get the comments section working.
How the Comments Section Works
Before doing anything, let’s understand how the code for the comments section works.
Four components are handling the comments sections:
blog-post.jsComments.jsCommentForm.jsComment.js
First, we need to identify the comments for a post. This can be done by making a unique ID for each blog post, or we can use the slug, which is always unique.
The blog-post.js file is the layout component for all blog posts. It is the perfect entry point for getting the slug of a blog post. This is done using a GraphQL query.
export const query = graphql`
     query($slug: String!) {
         markdownRemark(fields: { slug: { eq: $slug } }) {
             html
             frontmatter {
                 title
             }
             fields {
                 slug
             }
         }
     }
`
Before sending it over to the Comments.js component, let’s use the substring() method to get rid of the trailing slash (/) that Gatsby adds to the slug.
const slug = post.fields.slug.substring(1, post.fields.slug.length - 1)

return (
     <Layout>
         <div className="container">
             <h1>{post.frontmatter.title}</h1>
             <div dangerouslySetInnerHTML={{ __html: post.html }} />
             <Comments comments={comments} slug={slug} />
         </div>
     </Layout>
     )
 }
The Comments.js component maps each comment and passes its data over to Comment.js, along with any replies. For this project, I have decided to go one level deep with the commenting system.
The component also loads CommentForm.js to capture any top-level comments.
const Comments = ({ comments, slug }) => {
     return (
         <div>
             <h2>Join the discussion</h2>
             <CommentForm slug={slug} />
             <CommentList>
                 {comments.length > 0 &&
                     comments
                         .filter(comment => !comment.pId)
                         .map(comment => {
                             let child
                             if (comment.id) {
                                 child = comments.find(c => comment.id === c.pId)
                             }
                             return (
                                 <Comment
                                     key={comment.id}
                                     child={child}
                                     comment={comment}
                                     slug={slug}
                                 />
                             )
                         })}
                     </CommentList>
                 </div>
             )
         }
Let’s move over to CommentForm.js. This file is simple, rendering a comment form and handling its submission. The submission method simply logs the details to the console.
const handleCommentSubmission = async e => {
     e. preventDefault()
         let comment = {
             name: name,
             content: content,
             pId: parentId ∣∣ null,
             time: new Date(),
         }
         setName("")
         setContent("")
         console.log(comment)
     }
The Comment.js file has a lot going on. Let’s break it down into smaller pieces.
First, there is a SingleComment component, which renders a comment.
I am using the Adorable API to get a cool avatar. The Moment.js library is used to render time in a human-readable format.
const SingleComment = ({ comment }) => (
     <div>
         <div className="flex-container">
             <div className="flex">
                 <img
                     src="https://api.adorable.io/avazars/65/abott@adorable.png"
                     alt="Avatar"
                 />
             </div>
             <div className="flex">
                 <p className="comment-author">
                     {comment.name} <span>says</span>
                 </p>
                 {comment.time} &&(<time>(moment(comment.time.toDate()).calendar()}</time>)}
             </div>
         </div>
         </p>{comment.content}</p>
     </div>
)
Next in the file is the Comment component. This component shows a child comment if any child comment was passed to it. Otherwise, it renders a reply box, which can be toggled on and off by clicking the “Reply” button or “Cancel Reply” button.
const Comment = ({ comment, child, slug }) => {
     const [showReplyBox, setShowReplyBox] = useState(false)
     return (
         <CommentBox>
             <SingleComment comment={comment} />
             {child && (
                 <CommentBox child className=comment-reply">
                     <SingleComment comment={child} />
                 </CommentBox>
             )}
             {!child && (
                 <div>
                     {showReplyBox ? (
                         <div>
                             <button
                                 className="btn bare"
                                 onClick={() => setShowReplyBoy(false)}
                             >
                                 Cancel Reply
                             </button>
                             <CommentForm parentId={comment.id} slug={slug} />
                         </div>
                     ) : (
                         <button className="btn bare" onClick={() => setShowReplyBox(true)}>
                             Reply
                         </button>
                     )}
                 </div>
             )}
         </div>
     )}
</CommentBox>
Now that we have an overview, let’s go through the steps of making our comments section.
1. Add Firebase
First, let’s set up Firebase for our project.
Start by signing up. Go to Firebase, and sign up for a Google account. If you don’t have one, then click “Get Started”.
Click on “Add Project” to add a new project. Add a name for your project, and click “Create a project”.

Once we have created a project, we’ll need to set up Cloud Firestore.
In the left-side menu, click “Database”. Once a page opens saying “Cloud Firestore”, click “Create database” to create a new Cloud Firestore database.

When the popup appears, choose “Start in test mode”. Next, pick the Cloud Firestore location closest to you.

Once you see a page like this, it means you’ve successfully created your Cloud Firestore database.

Let’s finish by setting up the logic for the application. Go back to the application and install Firebase:
yarn add firebaseAdd a new file, firebase.js, in the root directory. Paste this content in it:
import firebase from "firebase/app"
import "firebase/firestore"

var firebaseConfig = 'yourFirebaseConfig'

firebase.initializeApp(firebaseConfig)

export const firestore = firebase.firestore()

export default firebase
You’ll need to replace yourFirebaseConfig with the one for your project. To find it, click on the gear icon next to “Project Overview” in the Firebase app.

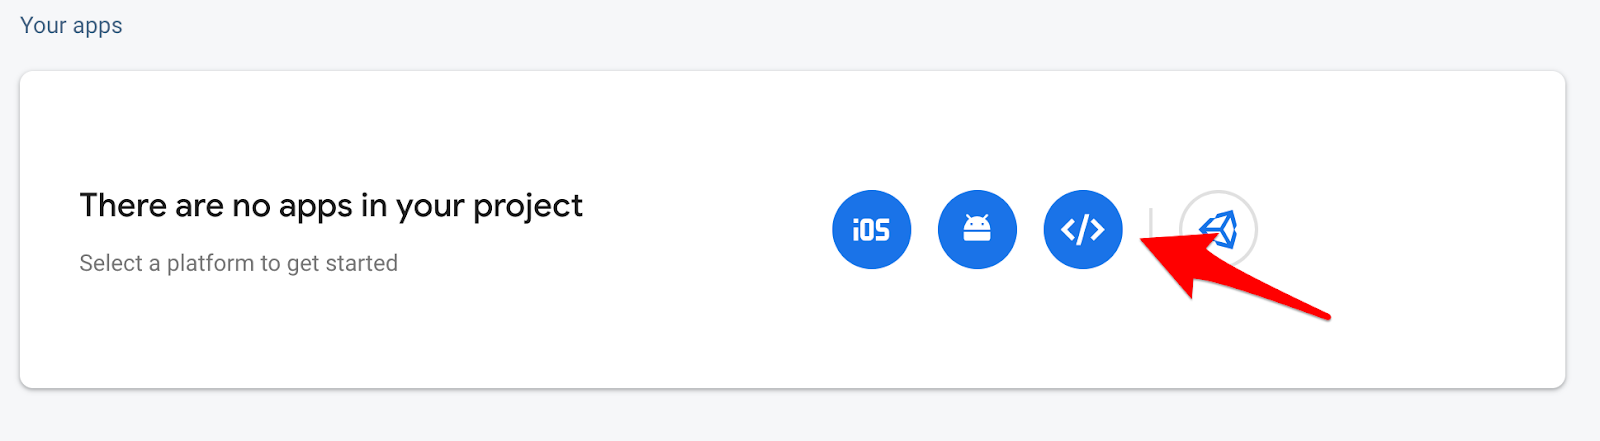
This opens up the settings page. Under your app’s subheading, click the web icon, which looks like this:
This opens a popup. In the “App nickname” field, enter any name, and click “Register app”. This will give your firebaseConfig object.
<!-- The core Firebase JS SDK is always required and must be listed first -->
<script src="https://www.gstatic.com/firebasejs/7.15.5/firebase-app.js"></script>

<!-- TODO: Add SDKs for Firebase products that you want to use
    https://firebase.google.com/docs/web/setup#available-libraries -->

<script>
    // Your web app’s Firebase configuration
    var firebaseConfig = {

    ...

    };
    // Initialize Firebase
    firbase.initializeApp(firebaseConfig);
</script>
Copy just the contents of the firebaseConfig object, and paste it in the firebase.js file.
Is It OK to Expose Your Firebase API Key?
Yes. As stated by a Google engineer, exposing your API key is OK.
The only purpose of the API key is to identify your project with the database at Google. If you have set strong security rules for Cloud Firestore, then you don’t need to worry if someone gets ahold of your API key.
We’ll talk about security rules in the last section.
For now, we are running Firestore in test mode, so you should not reveal the API key to the public.
How to Use Firestore?
You can store data in one of two types:
- collection
A collection contains documents. It is like an array of documents. - document
A document contains data in a field-value pair.
Remember that a collection may contain only documents and not other collections. But a document may contain other collections.
This means that if we want to store a collection within a collection, then we would store the collection in a document and store that document in a collection, like so:
{collection-1}/{document}/{collection-2}How to Structure the Data?
Cloud Firestore is hierarchical in nature, so people tend to store data like this:
blog/{blog-post-1}/content/comments/{comment-1}But storing data in this way often introduces problems.
Say you want to get a comment. You’ll have to look for the comment stored deep inside the blog collection. This will make your code more error-prone. Chris Esplin recommends never using sub-collections.
I would recommend storing data as a flattened object:
blog-posts/{blog-post-1}
comments/{comment-1}
This way, you can get and send data easily.
How to Get Data From Firestore?
To get data, Firebase gives you two methods:
get()
This is for getting the content once.onSnapshot()
This method sends you data and then continues to send updates unless you unsubscribe.
How to Send Data to Firestore?
Just like with getting data, Firebase has two methods for saving data:
set()
This is used to specify the ID of a document.add()
This is used to create documents with automatic IDs.
I know, this has been a lot to grasp. But don’t worry, we’ll revisit these concepts again when we reach the project.
2. Create Sample Date
The next step is to create some sample data for us to query. Let’s do this by going to Firebase.
Go to Cloud Firestore. Click “Start a collection”. Enter comments for the “Collection ID”, then click “Next”.

For the “Document ID”, click “Auto-ID. Enter the following data and click “Save”.

While you’re entering data, make sure the “Fields” and “Types” match the screenshot above. Then, click “Save”.
That’s how you add a comment manually in Firestore. The process looks cumbersome, but don’t worry: From now on, our app will take care of adding comments.
At this point, our database looks like this: comments/{comment}.
3. Get the Comments Data
Our sample data is ready to query. Let’s get started by getting the data for our blog.
Go to blog-post.js, and import the Firestore from the Firebase file that we just created.
import {firestore} from "../../firebase.js"To query, we will use the useEffect hook from React. If you haven’t already, let’s import it as well.
useEffect(() => {
    firestore
      .collection(`comments`)
      .onSnapshot(snapshot => {
        const posts = snapshot.docs
        .filter(doc => doc.data().slug === slug)
        .map(doc => {
          return { id: doc.id, ...doc.data() }
        })
        setComments(posts)
      })
}, [slug])
The method used to get data is onSnapshot. This is because we also want to listen to state changes. So, the comments will get updated without the user having to refresh the browser.
We used the filter and map methods to find the comments whose slug matches the current slug.
One last thing we need to think about is cleanup. Because onSnapshot continues to send updates, this could introduce a memory leak in our application. Fortunately, Firebase provides a neat fix.
useEffect(() => {
    const cleanUp = firestore
      .doc(`comments/${slug}`)
      .collection("comments")
      .onSnapshot(snapshot => {
        const posts = snapshot.docs.map(doc => {
          return { id: doc.id, ...doc.data() }
        })
        setComments(posts)
      })
    return () => cleanUp()
  }, [slug])
Once you’re done, run gatsby develop to see the changes. We can now see our comments section getting data from Firebase.

Let’s work on storing the comments.
4. Store Comments
To store comments, navigate to the CommentForm.js file. Let’s import Firestore into this file as well.
import { firestore } from "../../firebase.js"To save a comment to Firebase, we’ll use the add() method, because we want Firestore to create documents with an auto-ID.
Let’s do that in the handleCommentSubmission method.
firestore
.collection(`comments`)
.add(comment)
.catch(err => {
   console.error('error adding comment: ', err)
 })
First, we get the reference to the comments collection, and then add the comment. We’re also using the catch method to catch any errors while adding comments.
At this point, if you open a browser, you can see the comments section working. We can add new comments, as well as post replies. What’s more amazing is that everything works without our having to refresh the page.

You can also check Firestore to see that it is storing the data.

Finally, let’s talk about one crucial thing in Firebase: security rules.
5. Tighten Security Rules
Until now, we’ve been running Cloud Firestore in test mode. This means that anybody with access to the URL can add to and read our database. That is scary.
To tackle that, Firebase provides us with security rules. We can create a database pattern and restrict certain activities in Cloud Firestore.
In addition to the two basic operations (read and write), Firebase offers more granular operations: get, list, create, update, and delete.
A read operation can be broken down as:
get
Get a single document.list
Get a list of documents or a collection.
A write operation can be broken down as:
create
Create a new document.update
Update an existing document.delete
Delete a document.
To secure the application, head back to Cloud Firestore. Under “Rules”, enter this:
service cloud.firestore {
    match /databases/{database}/documents {
    match /comments/{id=**} {
        allow read, create;
      }
    }
}
On the first line, we define the service, which, in our case, is Firestore. The next lines tell Firebase that anything inside the comments collection may be read and created.
If we had used this:
allow read, write;… that would mean that users could update and delete existing comments, which we don’t want.
Firebase’s security rules are extremely powerful, allowing us to restrict certain data, activities, and even users.
On To Building Your Own Comments Section
Congrats! You have just seen the power of Firebase. It is such an excellent tool to build secure and fast applications.
We’ve built a super-simple comments section. But there’s no stopping you from exploring further possibilities:
- Add profile pictures, and store them in Cloud Storage for Firebase;
- Use Firebase to allow users to create an account, and authenticate them using Firebase authentication;
- Use Firebase to create inline Medium-like comments.
A great way to start would be to head over to Firestore’s documentation.
Finally, let’s head over to the comments section below and discuss your experience with building a comments section using Firebase.