How to Crop in Figma
Cropping is a fundamental design technique used to remove unwanted portions of an image, focus on specific areas, or adjust the aspect ratio.
In this article, we will guide you through the process of cropping images in Figma and discuss additional tips to help you make the most of this essential tool.
It’s a slightly tricky technique to master in Figma, as you’ll need to be using masks, rather than traditional cropping tools. But we’ve got some helpful tips to get you started!
Using Masks for Cropping
Figma does not have a dedicated cropping tool; instead, it uses masks to achieve a similar effect. Masks allow you to show or hide portions of layers, including images. Follow these steps to crop an image using a mask in Figma:
- Import the image you want to crop into your Figma project by dragging and dropping it from your file explorer or using the “Place Image” option in the toolbar.
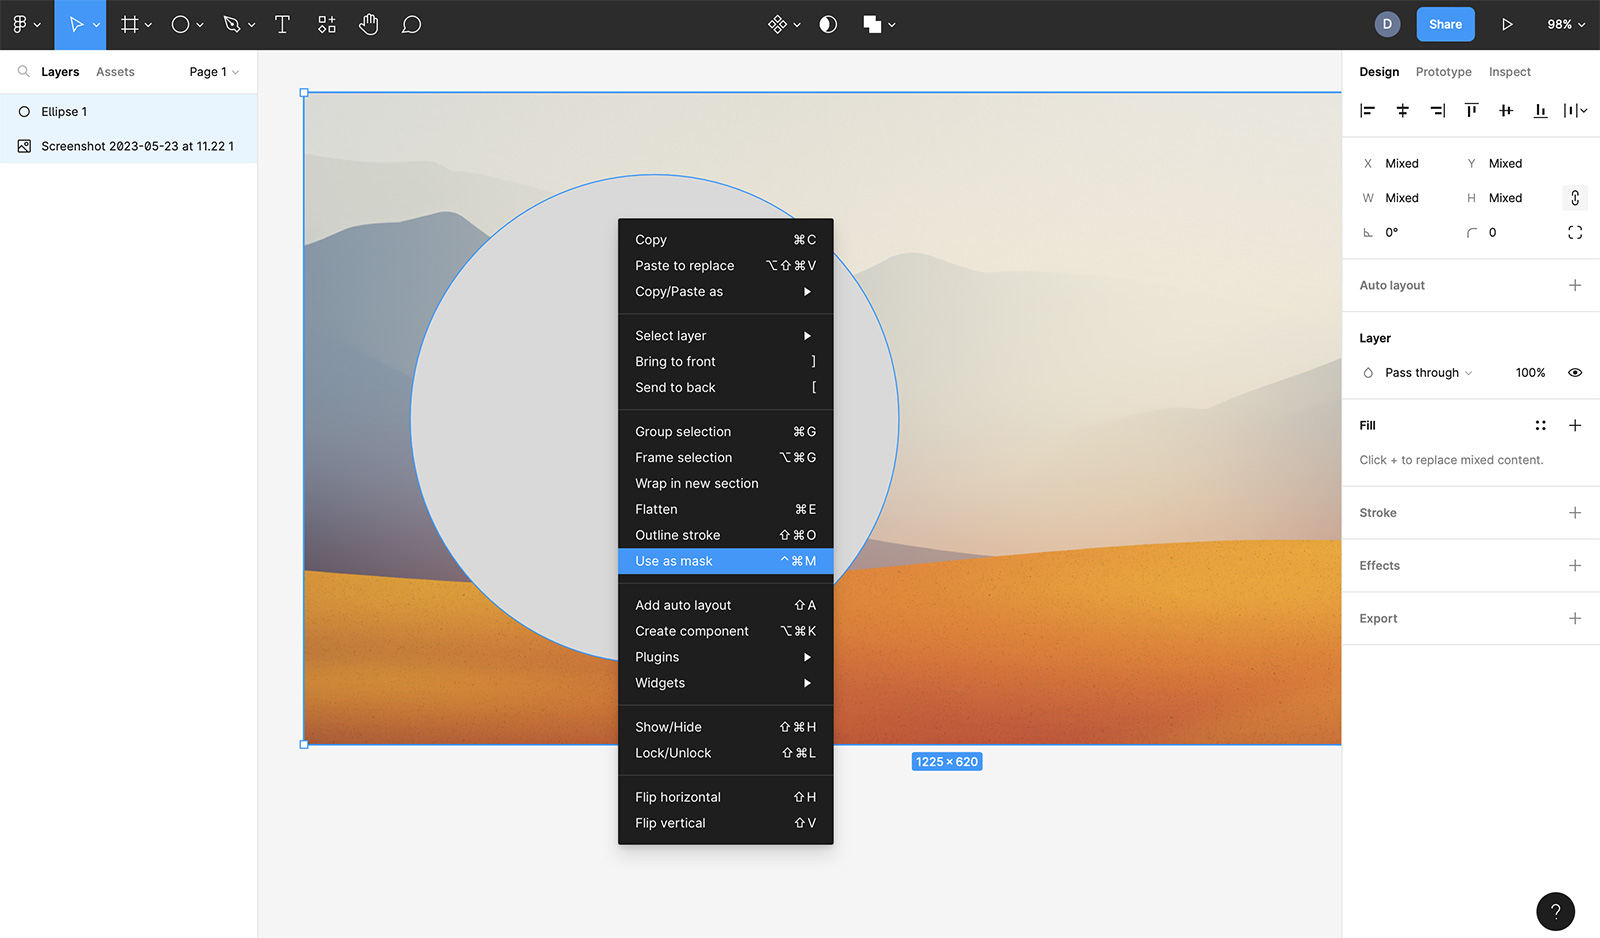
- Create a shape using the Rectangle, Ellipse, or Polygon tool that represents the area you want to keep visible after cropping. Position the shape over the area you want to crop.
- Select both the image and the shape by holding the Shift key and clicking on each of them.
- Right-click on the selection, then choose “Use as Mask” or use the shortcut Ctrl + Alt + M (Cmd + Opt + M on macOS).
- The image will now be cropped according to the shape you created. You can resize and move the mask to adjust the cropping as needed.
Using masks for cropping offers flexibility, as you can easily adjust the masked area or create non-rectangular crops.
Cropping Vector Objects
When working with vector objects, you can crop them by using the Boolean operations in Figma. These operations allow you to combine, subtract, or intersect shapes. To crop a vector object, follow these steps:
- Create a shape using the Rectangle, Ellipse, or Polygon tool that represents the area you want to keep visible after cropping. Position the shape over the area you want to crop.
- Select both the vector object and the shape by holding the Shift key and clicking on each of them.
- In the toolbar, click on the “Boolean operation” dropdown and select “Intersect.”
- The vector object will now be cropped according to the shape you created.
Cropping vector objects with Boolean operations allows you to create complex and precise crops.
Tips for Cropping in Figma
Cropping effectively in Figma can enhance your designs and improve the overall composition. Keep these tips in mind when working with cropping:
- Preserve aspect ratios: When cropping images, maintain the original aspect ratio to avoid distortion. Hold the Shift key while resizing the mask to maintain the image’s proportions.
- Use guides and grids: Align your cropping shapes to guides and grids to ensure precise cropping and maintain consistency across your design.
- Experiment with shapes: Don’t limit yourself to rectangular crops. Use different shapes, such as ellipses or polygons, to create unique and eye-catching crops.
- Adjust the mask: Remember that masks are non-destructive. You can resize, move, or delete the mask to reveal the original image or adjust the cropping without losing any information.
- Combine masks and effects: Use masks in combination with effects like blurs or drop shadows to create more visually appealing designs.
Cropping in Figma is a powerful technique that can elevate your designs when used effectively. By understanding how to use masks and Boolean operations for cropping, you can focus on specific areas of images, remove unwanted elements, or create unique compositions.
Scaling and Resizing Cropped Images
After cropping an image or vector object, you may want to resize or scale it to fit your design. Here’s how to scale and resize cropped images in Figma:
- Select the cropped image or vector object.
- Click and drag the handles on the bounding box to resize the image. Hold the Shift key while dragging to maintain the aspect ratio.
- If you need to scale the entire image, including the mask, group the masked image and shape first by selecting both layers and pressing Ctrl + G (Cmd + G on macOS). Then, resize the group as needed.
Scaling and resizing cropped images allows you to fit them into your design while maintaining their visual integrity.
Exporting Cropped Images
Once you have cropped your images and adjusted your design, you may need to export the cropped images for use in other applications or projects. To export cropped images in Figma, follow these steps:
- Select the cropped image or the group containing the cropped image and mask.
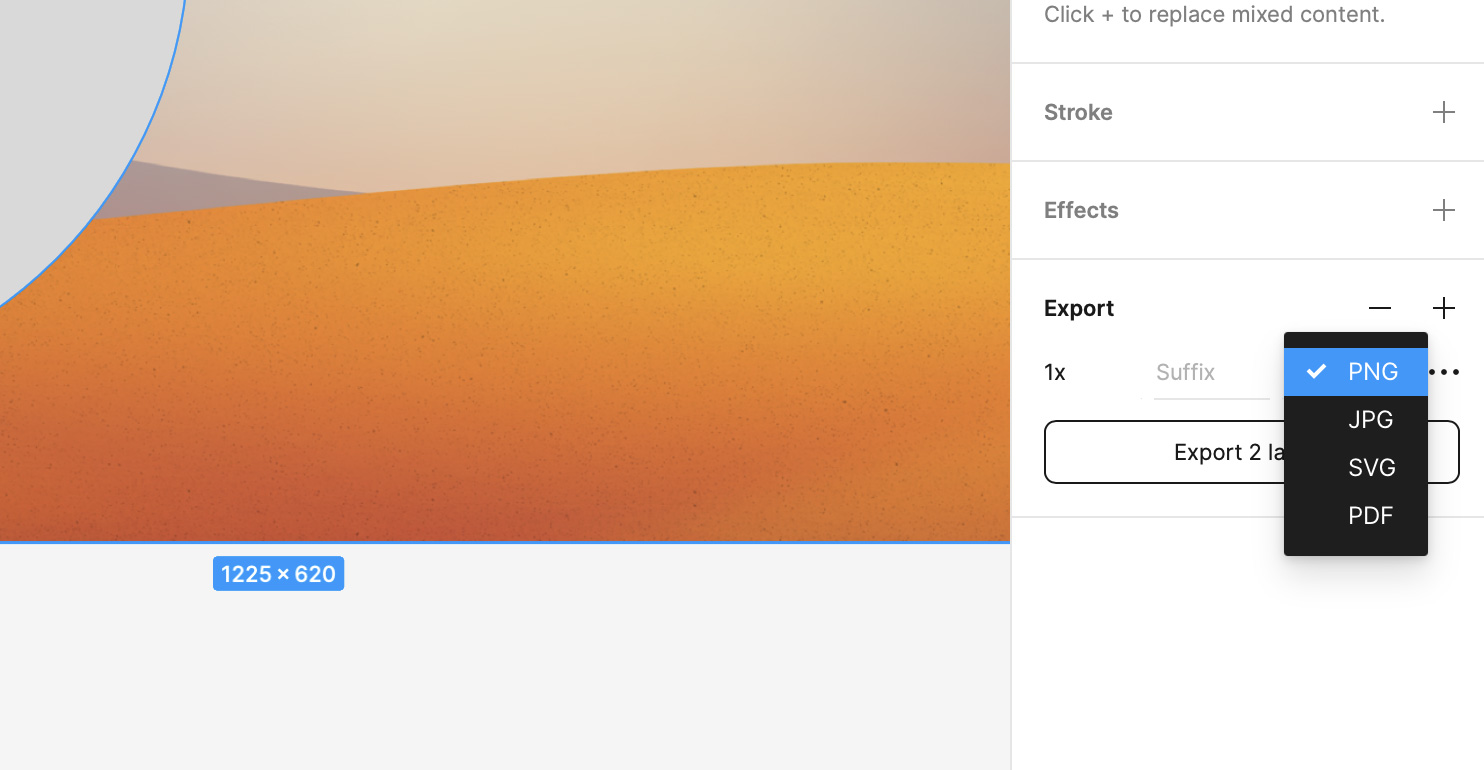
- Click on the “Export” tab in the right-hand panel or use the shortcut Ctrl + E (Cmd + E on macOS).
- Choose the desired file format, such as PNG, JPEG, or SVG, and adjust the export settings as needed.
- Click “Export” to save the cropped image to your computer.
Exporting cropped images in Figma allows you to use them in other applications, share them with clients or teammates, or integrate them into your website or app designs.
In conclusion, mastering the art of cropping in Figma can enhance your designs and help you create more engaging and visually appealing projects.
By using masks for cropping images, employing Boolean operations for vector objects, and following the tips and techniques outlined in this article, you’ll be well on your way to becoming a more proficient and versatile Figma user.