Improving JavaScript Bundle Performance With Code-Splitting
Projects built using JavaScript-based frameworks often ship large bundles of JavaScript that take time to download, parse and execute, blocking page render and user input in the process. This problem is more apparent on unreliable and slow networks and lower-end devices. In this article, we’re going to cover code-splitting best practices and showcase some examples using React, so we load the minimum JavaScript necessary to render a page and dynamically load sizeable non-critical bundles.
JavaScript-based frameworks like React made the process of developing web applications streamlined and efficient, for better or worse. This automatization often leads developers to treat a framework and build tools as a black box. It’s a common misconception that the code which is produced by the framework build tools (Webpack, for example) is fully optimized and cannot be improved upon any further.
Even though the final JavaScript bundles are tree-shaken and minified, usually the entire web application is contained within a single or just a few JavaScript files, depending on the project configuration and out-of-the-box framework features. What problem could there be if the file itself is minified and optimized?
Bundling PitfallsLet’s take a look at a simple example. The JavaScript bundle for our web app consists of the following six pages contained in individual components. Usually, those components consist of even more sub-components and other imports, but we’ll keep this simple for clarity.
- Four public pages
They can be accessed even when not logged in (homepage, login, register, and profile page). - A single private page
It can be accessed by logging in (dashboard page). - A restricted page
It’s an admin page that has an overview of all user activity, accounts, and analytics (admin page).

When a user lands on a homepage, for example, the entire app.min.js bundle with code for other pages is loaded and parsed, which means that only a part of it is used and rendered on the page. This sounds inefficient, doesn’t it? In addition to that, all users are loading a restricted part of the app which only a few users will be able to have access to — the admin page. Even though the code is partially obfuscated as part of the minification process, we risk exposing API endpoints or other data reserved for admin users.
How can we make sure that user loads the bare minimum JavaScript needed to render the page they’re currently on? In addition to that, we also need to make sure that the bundles for restricted sections of the page are loaded by the authorized users only. The answer lies in code-splitting.
Before delving into details about code-splitting, let’s quickly remind ourselves what makes JavaScript so impactful on overall performance.
Performance CostsJavaScript’s effect on performance consists of download, parsing and the execution costs.
Like any file referenced and used on a website, it first needs to be downloaded from a server. How quickly the file is downloaded depends on the connection speed and the size of the file itself. Users can browse the Internet using slow and unreliable networks, so minification, optimization, and code-splitting of JavaScript files ensure that the user downloads the smallest file possible.

Unlike the image file, for example, which only needs to be rendered once the file has been downloaded, JavaScript files need to be parsed, compiled, and executed. This is a CPU-intensive operation that blocks the main thread making the page unresponsive for that time. A user cannot interact with the page during that phase even though the content might be displayed and has seemingly finished loading. If the script takes too long to parse and execute, the user will get the impression that the site is broken and leave. This is why Lighthouse and Core Web Vitals specify First Input Delay (FID) and Total Blocking Time (TBT) metrics to measure site interactivity and input responsiveness.
JavaScript is also a render-blocking resource, meaning that if the browser encounters a script within the HTML document which isn’t deferred, it doesn’t render the page until it loads and executes the script. HTML attributes async and defer signal to the browser not to block page processing, however, the CPU thread still gets blocked and the script needs to be executed before the page becomes responsive to user input.
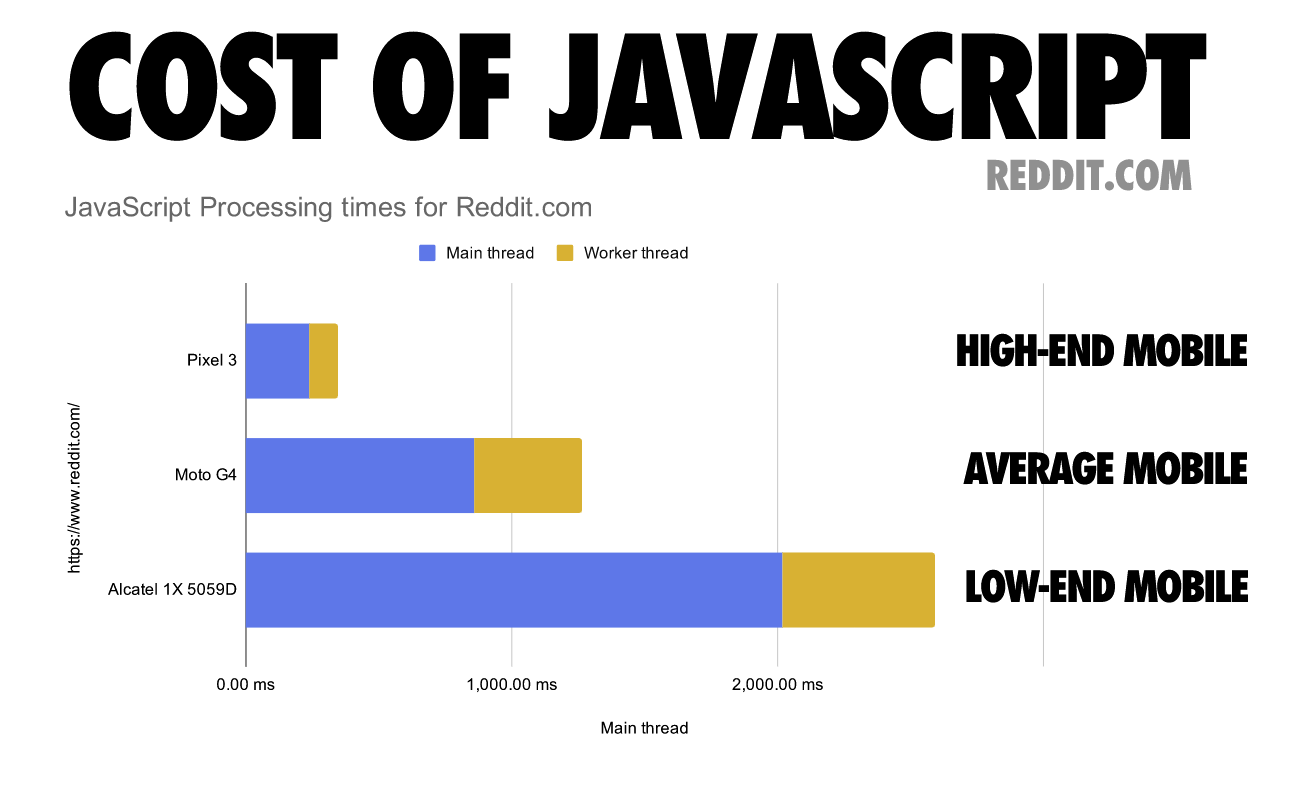
Website performance is not consistent across devices. There is a wide range of devices available on the market with different CPU and memory specs, so it’s no surprise that the difference in JavaScript execution time between the high-end devices and average devices is huge.
To cater to a wide range of device specs and network types, we should ship only critical code. For JavaScript-based web apps, it means that only the code which is used on that particular page should be loaded, as loading the complete app bundle at once can result in longer execution times and, for users, longer waiting time until the page becomes usable and responsive to input.
Code-splittingWith code-splitting, our goal is to defer the loading, parsing, and execution of JavaScript code which is not needed for the current page or state. For our example, that would mean that individual pages should be split into their respective bundles — homepage.min.js, login.min.js, dashboard.min.js, and so on.
When the user initially lands on the homepage, the main vendor bundle containing the framework and other shared dependencies should be loaded in alongside the bundle for the homepage. The user clicks on a button that toggles an account creation modal. As the user is interacting with the inputs, the expensive password strength check library is dynamically loaded. When a user creates an account and logs in successfully, they are redirected to the dashboard, and only then is the dashboard bundle loaded. It’s also important to note that this particular user doesn’t have an admin role on the web app, so the admin bundle is not loaded.

Dynamic Imports & Code-splitting In React
Code splitting is available out-of-the-box for Create React App and other frameworks that use Webpack like Gatsby and Next.js. If you have set up the React project manually or if you are using a framework that doesn’t have code-splitting configured out-of-the-box, you’ll have to consult the Webpack documentation or the documentation for the build tool that you’re using.
Functions
Before diving into code-splitting React components, we also need to mention that we can also code split functions in React by dynamically importing them. Dynamic importing is vanilla JavaScript, so this approach should work for all frameworks. However, keep in mind that this syntax is not supported by legacy browsers like Internet Explorer and Opera Mini.
import("path/to/myFunction.js").then((myFunction) => {
   /* ... */
});
In the following example, we have a blog post with a comment section. We’d like to encourage our readers to create an account and leave comments, so we are offering a quick way to create an account and start commenting by displaying the form next to the comment section if they’re not logged in.

The form is using a sizeable 800kB zxcvbn library to check password strength which could prove problematic for performance, so it’s the right candidate for code splitting. This is the exact scenario I was dealing with last year and we managed to achieve a noticeable performance boost by code-splitting this library to a separate bundle and loading it dynamically.
Let’s see what the Comments.jsx component looks like.
import React, { useState } from "react";
import zxcvbn from "zxcvbn"; /* We're importing the lib directly */
export const Comments = () => {
const [password, setPassword] = useState("");
const [passwordStrength, setPasswordStrength] = useState(0);
const onPasswordChange = (event) => {
const { value } = event.target;
const { score } = zxcvbn(value)
setPassword(value);
setPasswordStrength(score);
};
return (
<form>
{/* ... */}
<input onChange={onPasswordChange} type="password"></input>
<small>Password strength: {passwordStrength}</small>
{/* ... */}
</form>
);
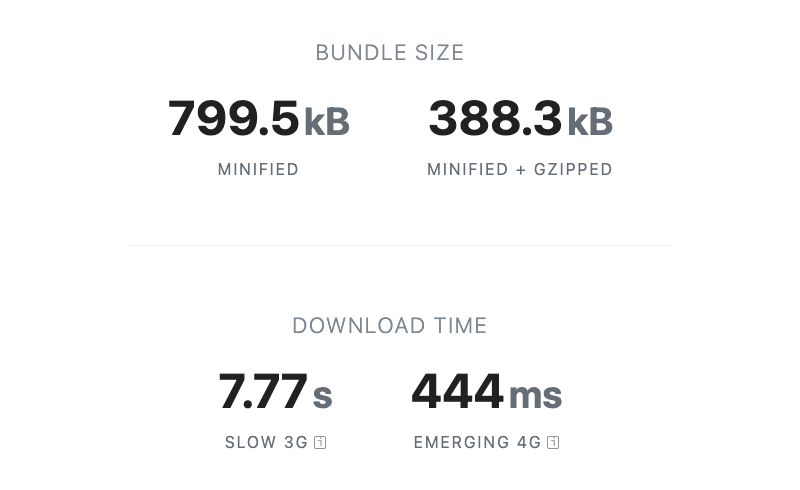
};We’re importing the zxcvbn library directly and it gets included in the main bundle as a result. The resulting minified bundle for our tiny blog post component is a whopping 442kB gzipped! React library and this blog post page barely reach 45kB gzipped, so we have slowed down the initial loading of this page considerably by instantly loading this password checking library.

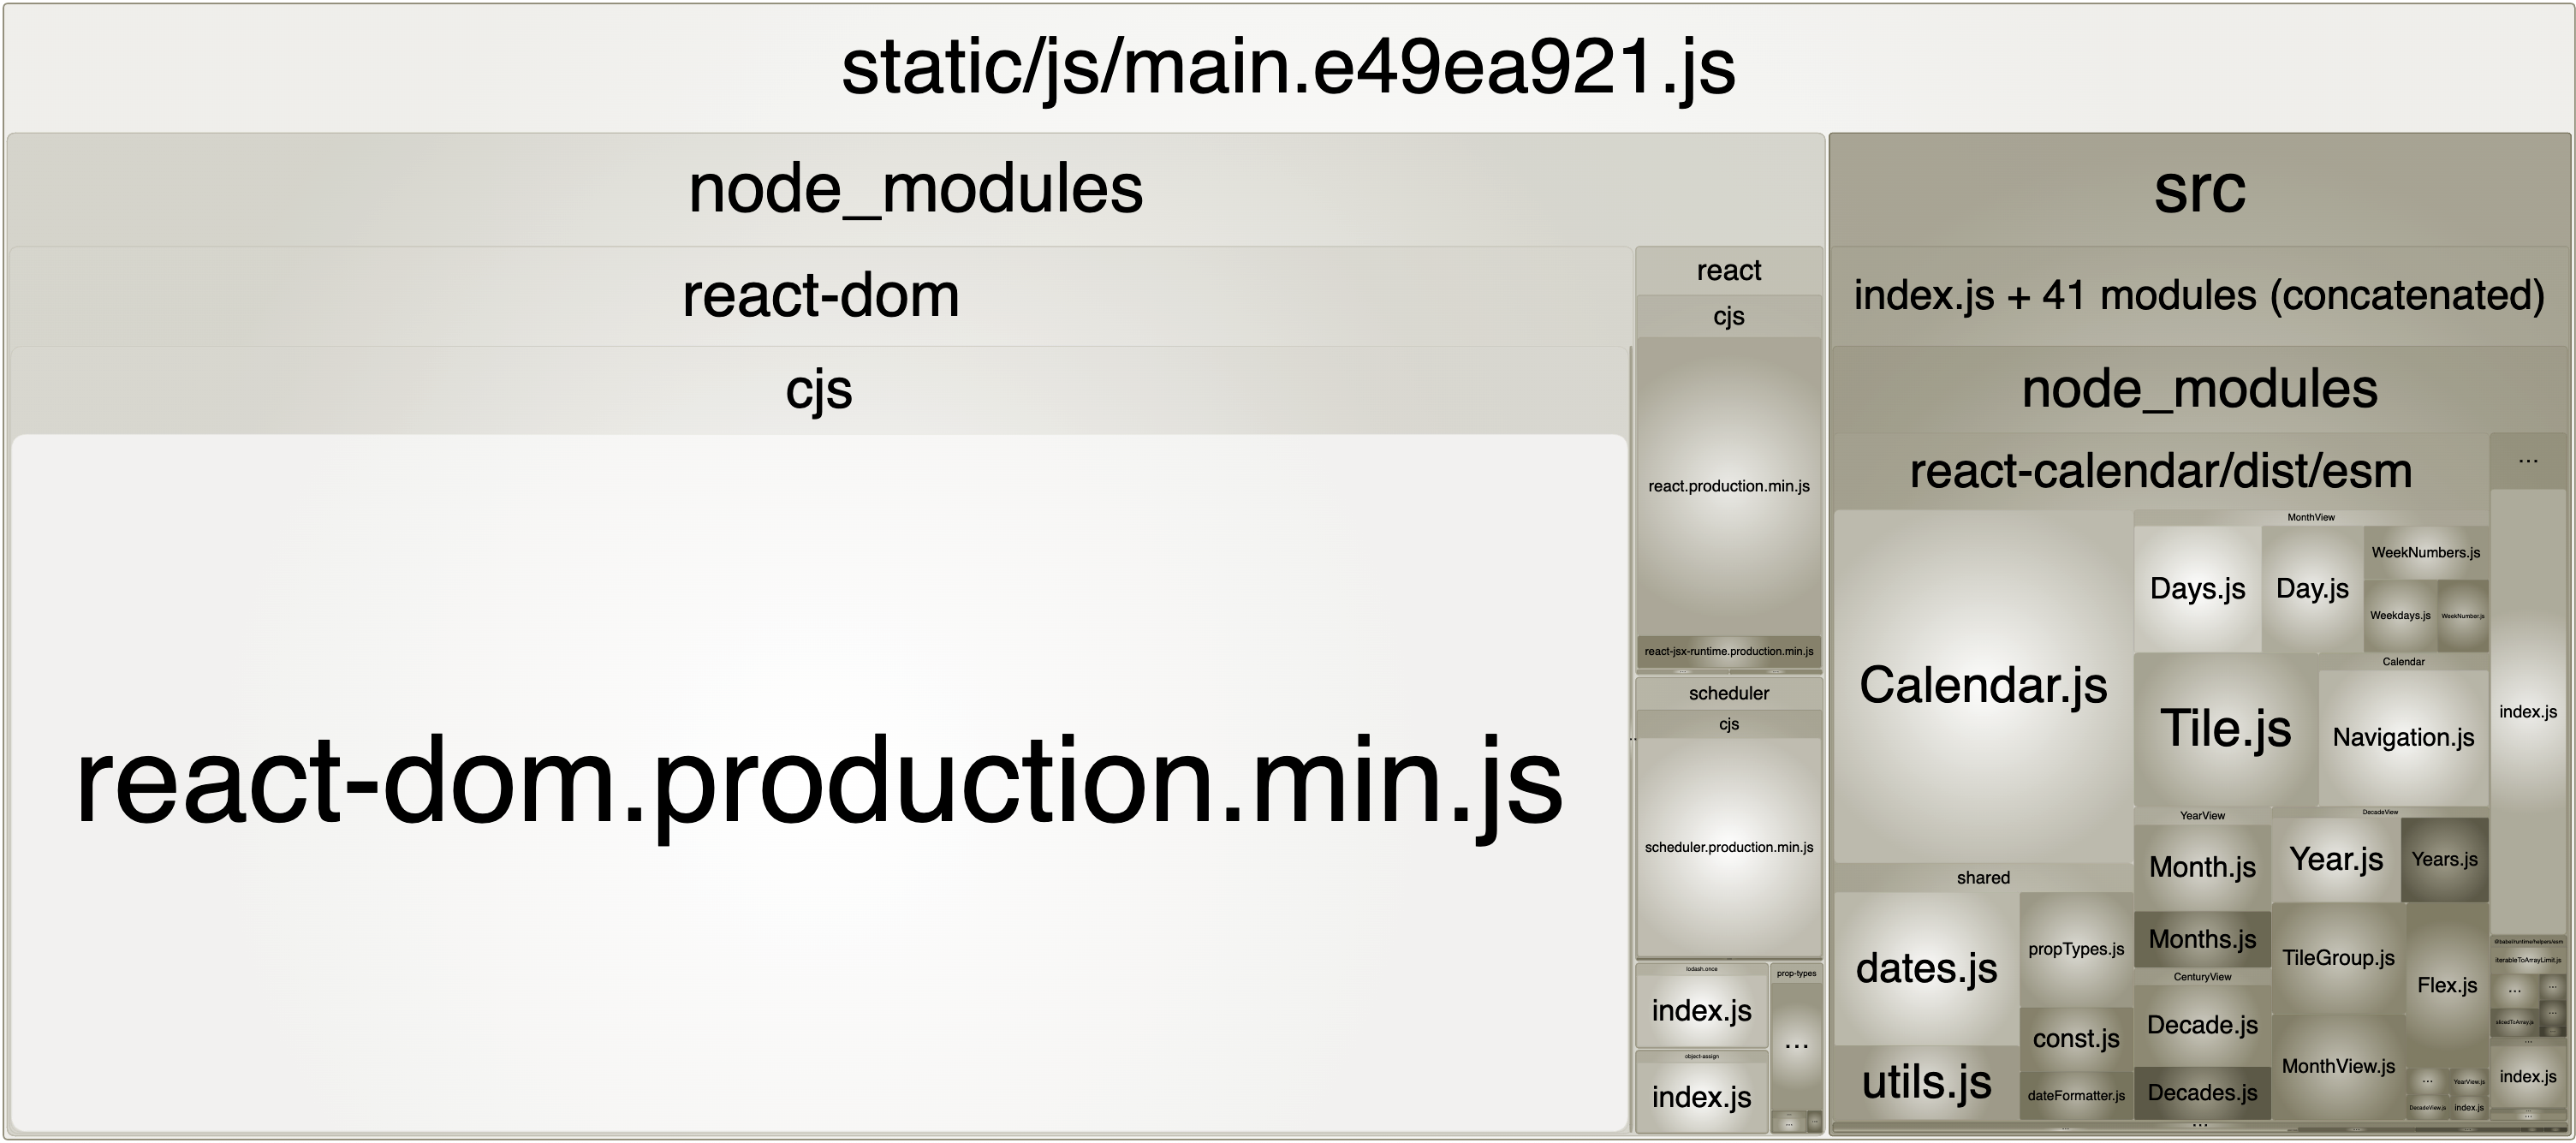
We can reach the same conclusion by looking at the Webpack Bundle Analyzer output for the app. That narrow rectangle on the far right is our blog post component.

Password checking is not critical for page render. Its functionality is required only when the user interacts with the password input. So, let’s code-split zxcvbn into a separate bundle, dynamically import it and load it only when the password input value changes, i.e. when the user starts typing their password. We need to remove the import statement and add the dynamic import statement to the password onChange event handler function.
import React, { useState } from "react";

export const Comments = () => {
  /* ... */
  const onPasswordChange = (event) => {
    const { value } = event.target;
    setPassword(value);

    /* Dynamic import - rename default import to lib name for clarity */
    import("zxcvbn").then(({default: zxcvbn}) => {
      const { score } = zxcvbn(value);
      setPasswordStrength(score);
    });
  };

  /* ... */
}
Let’s see how our app behaves now after we’ve moved the library to a dynamic import.

Third-party React components
Code-splitting React components are simple for most cases and it consists of the following four steps:
- use a default export for a component that we want to code-split;
- import the component with
React.lazy; - render the component as a child of
React.Suspense; - provide a fallback component to
React.Suspense.
Let’s take a look at another example. This time we’re building a date-picking component that has requirements that default HTML date input cannot meet. We have chosen react-calendar as the library that we’re going to use.

Let’s take a look at the DatePicker component. We can see that the Calendar component from the react-calendar package is being displayed conditionally when the user focuses on the date input element.
import React, { useState } from "react";
import Calendar from "react-calendar";

export const DatePicker = () => {
  const [showModal, setShowModal] = useState(false);

  const handleDateChange = (date) => {
    setShowModal(false);
  };

  const handleFocus = () => setShowModal(true);

  return (
    <div>
      <label htmlFor="dob">Date of birth</label>
      <input id="dob"
        onFocus={handleFocus}
        type="date"
        onChange={handleDateChange}
      />
      {showModal && <Calendar value={startDate} onChange={handleDateChange} />}
    </div>
  );
};
This is pretty much a standard way almost anyone would have created this app. Let’s run the Webpack Bundle Analyzer and see what the bundles look like.
Just like in the previous example, the entire app is loaded in a single JavaScript bundle and react-calendar takes a considerable portion of it. Let's see if we can code split it.
The first thing we need to notice is that the Calendar popup is loaded conditionally, only when the showModal state is set. This makes the Calendar component a prime candidate for code-splitting.
Next, we need to check if Calendar is a default export. In our case, it is.
import Calendar from "react-calendar"; /* Standard import */Let’s change the DatePicker component to lazy load the Calendar component.
import React, { useState, lazy, Suspense } from "react";

const Calendar = lazy(() => import("react-calendar")); /* Dynamic import */

export const DateOfBirth = () => {
  const [showModal, setShowModal] = useState(false);

  const handleDateChange = (date) => {
    setShowModal(false);
  };

  const handleFocus = () => setShowModal(true);

  return (
    <div>
      <input
        id="dob"
        onFocus={handleFocus}
        type="date"
        onChange={handleDateChange}
      />
      {showModal && (
        <Suspense fallback={null}>
          <Calendar value={startDate} onChange={handleDateChange} />
        </Suspense>
      )}
    </div>
  );
};
First, we need to remove the import statement and replace it with lazy import statement. Next, we need to wrap the lazy-loaded component in a Suspense component and provide a fallback which is rendered until the lazy-loaded component becomes available.
It’s important to note that fallback is a required prop of the Suspense component. We can provide any valid React node as a fallback:
null
If we do not want anything to render during the loading process.string
If we want to just display a text.- React component
Skeleton loading elements, for example.
Let’s run Webpack Bundle Analyzer and confirm that the react-calendar has been successfully code-split from the main bundle.

Project components
We are not limited to third-party components or NPM packages. We can code-split virtually any component in our project. Let’s take the website routes, for example, and code-split individual page components into separate bundles. That way, we’ll always load only the main (shared) bundle and a component bundle needed for the page we’re currently on.
Our main App.jsx consists of a React router and three components that are loaded depending on the current location (URL).
import { Navigation } from "./Navigation";
import { Routes, Route } from "react-router-dom";
import React from "react";

import Dashboard from "./pages/Dashboard";
import Home from "./pages/Home";
import About from "./pages/About";

function App() {
  return (
    <Routes>
      <Route path="/" element={<Home />} />
      <Route path="/dashboard" element={<Dashboard />} />
      <Route path="/about" element={<About />} />
    </Routes>
  );
}

export default App;
Each of those page components has a default export and is currently imported in a default non-lazy way for this example.
import React from "react";

const Home = () => {
  return (/* Component */);
};
export default Home;
As we’ve already concluded, these components get included in the main bundle by default (depending on the framework and build tools) meaning that everything gets loaded regardless of the route which user lands on. Both Dashboard and About components are loaded on the homepage route and so on.

Let’s refactor our import statements like in the previous example and use lazy import to code-split page components. We also need to nest these components under a single Suspense component. If we had to provide a different fallback element for these components, we’d nest each component under a separate Suspense component. Components have a default export, so we don’t need to change them.
import { Routes, Route } from "react-router-dom";
import React, { lazy, Suspense } from "react";

const Dashboard = lazy(() => import("./pages/Dashboard"));
const Home = lazy(() => import("./pages/Home"));
const About = lazy(() => import("./pages/About"));

function App() {
  return (
    <Suspense fallback={null}>
      <Routes>
        <Route path="/" element={<Home />} />
        <Route path="/dashboard" element={<Dashboard />} />
        <Route path="/about" element={<About />} />
      </Routes>
    </Suspense>
  );
}

export default App;
And that’s it! Page components are neatly split into separate packages and are loaded on-demand as the user navigates between the pages. Keep in mind, that you can provide a fallback component like a spinner or a skeleton loader to provide a better loading experience on slower networks and average to low-end devices.


Being tasked with optimizing the performance of the entire web app may be a bit overwhelming at first. A good place to start is to audit the app using Webpack Bundle Analyzer or Source Map Explorer and identify bundles that should be code-split and fit the aforementioned criteria. An additional way of identifying those bundles is to run a performance test in a browser or use WebPageTest, and check which bundles block the CPU main thread the longest.
After identifying code-splitting candidates, we need to check the scope of changes that are required to code-split this component from the main bundle. At this point, we need to evaluate if the benefit of code-splitting outweighs the scope of changes required and the development and testing time investment. This risk is minimal to none early in the development cycle.
Finally, we need to verify that the component has been code-split correctly and that the main bundle size has decreased. We also need to build and test the component to avoid introducing potential issues.
There are a lot of steps for code-splitting a single existing component, so let’s summarize the steps in a quick checklist:
- Audit the site using bundle analyzer and browser performance profiler, and identify larger components and bundles that take the most time to execute.
- Check if the benefit of code-splitting outweighs the development and testing time required.
- If the component has a named export, convert it to the default export.
- If the component is a part of barrel export, remove it from the barrel file.
- Refactor
importstatements to uselazystatements. - Wrap code-split components in the
Suspensecomponent and provide a fallback. - Evaluate the resulting bundle (file size and performance gains). If the bundle doesn’t significantly decrease the bundle file size or improve performance, undo code-splitting.
- Check if the project builds successfully and if it performs without any issues.
Performance Budgets
We can configure our build tools and continuous integration (CI) tools to catch bundle sizing issues early in development by setting performance budgets that can serve as a performance baseline or a general asset size limit. Build tools like Webpack, CI tools, and performance audit tools like Lighthouse can use the defined performance budgets and throw a warning if some bundle or resource goes over the budget limit. We can then run code-splitting for bundles that get caught by the performance budget monitor. This is especially useful information for pull request reviews, as we check how the added features affect the overall bundle size.

We can fine-tune performance budgets to tailor for worse possible user scenarios, and use that as a baseline for performance optimization. For example, if we use the scenario of a user browsing the site on an unreliable and slow connection on an average phone with a slower CPU as a baseline, we can provide optimal user experience for a much wider range of user devices and network types.
Alex Russell has covered this topic in great detail in his article on the topic of real-world web performance budgets and found out that the optimal budget size for those worst-case scenarios lies somewhere between 130kB and 170kB.
“Performance budgets are an essential but under-appreciated part of product success and team health. Most partners we work with are not aware of the real-world operating environment and make inappropriate technology choices as a result. We set a budget in time of <= 5 seconds first-load Time-to-Interactive and <= 2s for subsequent loads. We constrain ourselves to a real-world baseline device + network configuration to measure progress. The default global baseline is a ~$200 Android device on a 400Kbps link with a 400ms round-trip-time (“RTT”). This translates into a budget of ~130-170KB of critical-path resources, depending on composition — the more JS you include, the smaller the bundle must be.”React Suspense And Server-Side Rendering (SSR)
— Alex Russell
An important caveat that we have to be aware of is that React Suspense component is only for client-side use, meaning that server-side rendering (SSR) will throw an error if it tries to render the Suspense component regardless of the fallback component. This issue will be addressed in the upcoming React version 18. However, if you are working on a project running on an older version of React, you will need to address this issue.
One way to address it is to check if the code is running on the browser which is a simple solution, if not a bit hacky.
const isBrowser = typeof window !== "undefined"

return (
  <>
    {isBrowser && componentLoadCondition && (
      <Suspense fallback={<Loading />}>
        <SomeComponent />
      <Suspense>
    )}
  </>
)
However, this solution is far from perfect. The content won’t be rendered server-side which is perfectly fine for modals and other non-essential content. Usually, when we use SSR, it is for improved performance and SEO, so we want content-rich components to render into HTML, thus crawlers can parse them to improve search result rankings.
Until React version 18 is released, React team recommends using the Loadable Components library for this exact case. This plugin extends React’s lazy import and Suspense components, and adds Server-side rendering support, dynamic imports with dynamic properties, custom timeouts, and more. Loadable Components library is a great solution for larger and more complex React apps, and the basic React code-splitting is perfect for smaller and some medium apps.
We’ve seen how page performance and load times can be improved by dynamically loading expensive, non-critical JavaScript bundles. As an added benefit of code-splitting, each JavaScript bundle gets its unique hash which means that when the app gets updated, the user’s browser will download only the updated bundles that have different hashes.
However, code-splitting can be easily abused and developers can get overzealous and create too many micro bundles which harm usability and performance. Dynamically loading too many smaller and irrelevant components can make the UI feel unresponsive and delayed, harming the overall user experience. Overzealous code-splitting can even harm performance in cases where the bundles are served via HTTP 1.1 which lacks multiplexing.
Use performance budgets, bundle analyzers, performance monitoring tools to identify and evaluate each potential candidate for code splitting. Use code-splitting in a sensible and temperate way, only if it results in a significant bundle size reduction or noticeable performance improvement.
References
- Code-Splitting, React documentation
- “JavaScript Start-up Optimization”, Addy Osmani
- “Can You Afford It?: Real-world Web Performance Budgets”, Alex Russell
- “Incorporate Performance Budgets Into Your Build Process”, Milica Mihajlija
- “When JavaScript Bytes”, Tim Kadlec