What Is Google Optimize? (And How to Use Google Optimize Like a Pro)
“I’m telling you, make that button green, and the phone will be ringing off the hook.” You disagree but aren’t looking for an argument. So, what do you do? Well, luckily for you, your company has Google Optimize, which means you can put your co-worker’s prediction to the test for free.
Google Optimize is a free tool from Google’s Marketing Platform that allows your business to create personalized experiences and experiments, like A/B, redirect, and multivariate tests, on your website. Based on your results, you can uncover ways to improve conversion rates, like for phone calls.
Looking to learn more? Keep reading to learn:
- What is Google Optimize?
- How does Google Optimize work?
- Why should I use Google Optimize?
- How to use Google Optimize to launch your first test
- FAQs about Google Optimize

For even more digital marketing advice, sign up for the email that more than 150,000 other marketers trust: Revenue Weekly.
Sign up today!
What is Google Optimize?
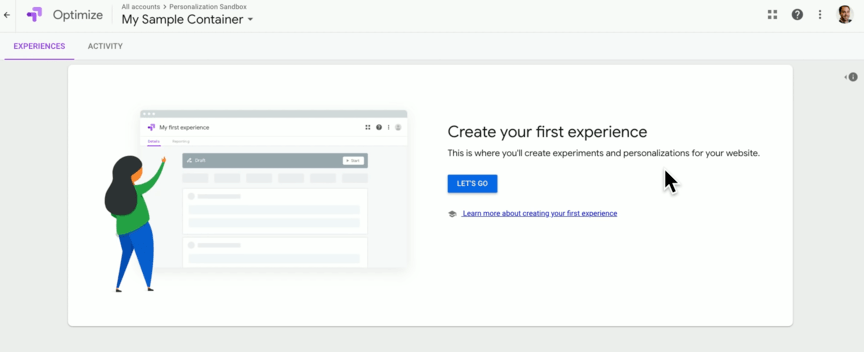
Google Optimize, formerly called Google Website Optimizer, is a free conversion rate optimization (CRO) tool for testing different versions of pages on your website and measuring their performance against specific metrics, like email sign-ups, bounce rate, and more.
How does Google Optimize work?
Google Optimize works through a tracking snippet, as well as page and audience targeting settings. When a user arrives on a page with an active Google Optimize experiment — and meets the audience targeting settings — your experiment will trigger.
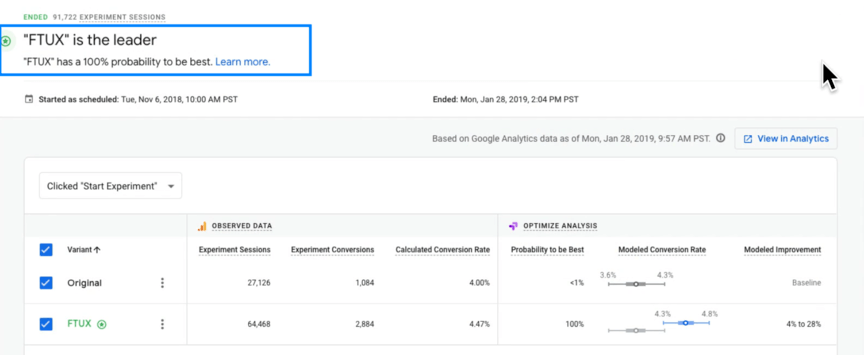
You view each experiment’s performance from your Google Optimize dashboard or Google Analytics “Behavior” report. Performance metrics vary and depend on which metrics you selected to measure at the start of the test, like product purchases.

As your experiment runs and gathers more data, Google Optimize will begin to predict which page version (or variant) is most likely to deliver the best performance over time.
In some cases, Google Optimize will declare that neither version is the leader.
Like most Google Marketing Platforms, Google Optimize provides you with an impressive toolkit for improving your site’s performance and even return on investment (ROI). Getting the most value from Google Optimize, though, depends on your expertise to build experiments that speak to your users.
Why should I use Google Optimize?
You’re making a smart decision when you choose to use Google Optimize. Here’s why:
Upgrade your CRO efforts for free
Google Optimize is free, and that’s impressive.
For what you get with Google Optimize, Google could easily charge a subscription fee. The fact that Google Optimize is free also makes it easier for you to earn buy-in from company decision-makers on launching a CRO plan.
Search around and see what other CRO tools charge, and you’ll see the value of Google Optimize.
Empower your decisions with data
When it comes to your website’s design, like for your product pages or your landing pages, it’s dicey to make decisions based on hunches. One change could tank your conversion rates, which could have a big impact on your company’s revenue.

That’s why it’s essential to inform your decisions with data, and Google Optimize makes that possible.
Are you looking to redesign your product pages? Launch a Google Optimize experiment and see what happens to purchase rates.
Were you thinking about changing your homepage copy? Start a Google Optimize test and monitor your bounce rates, time on page, and more.
With Google Optimize, you don’t have to guess or debate. Instead, you can look at the data and decide.
Personalize your website to drive action
People expect personalization now more than ever. Recent studies, for example, have found that 63% of people expect brands to use their purchase history to create personalized experiences, like through product recommendations.
With Google Optimize, you can create up to 10 personalized experiences for your target audience.
In the past, personalization was a tremendous investment of a company’s time and money. Now, though, it’s easier than ever for a business to begin personalizing its website with Google Optimize, like by greeting returning users with a “Welcome back” message.
Improve your ROI from other marketing efforts, like advertising
You can also use Google Optimize to improve your ROI from other digital marketing strategies, like:
- Pay-per-click (PPC) advertising
- Email marketing
- Social media marketing
- And more
For example, if you have a dedicated landing page for your PPC campaign, you can use Google Optimize to test different calls-to-action (CTAs), layouts, offers, and more. In comparison, you can use Google Optimize with email marketing to personalize experiences for subscribers visiting your site.
How to use Google Optimize to launch your first test
You know why Google Optimize (also called Google Optimizer by some) is a fan favorite. The question is, are you ready to start using Google Optimize to improve your website’s performance and contribution to your bottom line?
If you are, keep reading to learn how to use Google Optimize:
1. Create your Google Optimize account
First, you’ll want to create your Google Optimize account, which you can do with your Google account.
As a part of your account creation process, you’ll set up the following:
- Your account name, like Acme Inc.
- Your container name, like acme.com
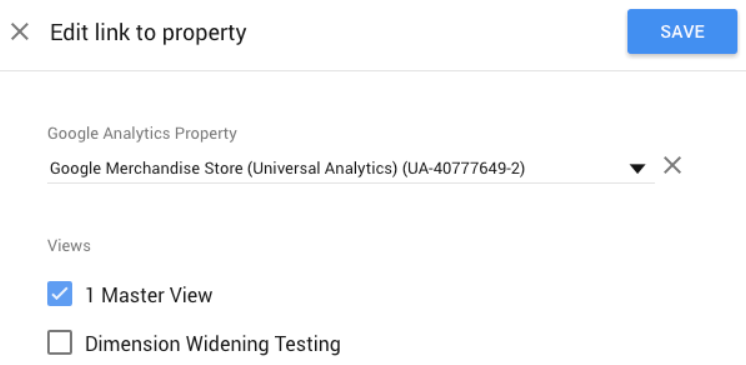
Next, you’ll link Google Analytics with your Google Optimize account by viewing your container and:
- Clicking “Settings” in the upper right-hand corner
- Selecting the pencil icon in the “Measurement” box
- Choosing the Google Analytics property that matches your container, like acme.com with acme.com vs. blog.acme.com with acme.com.
- Selecting the appropriate views to link
- Clicking “Save”
Once you complete the above steps, you can move onto installing Google Optimize.
2. Install Google Optimize
How you install Google Optimize on your site will depend on your answers to the following questions:
- Do you use Google Tag Manager?
- Yes: Great! You can use Google Tag Manager to install Google Optimize.
- No: Move onto the second question.
- Are you able to edit your website’s HTML?
- Yes: Great! You can install Google Optimize by editing your website’s HTML.
- No: Ok! You’ll need to ask your company’s developer for some help then.
Since Google Tag Manager is the preferred way to install Google Optimize and manage your website tracking, this blog post on how to use Google Optimize will provide a walkthrough on using Google Tag Manager to install Google Optimize.
In Google Tag Manager, follow these steps:
- Click “Tags” and then “New”
- Select “Tag Configuration” followed by “Google Optimize”
- Enter your Google Optimize container ID
- Choose your Google Analytics Settings variable
- Note: If you don’t have one, follow these steps to create one.
- Save your tag
- Note: Your tag will not have a trigger attached — this is okay!
Next, go ahead and:
- View your Google Analytics tag for tracking pageviews
- Note: This tag is the one linked to your Google Optimize container
- Click “Tag Configuration,” and then “Advanced Settings,” followed by “Tag Sequencing”
- Check the box, “Fire a tag before…”
- Select your Google Optimize tag from the dropdown menu
- Save your changes
Then, return to your Google Optimize tag and follow these steps:
- Select “All Pages” as your trigger
- Save your changes
Once you test your pages with the built-in debugger in Google Tag Manager, publish your changes.
3. Pick your first experiment
Now that you’ve set up Google Optimize on your website, you can start testing!
Return to your Google Optimize experiment and follow these steps:
- Click “Create experience”
- Enter your experience name and editor page
- Choose your experience type
- Note: If you’re new to Google Optimize, try an A/B test
Once you complete these steps, you’ll arrive at your experience’s draft page, which includes:
- Your variants
- Your targeting settings
- Your experience description
- Your measurement and objectives
- Your miscellaneous settings
This Google Optimize tutorial will work through each of these steps, so keep reading to get started!
4. Set up your variants
On your experience’s draft page, you can create your first variant by clicking “+ Add variant” in the box titled “Targeting and variants.” You’ll then name your variant, like “CTA: Buy now,” or use the default name, like “Variant 1.”

After naming your variant, click the “Edit” button next to it.

The Google Optimize editor will then open, which allows you to make code-free changes to your page.
For example, if you select and right-click on some text, you’ll have the option to remove or edit the text, as well as modify the text’s HTML. You can even adjust the text’s size, font, and color from the editor palette menu.

Once you complete your changes, click “Done,” and you’ll return to the previous page.
As you build your variants, remember that most A/B tests have one variant vs. multiple variants.
5. Add your targeting settings
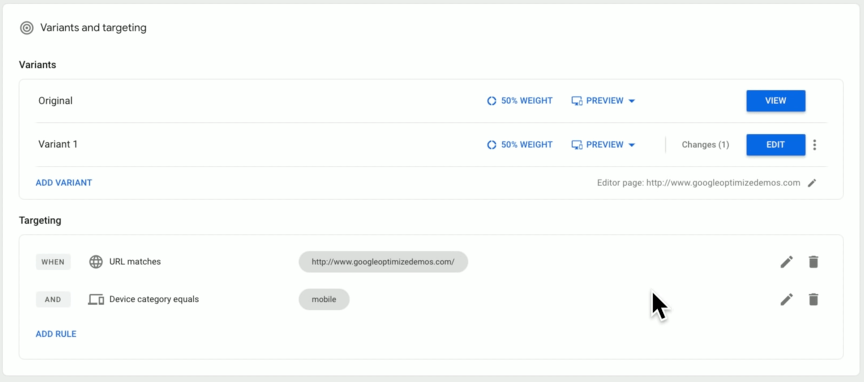
Next, you’ll add your targeting settings, which include:
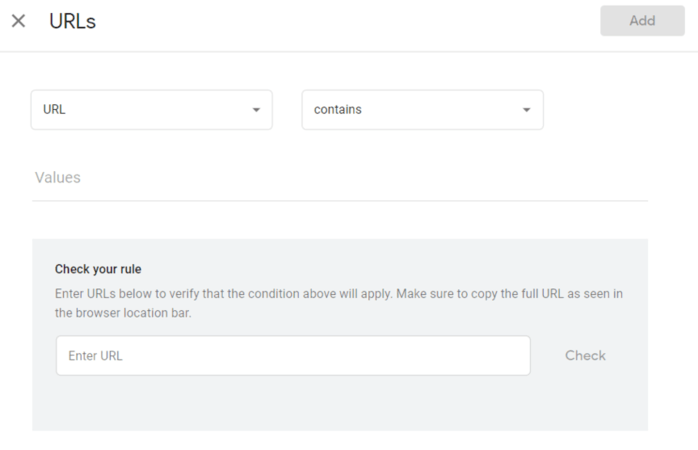
- Page targeting: Use URLs to determine when an experiment will fire, like for sitewide tests.
- Audience targeting: Reference a user’s location, device, and more to include or exclude them.
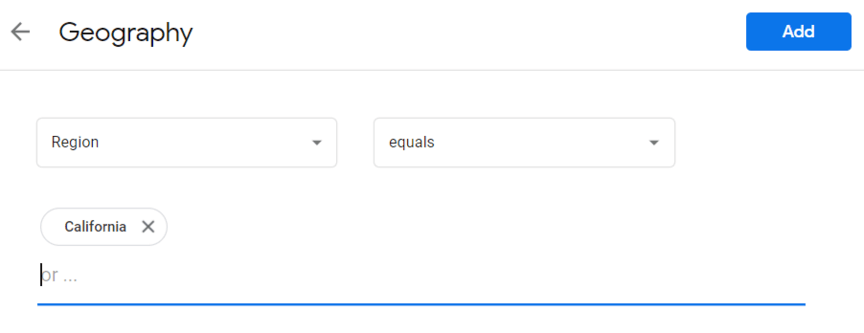
If you’re unsure whether an experiment would fire, you can check your rules in the page targeting settings by entering a URL. You can also access the Google Optimize debugger by returning to your variants and selecting “Debug” from the “Preview” dropdown menu.
6. Choose your objectives
Your objectives are the next step in this Google Optimize tutorial.
First, link your preferred Google Analytics view with your experiment. If you have a view that excludes company traffic, you may use this view to avoid tracking co-worker activity, like testing a checkout process, that could sway the results.
Next, choose up to three objectives.
Your primary objective, which is the first objective you select, is what Google Optimize uses to determine if your experiment has a leader. Look at your primary objective as the most important goal for this experiment, like product purchases or form submissions.
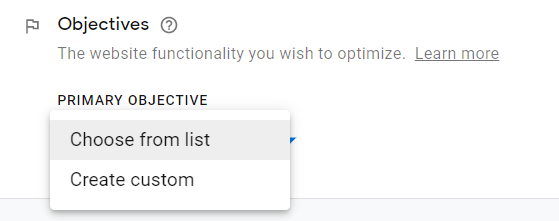
When selecting an objective, you’ll have two options:
- Choose from list: Includes system objectives, like bounce rate, and Google Analytics goals.
- Create custom: Includes custom events and custom pageviews.
Once you select your primary objective, you can choose supporting objectives, like:
- Custom events
- Bounce rate
- Pageviews
- Session duration
- Google Analytics goals
Your supporting objectives can be “Choose from list” or “Create custom” objectives.
7. Customize your miscellaneous settings
Next, customize your miscellaneous settings, which include:
- Optimize installation: Click “Check installation” to confirm your Google Optimize installation.
- Email notifications: Enable or disable experiment-related notifications.
- Traffic allocation: Determine what percentage of visitors to include in your test.
- Activation event: Decide when to trigger an experiment, like on page load.
If you’re looking to change the traffic allocation for your original and your variant — versus the entire experiment — return to the “Targeting and variants” box. You can then select the “XX% weight” option to customize the percentage of users sent to the original and the variant.

8. Review your experiment
Once you’ve completed the above steps, review your experiment by checking your:
- Editor page URL
- Variant changes
- Page targeting settings
- Audience targeting settings
- Google Analytics settings
- Objective settings
You can also double-check your targeting settings through the Google Optimize debug mode.
From the “Targeting and variants” menu, click “Preview” and select “Debug” from the dropdown menu. Google Optimize will then take you to the page — either the original or variant version depending on your selection — and tell you whether the experiment would have fired and why or why not.

9. Launch your test
After double-checking your work, click “Start” from the upper right-hand menu to launch your test.
If you need to make edits to your test later, you’ll want to return to your experiment, and in the “Details” tab select, “Edit.” From the pop-up menu, you can select “End experience and make a copy” or “Edit running experience.”
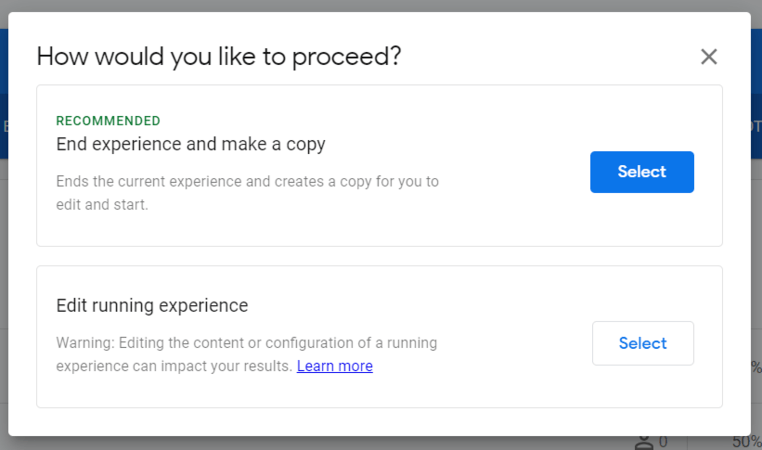
Typically, you’ll select “End experience and make a copy” to keep your results accurate.
FAQs about Google Optimize
Looking to learn more from this Google Optimize tutorial? Check out these FAQs:
Is Google Optimize free?
Yes, Google Optimize is free! If you’re looking to increase your number of experiments, personalizations, and targeting options, you can upgrade to Google Optimize 360. For pricing, you’ll need to connect with Google.
What tests can I run in Google Optimize?
You can run a few types of tests in Google Optimize, like:
- A/B
- Redirect
- Personalization
- Multivariate
- Banner
If you’re new to Google Optimize and CRO, get started with an A/B test!
When should I use Google Optimize?
Google Optimize is wise to use when you’re:
- Looking to launch a new design across your site
- Trying to increase website conversion rates
- Debating about a potential site change, like gated or ungated content
If you’re not sure about something and have enough traffic, you should test the proposed update. That way, you can make informed decisions about your company’s website and help your business get more value from its existing traffic.
Which tools does Google Optimize work with?
Google Optimize is compatible with several tools, including:
- Google Analytics
- Google Ads
- Google BigQuery
- Firebase
- Accelerated Mobile Pages (AMP)
If you want to learn more about these pages, check out Google’s resource on it.
Is Google Optimize worth it?
Yes, Google Optimize is worth it. As a free conversion optimization tool, Google Optimize provides your business with enough flexibility and features to create a range of experiences (from personalizations to A/B tests) that help you uncover ways to earn more value from your existing traffic.
Got Google Optimize but missing CRO expertise? Close the gap with WebFX.
When it comes to conversion rate optimization, Google Optimize is only one part of the puzzle. Besides the platform, you also need the know-how to develop, launch, and analyze your experiments. If you’re looking for some CRO expertise — or just a way to free up your schedule — WebFX can help.
With our conversion rate optimization services, your business receives a turnkey solution to CRO. From developing and implementing to analyzing and revising, our dedicated team of CRO specialists and web developers does it all.
Browse our CRO plans now to learn more! You can also contact us online or call us at 888-601-5359!