A Guide To Undoing Mistakes With Git (Part 1)
Working with code is a risky endeavour: There are countless ways to shoot yourself in the foot! But if you use Git as your version control system, then you have an excellent safety net. A lot of “undo” tools will help you recover from almost any type of disaster.
In this first article of our two-part series, we will look at various mistakes — and how to safely undo them with Git!
Discard Uncommitted Changes in a File
Suppose you’ve made some changes to a file, and after some time you notice that your efforts aren’t leading anywhere. It would be best to start over and undo your changes to this file.
The good news is that if you haven’t committed the modifications, undoing them is pretty easy. But there’s also a bit of bad news: You cannot bring back the modifications once you’ve undone them! Because they haven’t been saved to Git’s “database”, there’s no way to restore them!
With this little warning out of the way, let’s undo our changes in index.html:
$ git restore index.html
This command will restore our file to its last committed state, wiping it clean of any local changes.
Restore a Deleted File
Let’s take the previous example one step further. Let’s say that, rather than modifying index.html, you’ve deleted it entirely. Again, let’s suppose you haven’t committed this to the repository yet.
You’ll be pleased to hear that git restore is equipped to handle this situation just as easily:
$ git restore index.html
The restore command doesn’t really care what exactly you did to that poor file. It simply recreates its last committed state!
Discard Some of Your Changes
Most days are a mixture of good and bad work. And sometimes we have both in a single file: Some of your modifications will be great (let’s be generous and call them genius), while others are fit for the garbage bin.
Git allows you to work with changes in a very granular way. Using git restore with the -p flag makes this whole undoing business much more nuanced:
$ git restore -p index.html
Git takes us by the hand and walks us through every chunk of changes in the file, asking whether we want to throw it away (in which case, we would type y) or keep it (typing n):

Using the --amend option allows you to change this very last commit (and only this one):
$ git commit --amend -m "A message without typos"
In case you’ve also forgotten to add a certain change, you can easily do so. Simply stage it like any other change with the git add command, and then run git commit --amend again:
$ git add forgotten-change.txt

$ git commit --amend --no-edit
The --no-edit option tells Git that we don’t want to change the commit’s message this time.
Revert the Effects of a Bad Commit
In all of the above cases, we were pretty quick to recognize our mistakes. But often, we only learn of a mistake long after we’ve made it. The bad commit sits in our revision history, peering snarkily at us.

Of course, there’s a solution to this problem, too: the git revert command! And it solves our issue in a very non-destructive way. Instead of ripping our bad commit out of the history, it creates a new commit that contains the opposite changes.

Performing that on the command line is as simple as providing the revision hash of that bad commit to the git revert command:
$ git revert 2b504bee
As mentioned, this will not delete our bad commit (which could be problematic if we have already shared it with colleagues in a remote repository). Instead, a new commit containing the reverted changes will be automatically created.
Restore a Previous State of the Project
Sometimes, we have to admit that we’ve coded ourselves into a dead end. Perhaps our last couple of commits have yielded no fruit and are better off undone.
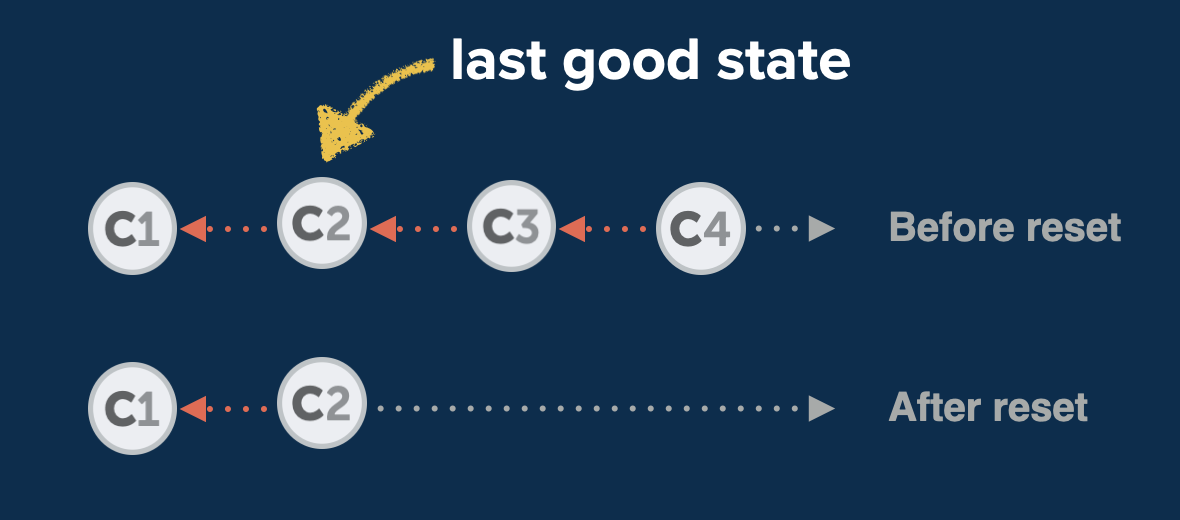
Luckily, this problem is pretty easy to solve. We simply need to provide the SHA-1 hash of the revision that we want to return to when we use the git reset command. Any commits that come after this revision will then disappear:
$ git reset --hard 2b504bee
The --hard option makes sure that we are left with a clean working copy. Alternatively, we can use the --mixed option for a bit more flexibility (and safety): --mixed will preserve the changes that were contained in the deleted commits as local changes in our working copy.

The first thing to know about reflog is that it’s ordered chronologically. Therefore, it should come as no surprise to see our recent git reset mistake at the very top. If we now want to undo this, we can simply return to the state before, which is also protocoled here, right below!
We can now copy the commit hash of this safe state and create a new branch based on it:
$ git branch happy-ending e5b19e4
Of course, we could have also used git reset e5b19e4 to return to this state. Personally, however, I prefer to create a new branch: It comes with no downsides and allows me to inspect whether this state is really what I want.
Restore a Single File From a Previous State
Until now, when we’ve worked with committed states, we’ve always worked with the complete project. But what if we want to restore a single file, not the whole project? For example, let’s say we’ve deleted a file, only to find out much later that we shouldn’t have. To get us out of this misery, we’ll have to solve two problems:
- find the commit where we deleted the file,
- then (and only then) restore it.
Let’s go search the commit history for our poor lost file:
$ git log -- <filename>
The output of this lists all commits where this file has been modified. And because log output is sorted chronologically, we shouldn’t have to search for long — the commit in which we deleted the file will likely be topmost (because after deleting it, the file probably wouldn’t show up in newer commits anymore).
With that commit’s hash and the name of our file, we have everything we need to bring it back from the dead:
$ git checkout <deletion commit hash>~1 -- <filename>
Note that we’re using ~1 to address the commit before the one where we made the deletion. This is necessary because the commit where the deletion happened doesn’t contain the file anymore, so we can’t use it to restore the file.
You Are Now (Almost) Invincible
During the course of this article, we’ve witnessed many disasters — but we’ve seen that virtually nothing is beyond repair in Git! Once you know the right commands, you can always find a way to save your neck.
But to really become invincible (in Git, that is), you’ll have to wait for the second part of this series. We will look at some more hairy problems, such as how to recover deleted branches, how to move commits between branches, and how to combine multiple commits into one!
In the meantime, if you want to learn more about undoing mistakes with Git, I recommend the free “First Aid Kit for Git”, a series of short videos about this very topic.
See you soon in part two of this series! Subscribe to the Smashing Newsletter to not miss that one. ;-)